PhpStorm plugin User Guide
Coding Standards
Detect dependency on implementation details
According to the architecture principles (dependency injection as an example) on which Magento 2 & Adobe Commerce are built software solutions such as customisations and modules should use interfaces instead of the direct usage of the implementation. This helps to keep the whole application stable and reduces the time that is needed for future changes and modifications.
The “Detect dependency on implementation details”
inspection validates direct usage of implementation instead of the existing interface and provides error notification with the auto-fix suggestion. In the case of the fix, the direct usage of the implementation is changed to the corresponding interface with the required declaration in the di.xml.
There is a list of scenarios when the direct usage of the implementation is allowed and considered a corrective action from the architectural perspective:
The target class is:
Magento\Sales\Model\Convert\OrderThe target class is marked as
@api.
The target class is not inside a Magento component type
module.
The target class implements interfaces:
Magento\Framework\Session\SessionManagerInterface
Psr\Log\LoggerInterface
Magento\Framework\View\Element\Block\ArgumentInterface
Magento\Framework\ObjectManager\ContextInterface
Magento\Framework\Data\OptionSourceInterface
Magento\Framework\Event\ObserverInterface
Magento\Framework\Indexer\ActionInterface
Magento\Framework\Mview\ActionInterface
The target class extends next classes:
Magento\Framework\Model\ResourceModel\AbstractResource
Magento\Framework\Model\AbstractModel
Magento\Framework\Model\ResourceModel\Db\Collection\AbstractCollection
Magento\Framework\App\Helper\AbstractHelper
Magento\Framework\View\Element\AbstractBlock
Magento\Sales\Model\Order\Pdf\AbstractPdf

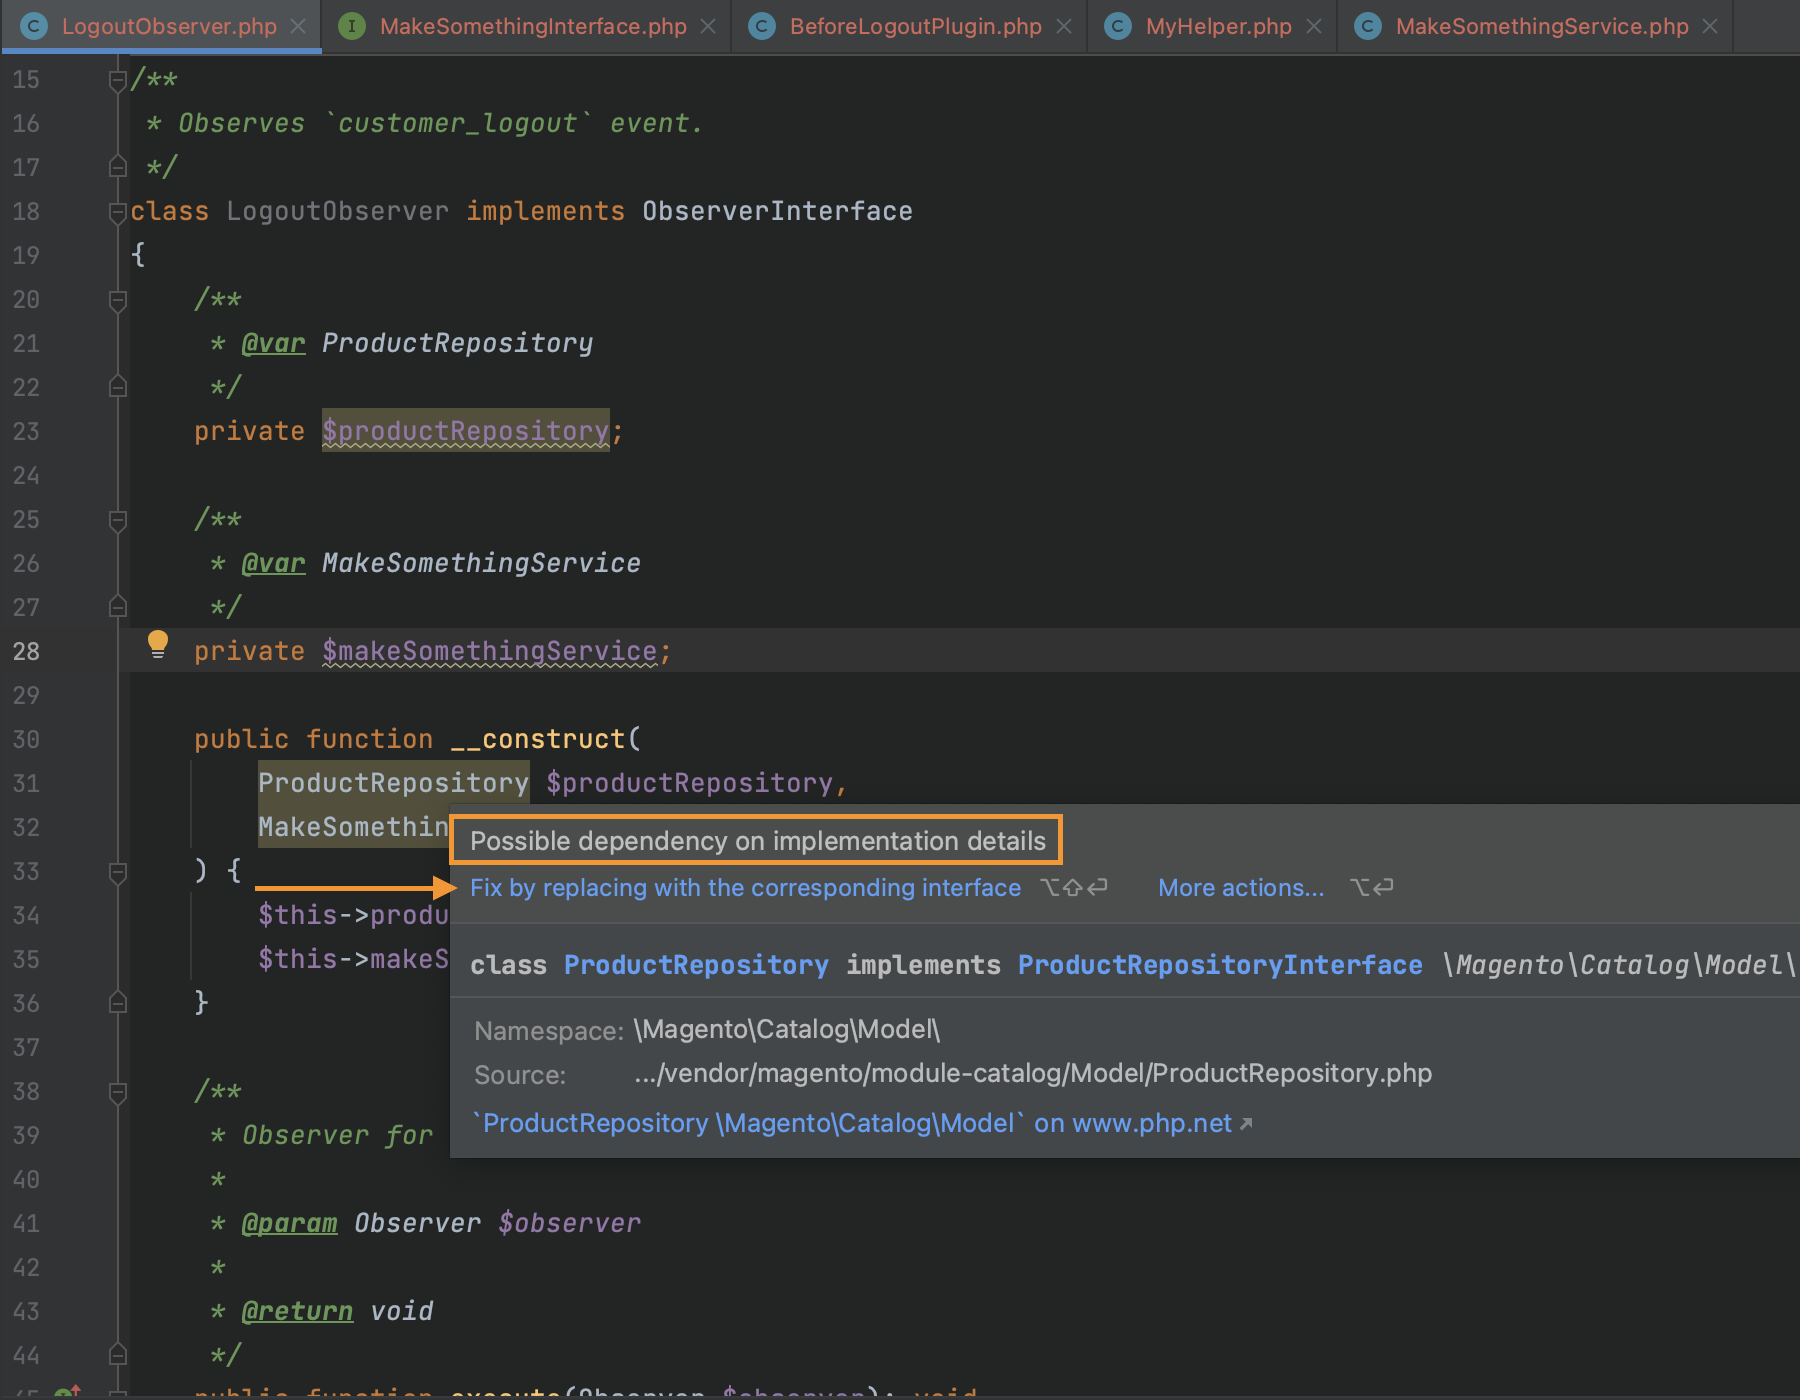
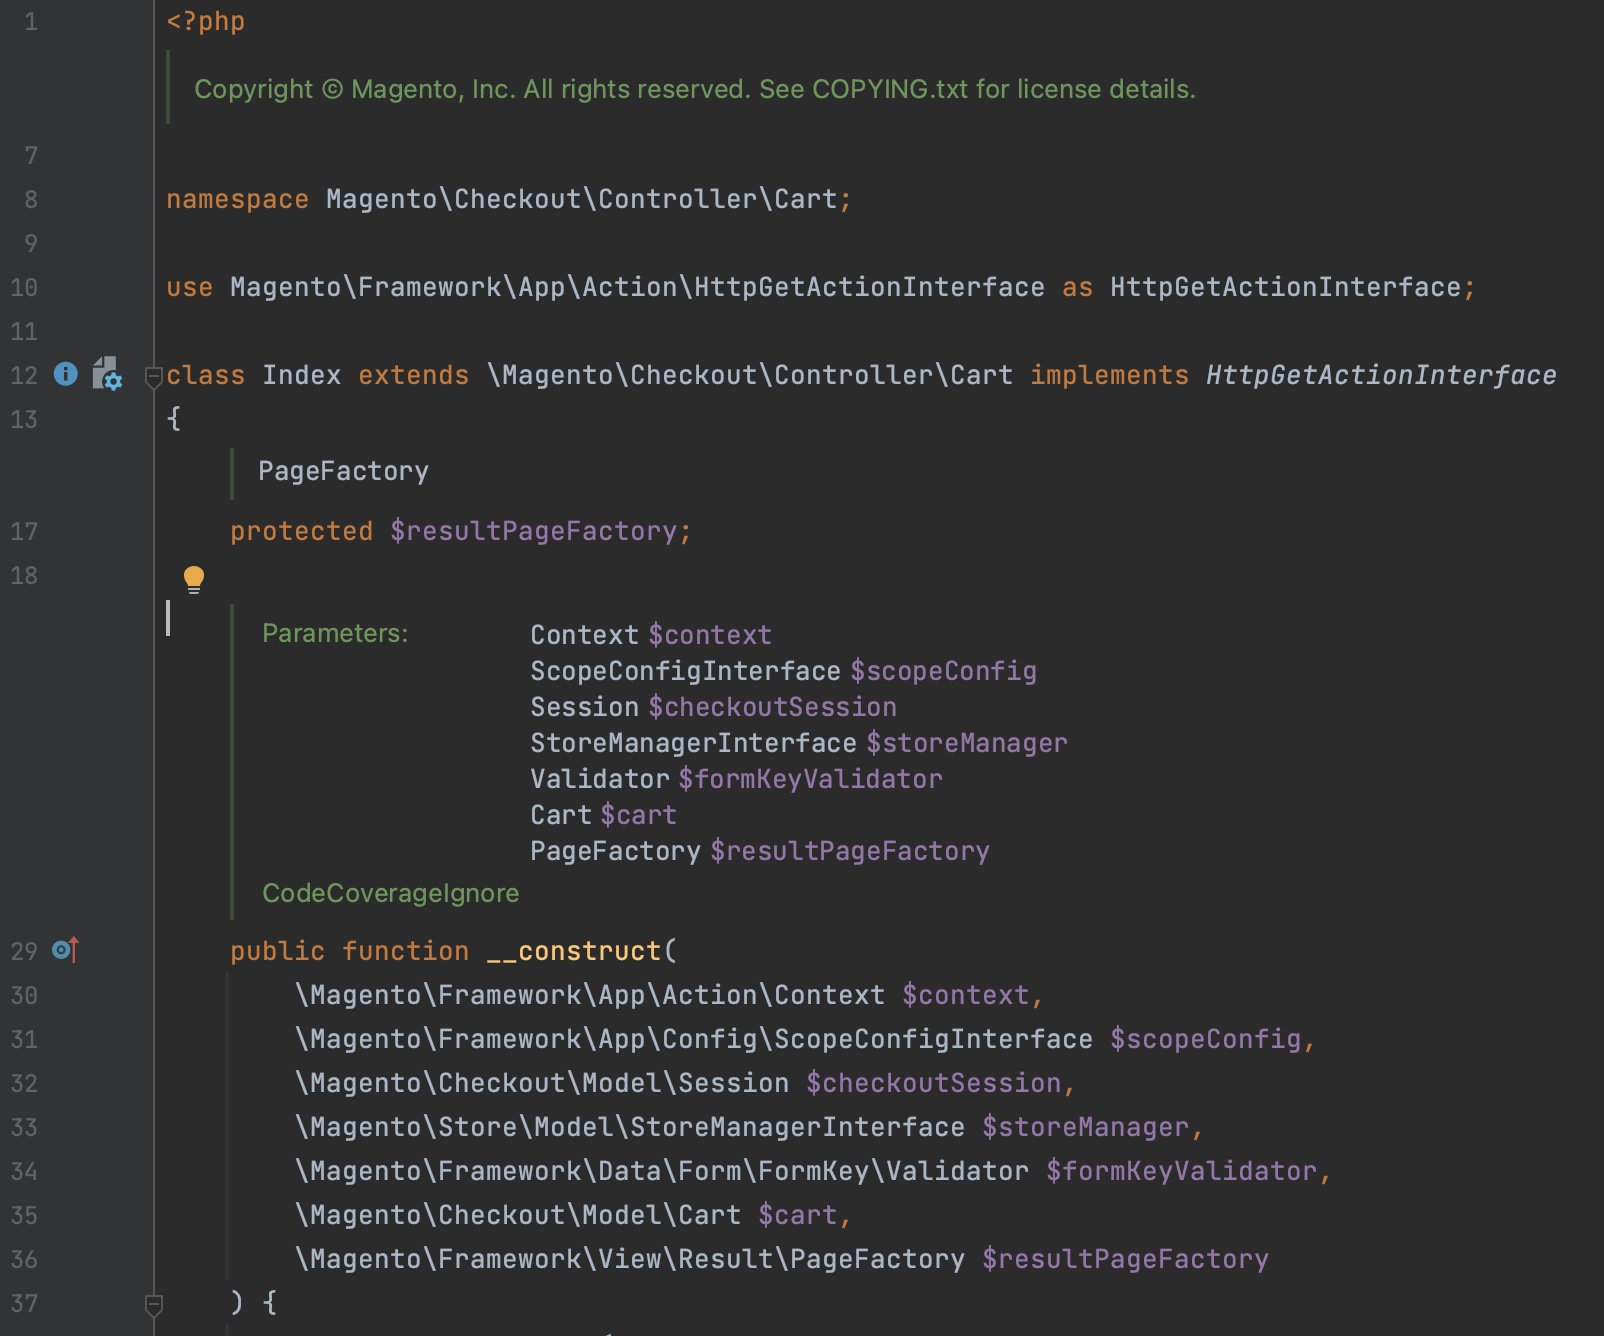
One aspect that should be considered is when the quick fix of the discussed functionality identifies that the current implementation does not have a preference, it recommends injecting the original class as a parameter of the current class.
.png)
.png)
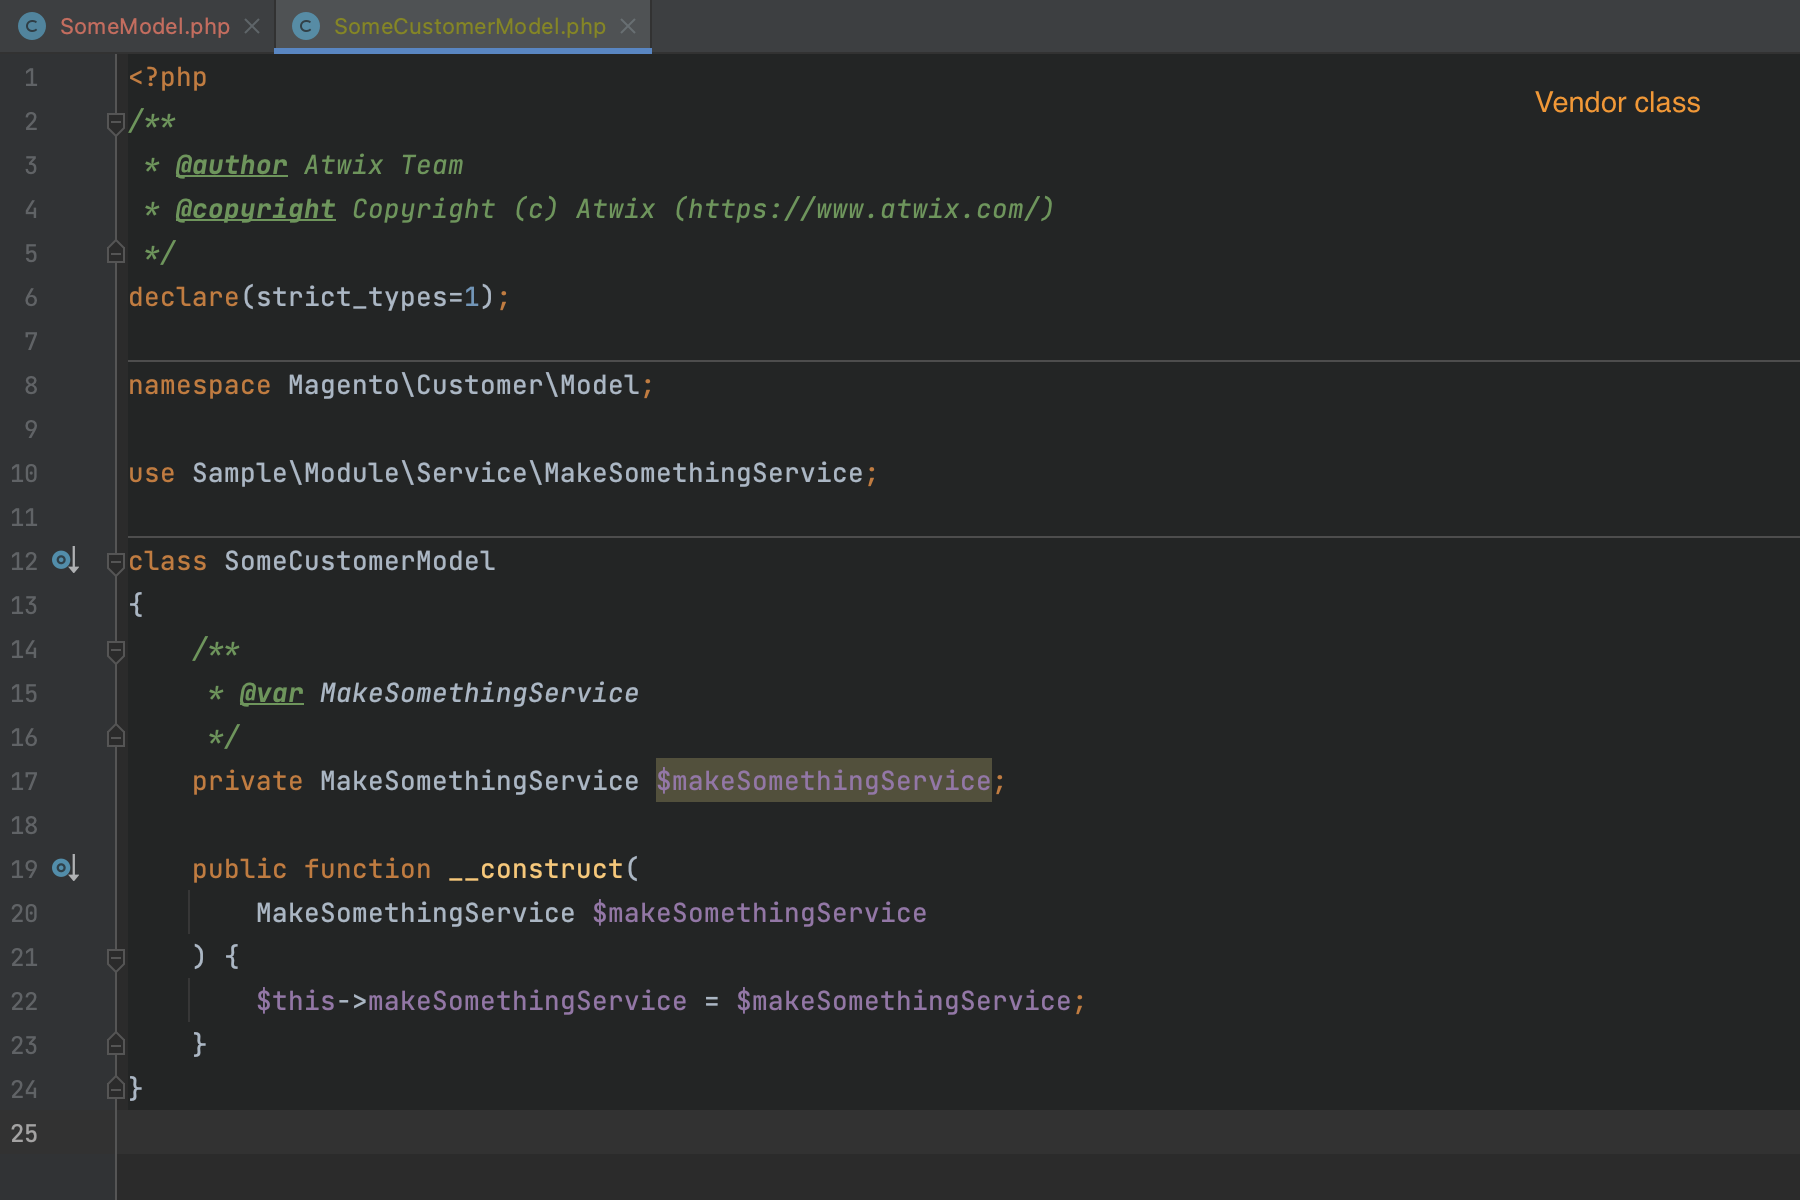
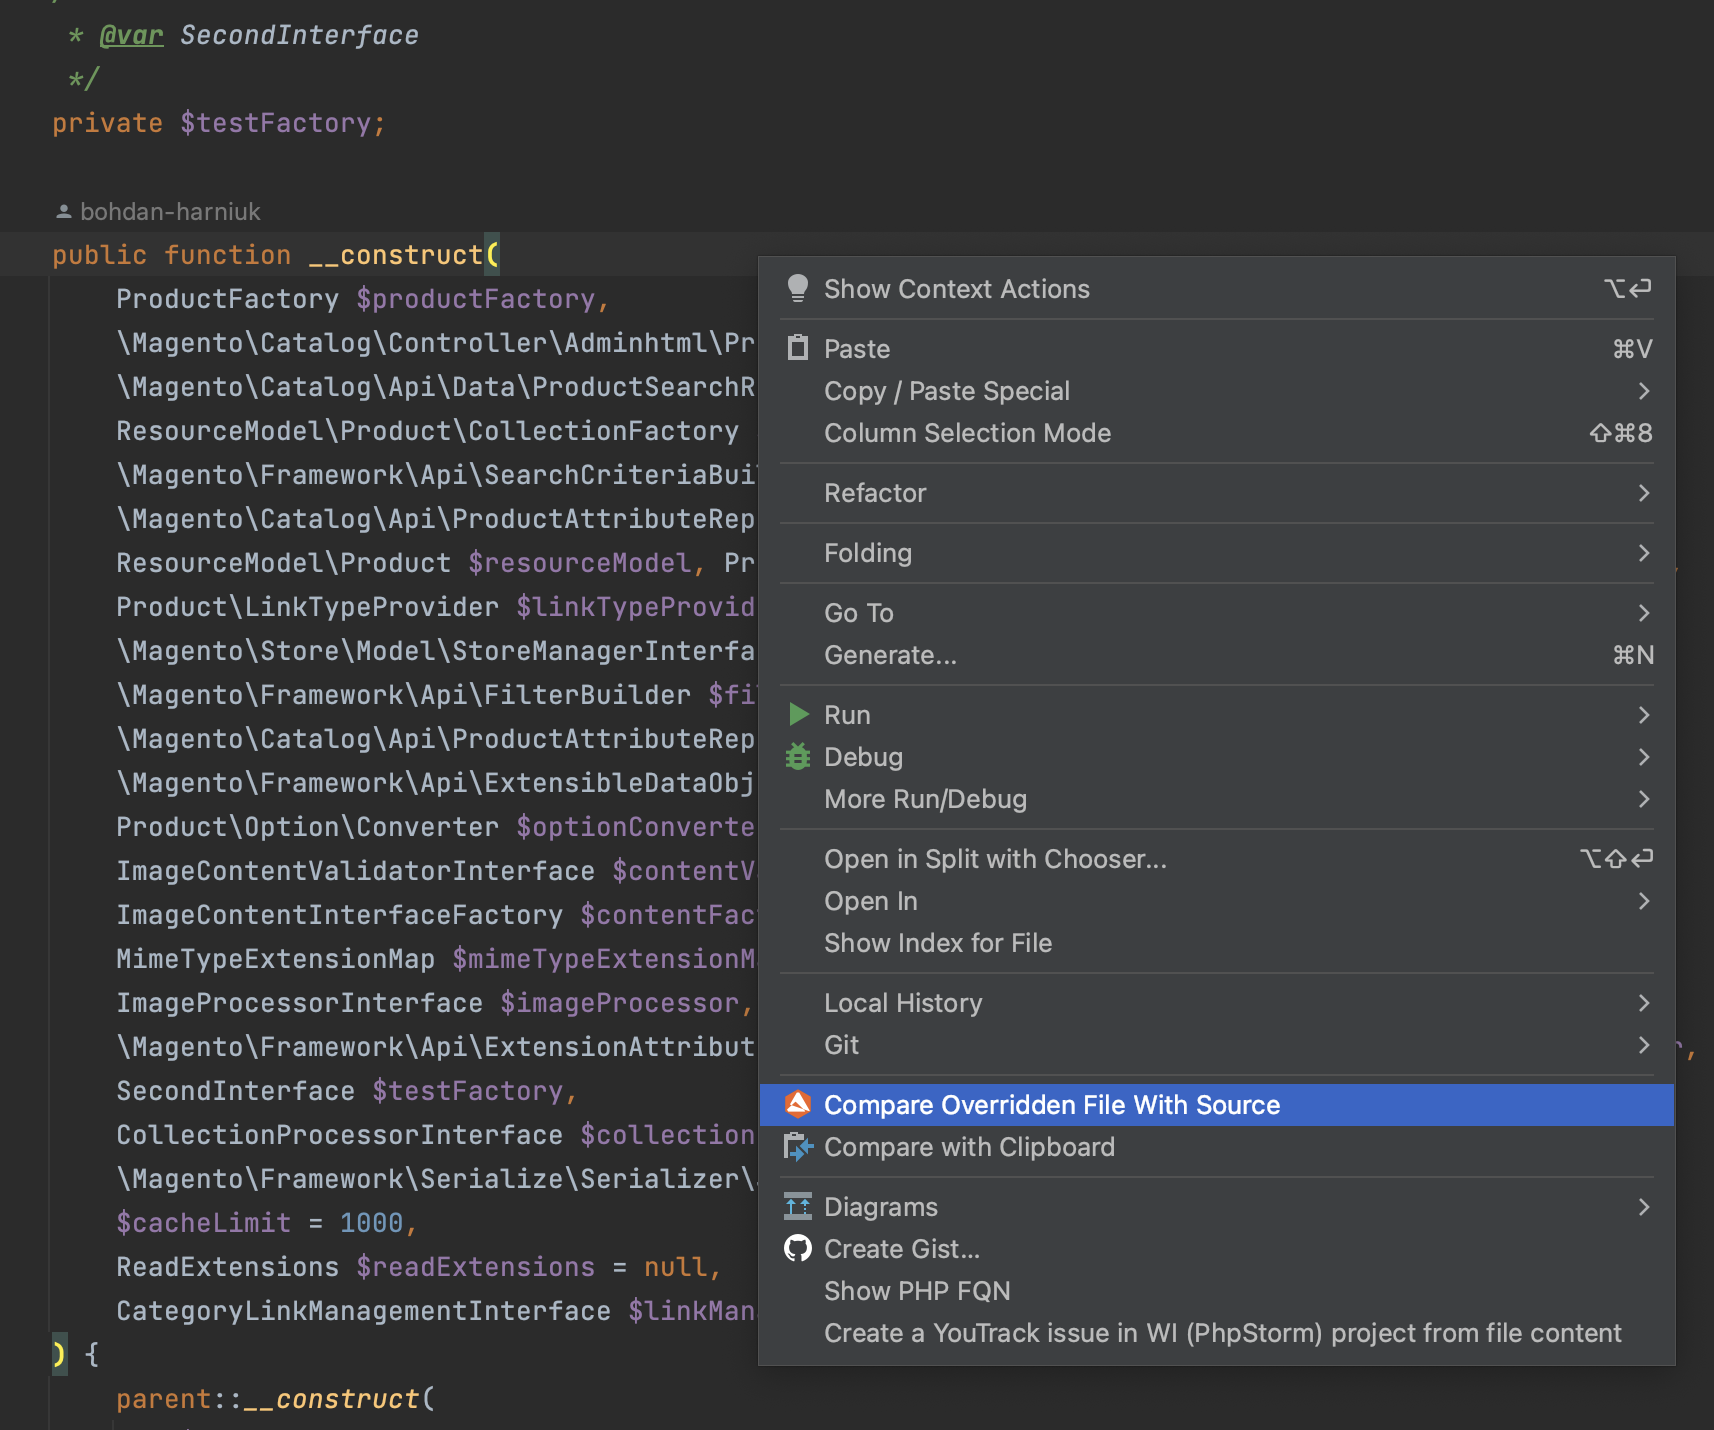
There is one more case that engineers should take into account. Suppose a current class has an implementation in its __construct(), and this implementation also uses in the parent __construct() in that case, inspection notification should not be shown because the parent already uses implementation. Screenshots below illustrate the corresponding statement.


Avoid instantiating objects via the ObjectManger instance
The ObjectManager is one of the core patterns used in the Magento 2 Open Source & Adobe Commerce (the platforms). It was included in the platform's architecture to avoid boilerplate code when creating objects during their instantiation. According to the official documentation,
the ObjectManger is responsible for the following:
Object creation in factories and proxies
Implementing the singleton pattern by returning the same shared instance of a class when requested
Dependency management by instantiating the preferred class when a constructor requests its interface
Automatically instantiating parameters in class constructors
And the direct usage of the ObjectManager may be considered the best software engineer practice violation because of the following reasons:
Object instantiation is a responsibility that is handled by proxies and factories
Direct usage of the ObjectManager hides actual dependencies of the object that will be instantiated. This makes the whole implementation fragile and hard to maintain.
Please, take into consideration that there are some exceptions that may not be considered the best practice violation -
check the official documentation.The Avoid instantiating objects via the ObjectManger instance
inspection identifies direct usage of the ObjectManager and provides a fix that takes the class from the explicit declaration and injects it through the dependency injection. This
inspection is valuable in the following situations:
Application development
Refactoring
Code quality analyses


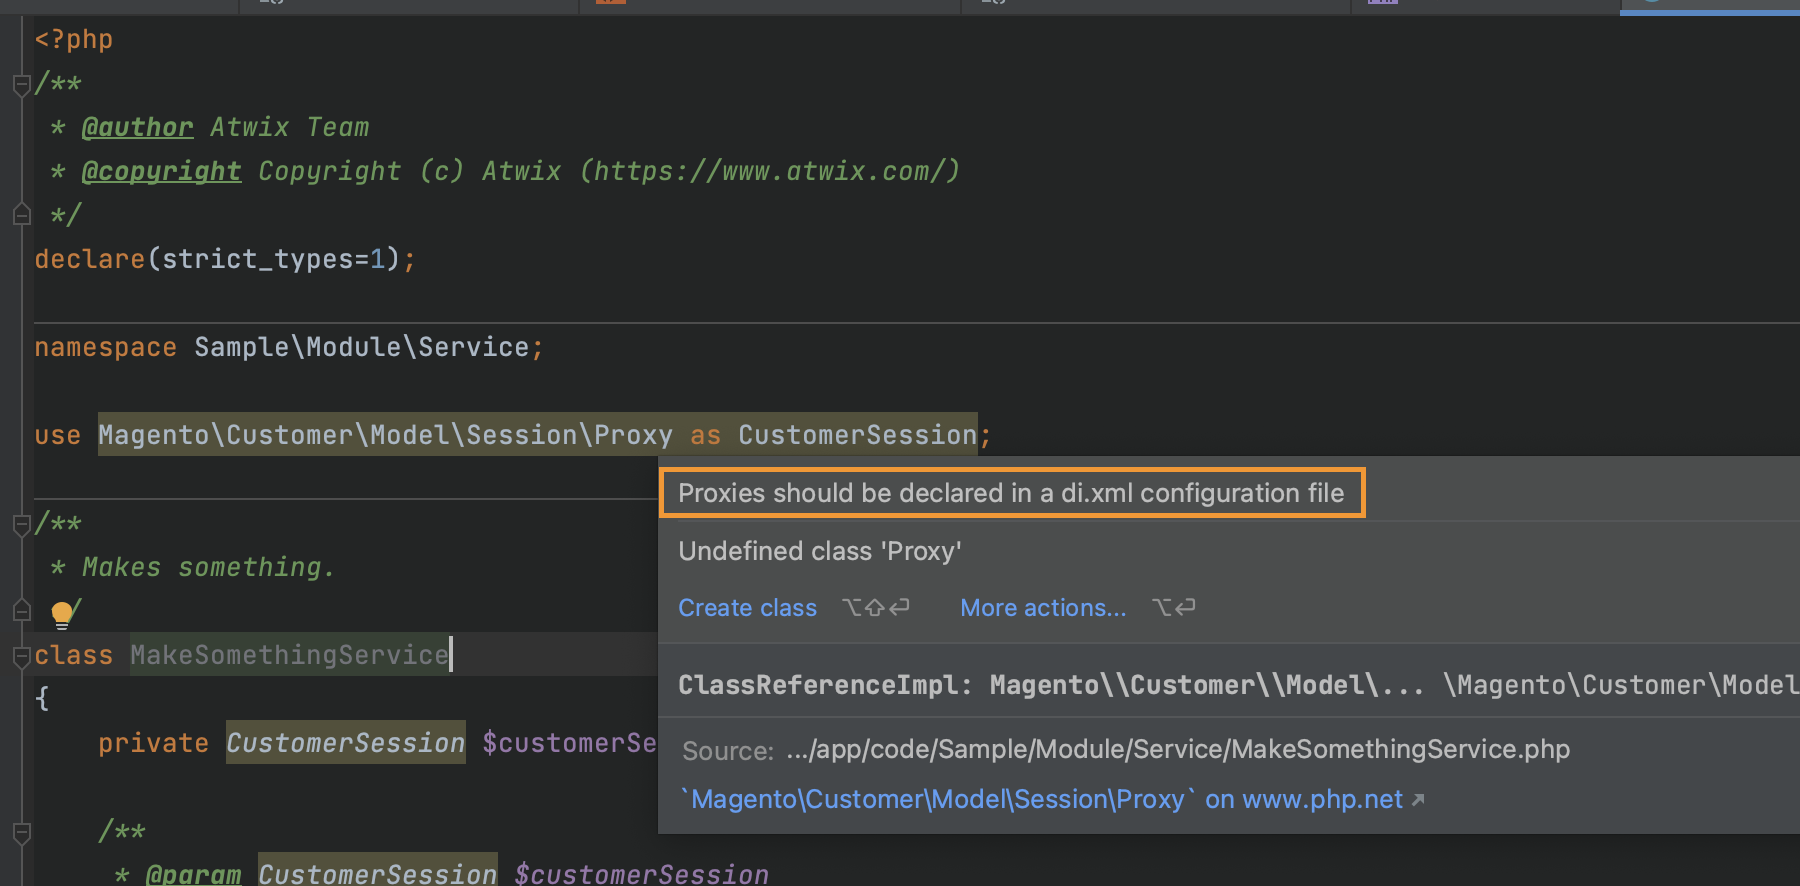
Detect the session usage without Proxy declaration
Performance is the critical point in all E-commerce applications. It is crucial to have a stable and fast application that provides the best user experience. A lot of aspects should be taken into account during the development of the E-commerce application. One of the most important parts is the architecture because proper usage of the best practices is the key to a stable and balanced application.
In the Magento 2 Open Source & Adobe Commerce, the
Proxy is used to avoid situations when one of the constructor parameters injected with the dependency injection runs heavy operations during the project initialisation. Or, for example, the initialisation of such a parameter is resource-consuming because of a long list of dependencies. Such architecture leads to performance degradation and as a result, not a beneficial user experience.
For example, the
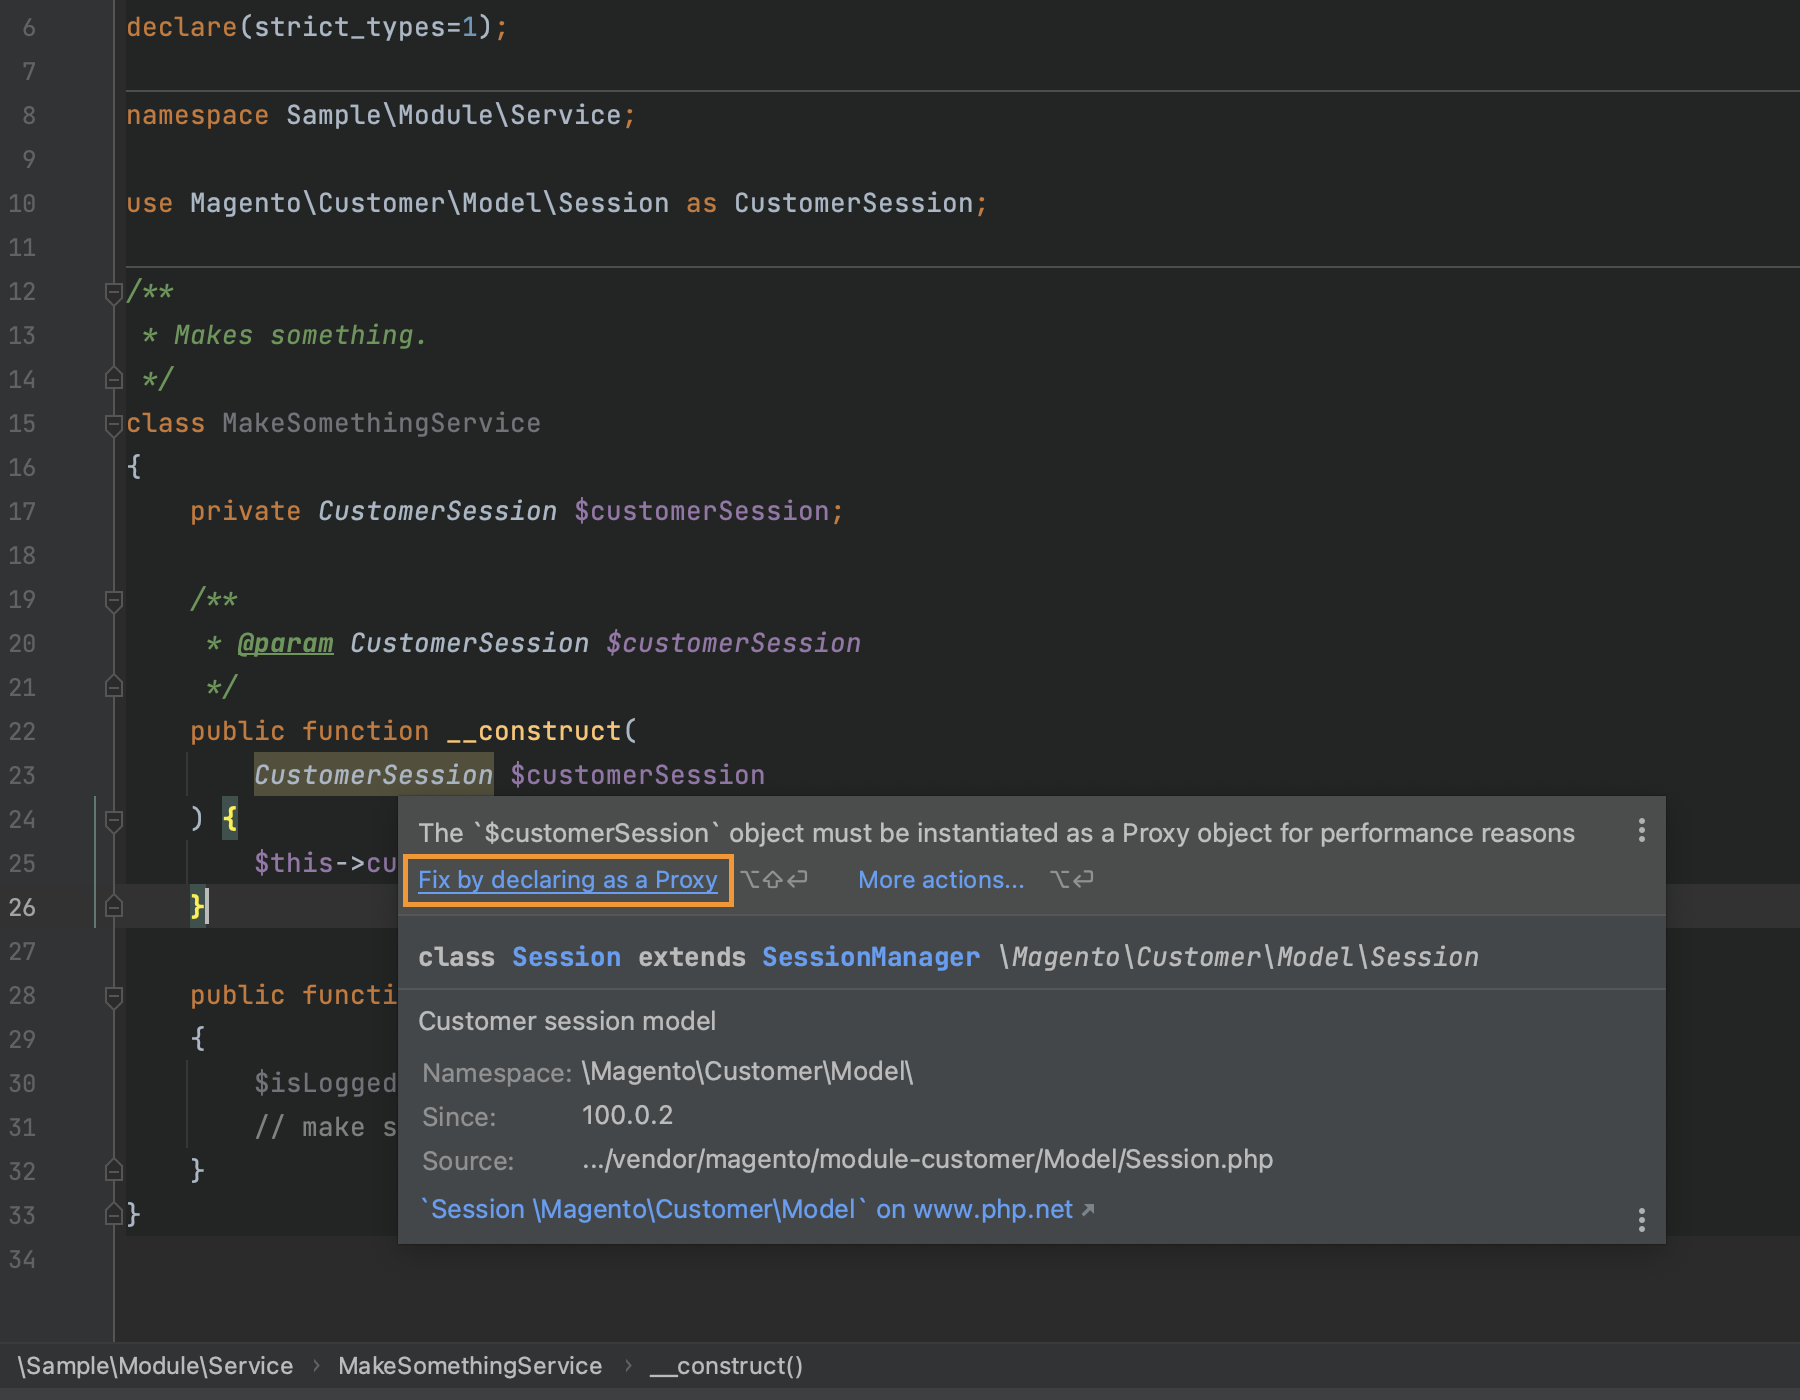
Magento\Customer\Model\Session is the highly used class responsible for customer sessions. It has a long list of dependencies, and to avoid performance degradation, it is suitable to lazy load its instance when it is necessary to call it in the business logic. Detecting the customer session usage without Proxy declaration
inspection helps to identify the direct initialization of the
Magento\Customer\Model\Session and provides a quick fix. The fix allows choosing the area where the Proxy will be declared. In the appropriate
di.xml the fix creates all needed settings and updates the corresponding class constructor.
This
inspection is beneficial for application development, refactoring and code quality analyses during the audits.
More information about the Proxy approach in the Magento 2 Open Source & Adobe Commerce is on the official website. Please, check this
link.
Add circular dependencies inspection
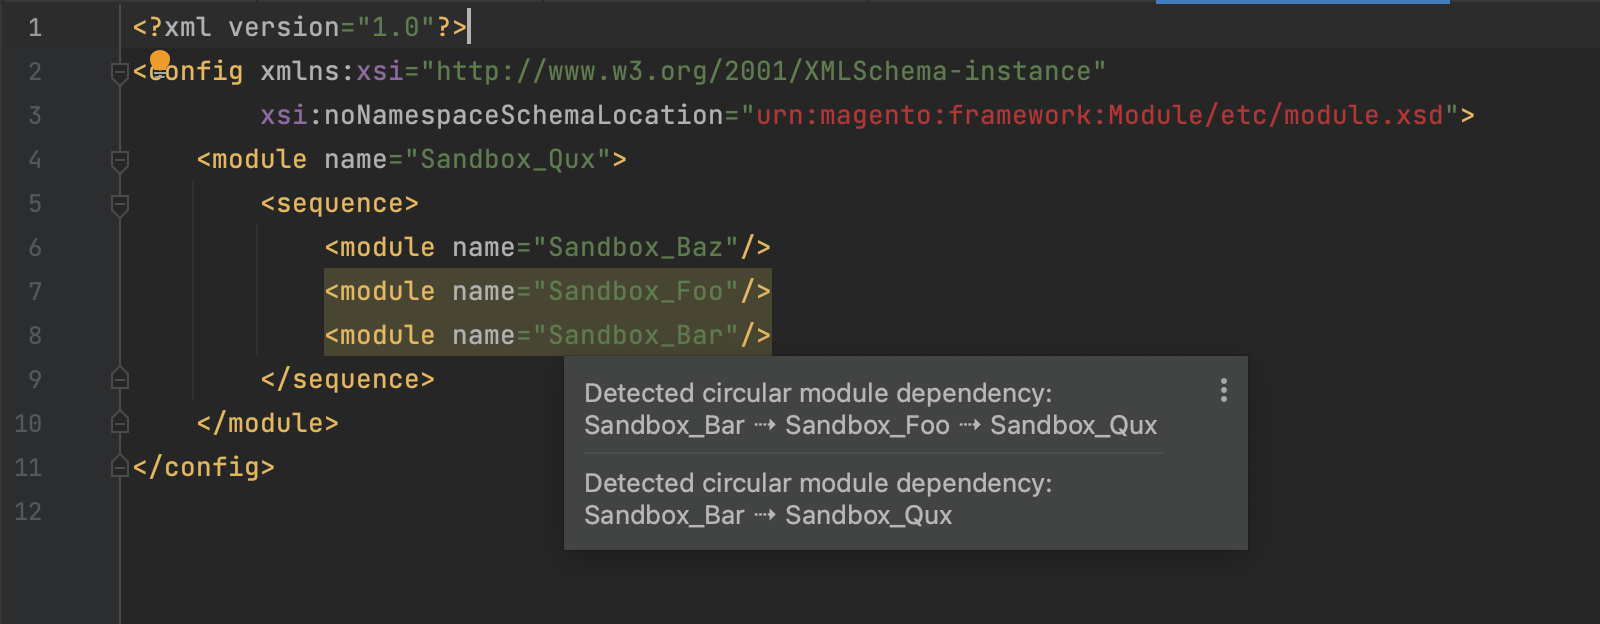
In software engineering, a circular dependency is a relation between two or more modules which either directly or indirectly depend on each other to function properly. Such modules are also known as mutually recursive. Circular dependencies are natural in many domain models where particular objects of the same domain depend on each other.
However, circular dependencies between larger software modules in software design are considered an anti-pattern because of their adverse effects. Despite this, such circular (or cyclic) dependencies are widespread among the source files of real-world software.This
inspection depends on analysing used code consistency with the specified module dependencies inspection.
Detect the wrong Proxy declaration
As mentioned in the previous paragraph (Detect a customer session usage without Proxy declaration), Proxy is an excellent mechanism for avoiding performance degradation during object initialisation. According to the best practices of the Magento 2 Open Source & ADobe Commerce, it is more practical to declare Proxy through the dependency injection rather than directly through the class and use keyword.
The reason why this approach is more elegant and practical is that the Proxy is a framework operation. It should be declared in the corresponding di.xml to make the code generation process consistent and at the proper time.
The Detect the wrong Proxy declaration
inspection helps to identify the incorrect direct Proxy initialisation through the class and allows to fix it automatically.
This
inspection is beneficial for application development, refactoring and primarily code quality analyses during the audits.
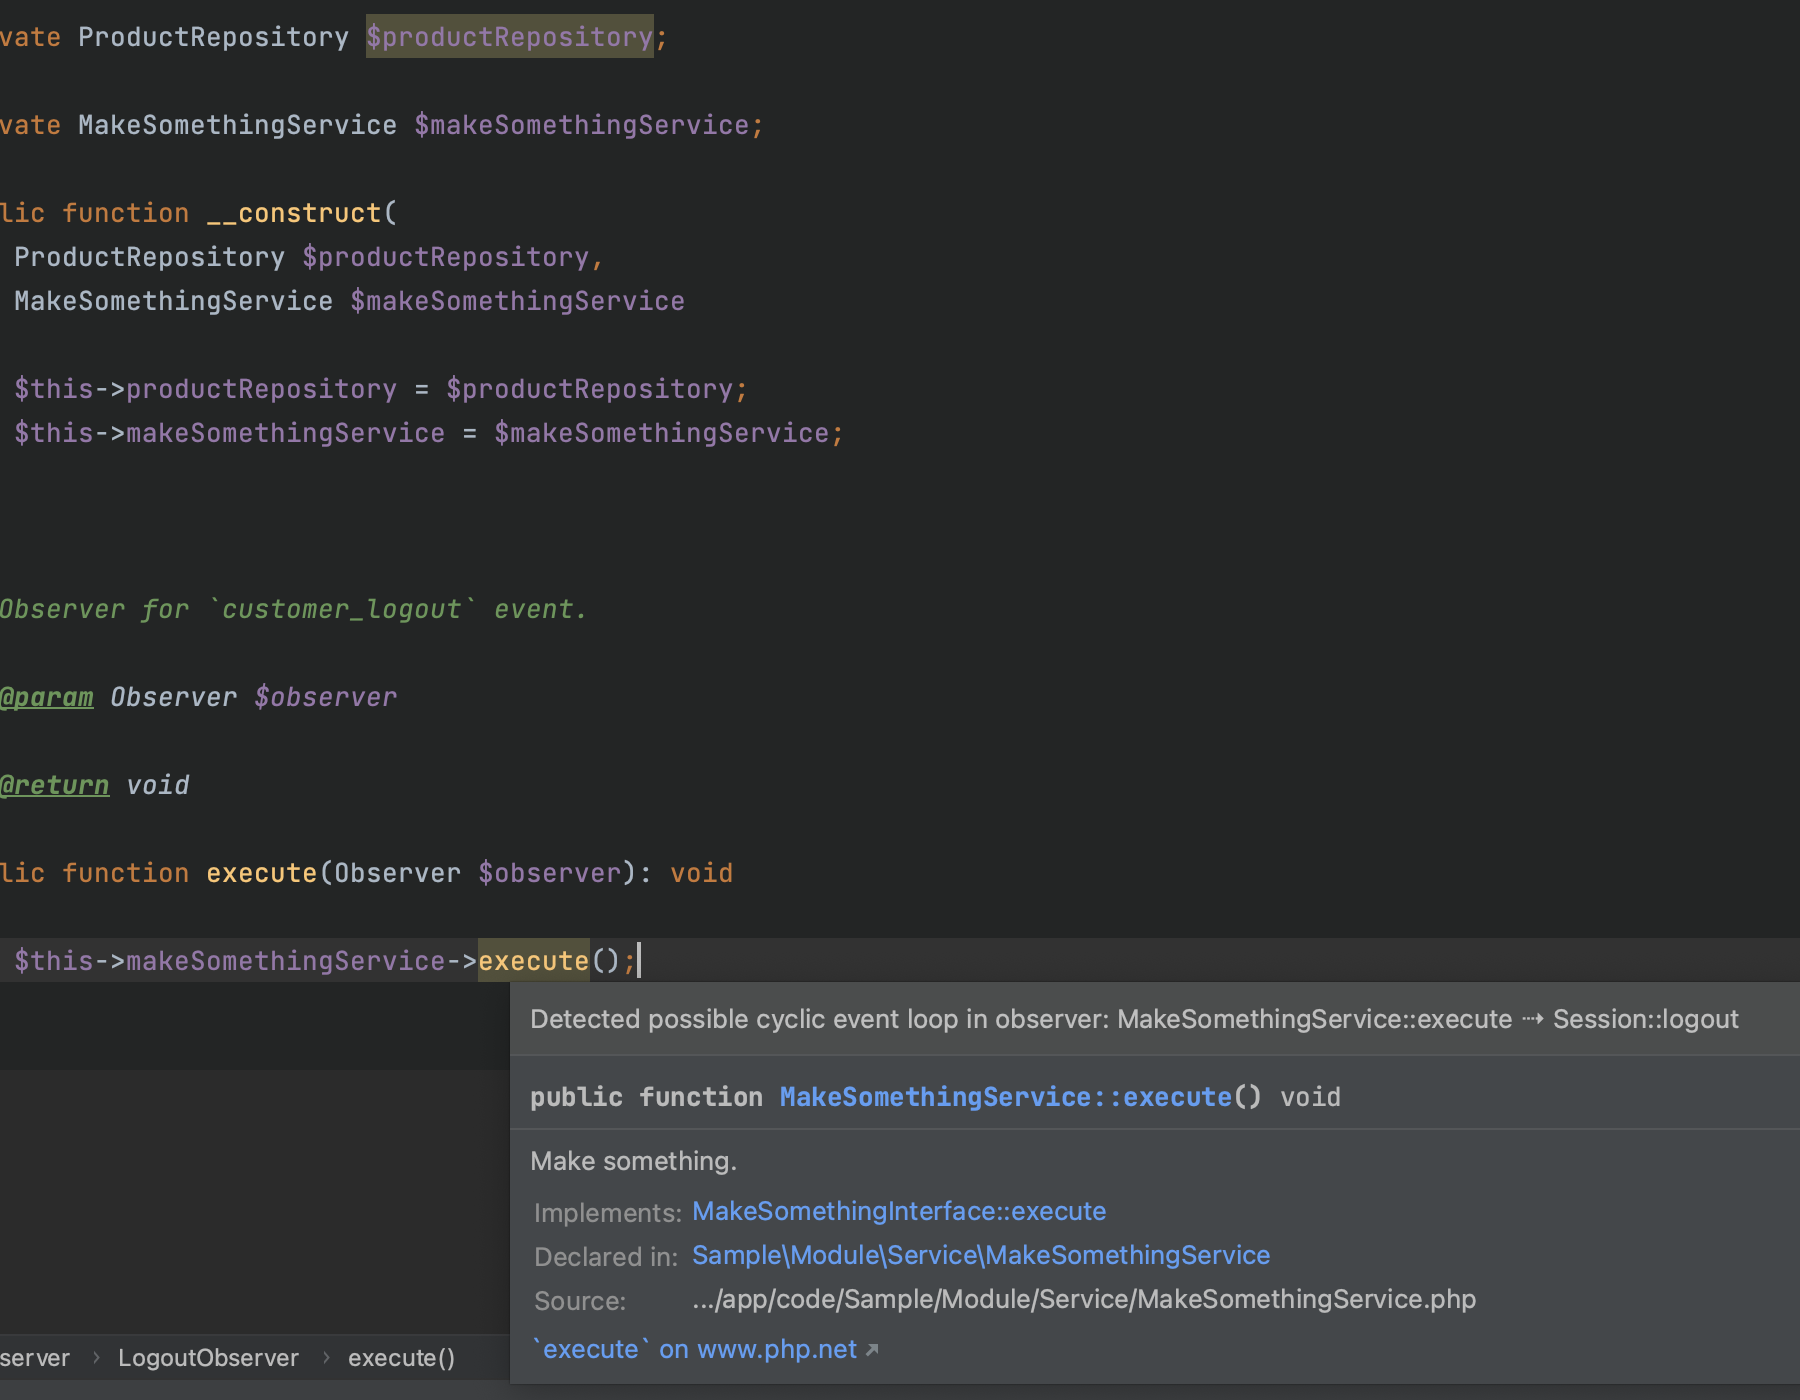
Avoid cyclical event loops in observers & plugins
One of the most tricky errors in the Magento 2 Open Source and Adobe Commerce applications is when you face cyclical event loops. It is not only difficult to identify but also results in fatal errors. This makes the error price significantly high because it may take hours to fix in case of an emergency, resulting in significant losses for the business.
The Magento 2 Open Source and Adobe Commerce have under the hood a list of strategies for business logic customisation. Still, two of them are the most popular and commonly used: observers and plugins. Observers allow us to listen to specific events such as sales order placed and customer creation after starting related business operations. Plugins allow you to plug into a particular method in the code base and change behaviour, data or else. As usual, there is a long list of plugins and observers in the E-commerce projects based on the mentioned platforms. And do not forget about the third-party extensions.
Based on the above statement, it is possible to create a cyclical loop of calls that results in a fatal error. Because business logic typically has many variations for processes, it is easy not to avoid catching cyclical errors during testing. One plugin can call the same method you try to modify, and one observer can call your observer that runs the whole process.
The avoid cyclical event loops in observers & plugins
inspections help to identify such cyclical errors based on the code base analyses. It analyzes not only the simple call of the same method in the plugin but also has sophisticated logic for error identification through the nested methods analyses. The same reasoning is for observers.
This
inspection is highly profitable for project maintenance, application development and code quality analyses.
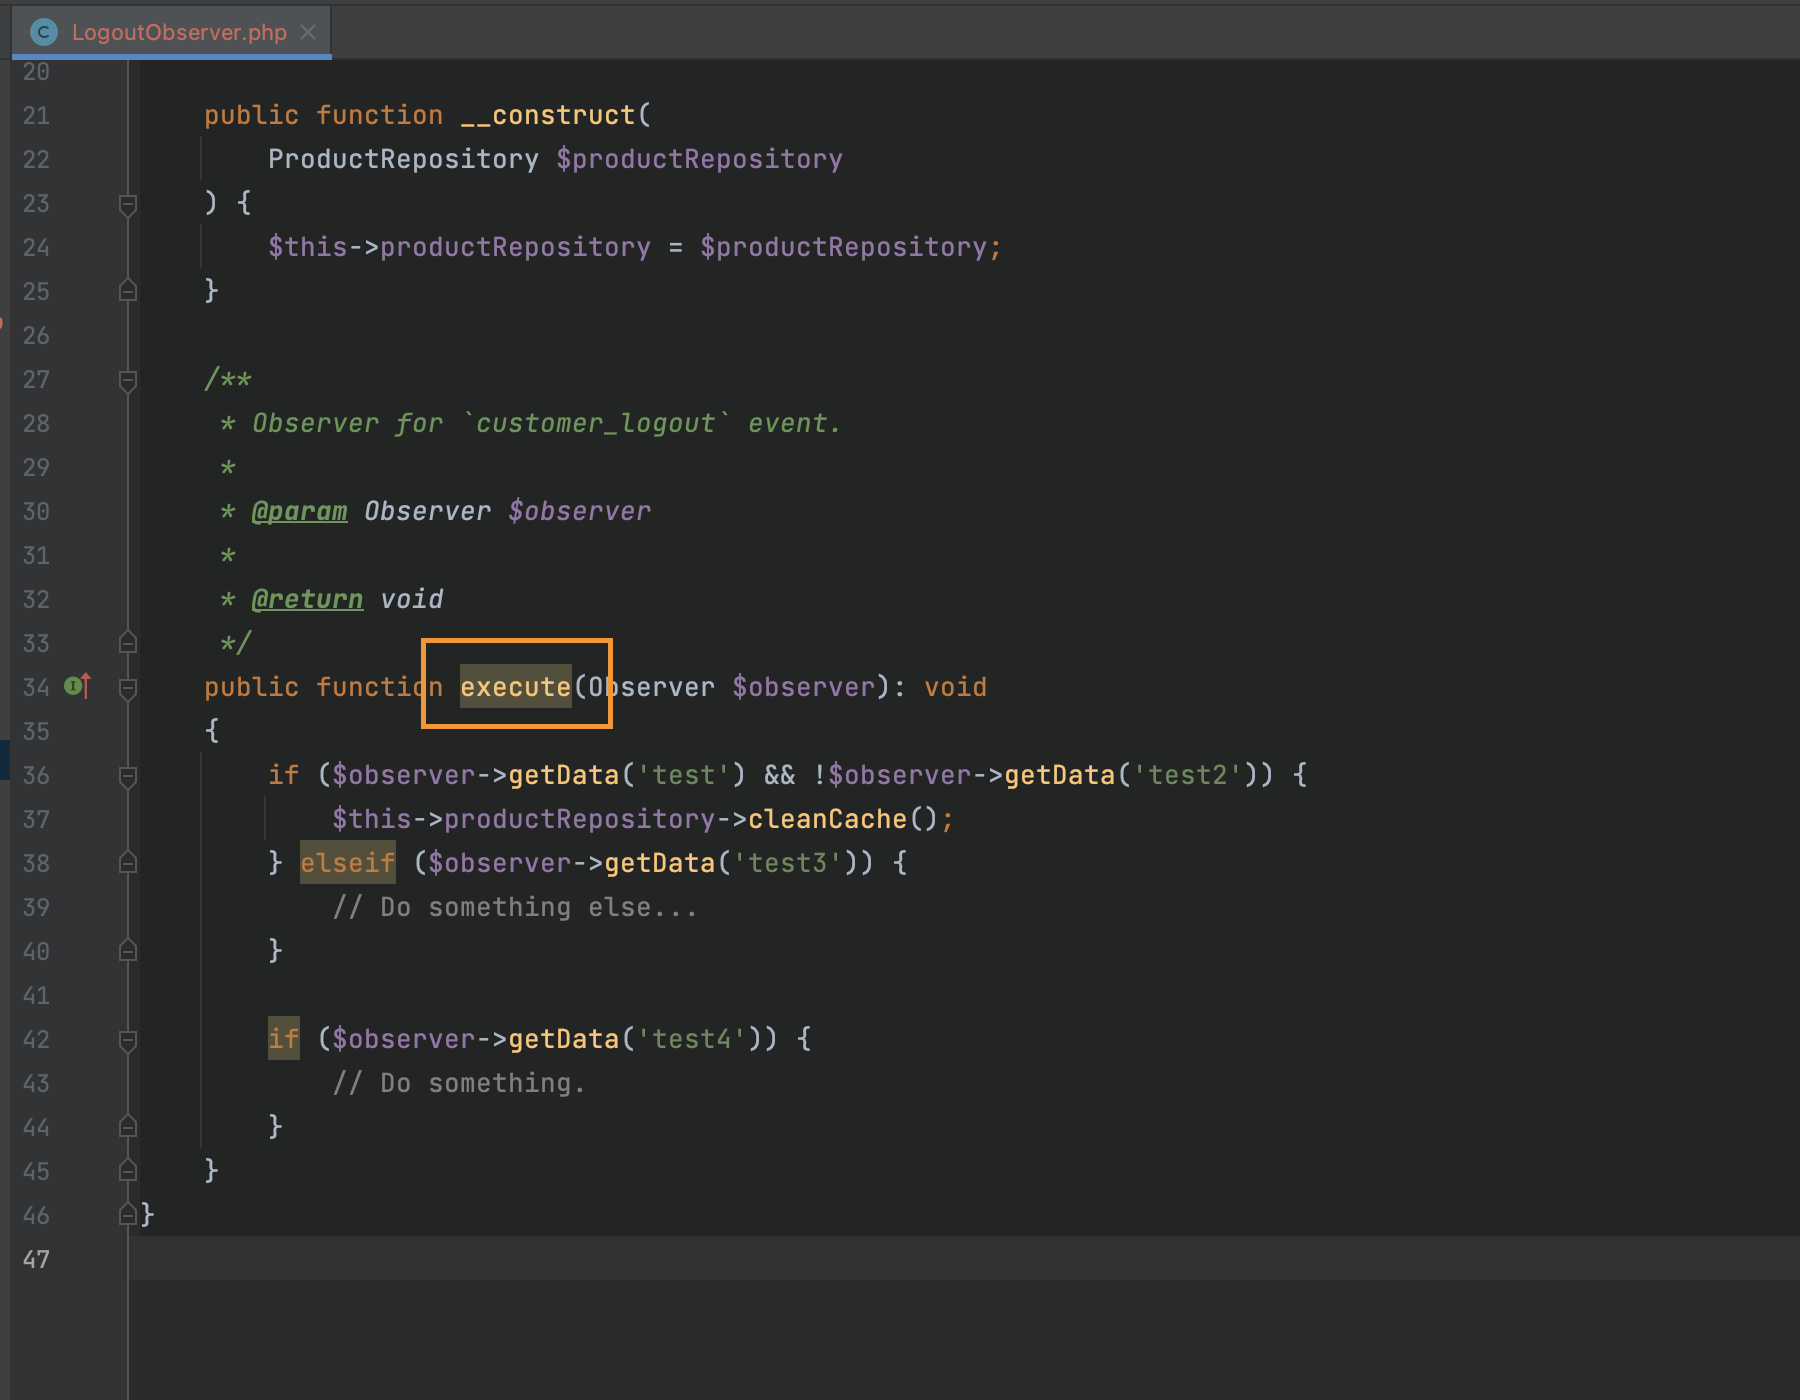
Do not include business logic in Observer classes
The Observer pattern implementation in the Magento 2 Open Source and Adobe Commerce is used for listening to the specified events such as customer creation after, sales order placed after and others. This approach allows application developers to track specific events and start other parts of the business logic.
For example, a business is required to send aggregated data from the recently placed order to the third-party system. Injecting logic into the sales order placement process is risky because this can lead to unexpected errors and the sales process performance degradation. Observing the sales order place after event looks like an excellent option to reach the goal.
In the case described above, application developers initialize a new observer and call the required business logic in the specified class. And this is a place of a possible software design error.
Placing business logic in the class declared as an observer violates fundamental principles of the OOP and good application design. Business logic in observers makes it fragile and hard to maintain. For example, if a software engineer places all send to the third-party logic into the observer, it makes it over-complicated and hard to maintain and understand. Also, it makes solutions for business logic not reusable because they belong to the observer class only.
The “Do not include business logic in Observer classes”
inspection analyses observers structure and identifies whether it contains business logic or not. It takes into consideration the complexity of the methods and the number of dependencies declared for the observer.
This
inspection is exceptionally beneficial for code quality analyses, refactoring and application development.
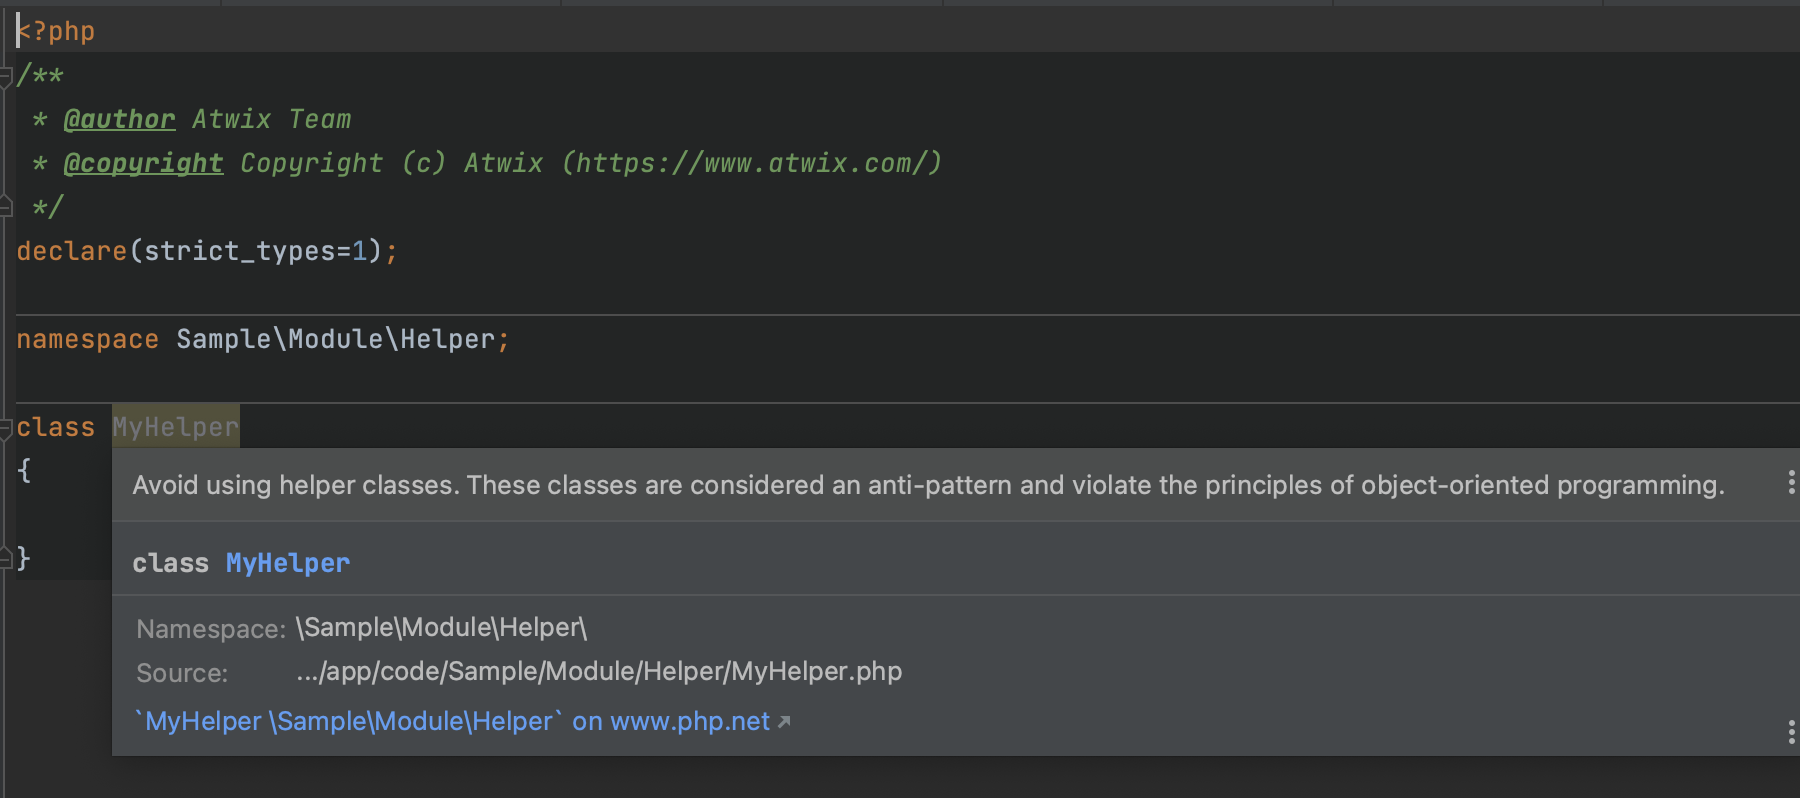
Avoid creating helper classes
The
Helper class, or better said, the approach in software development, is the way to handle various functionality in one class to re-use them in different situations. For example, getting values from configuration, some reusable methods in the scope of one module like validation, calculation or repeated actions. From one point of view, it is a valuable thing that helps keep everything in one place, but it makes it difficult to maintain and extend the whole application. This is because the Helper class breaks the fundamental
single responsibility principle of the OOP. It is essential to follow this principle because it protects the logic of a particular implementation from modifications from different sides. If you have ClassA and a ClassAHelper with static functions that work on ClassA, you should consider refactoring those functions into ClassA.
The Magento 2 & Adobe Commerce Helper approach is considered a best practice violation because it couples functionality over the application.
The “Avoid creating helper classes”
inspection helps software engineers to prevent new helpers creation.
Preferences declared in the non-global area
From time to time there is a need to create a preference for a specific implementation. This kind of change in the scope of the Magento 2 / Adobe Commerce based projects is considered a risky one because it directly overrides implementation. In that case, it is also very important to check where the override through the preference implementation is used to define areas. Because if the author of the preference change puts its declaration, for example, to the frontend area but it also is used in the scope of the admin area it will lead to fatal errors. Just because there is no particular implementation in the specified area.
The “Preferences declared in the non-global area”
inspection validates that preference is defined in the global area to avoid situations as explained in the above paragraph. Preference should be defined in the global area to prevent unexpected crashes of the system.

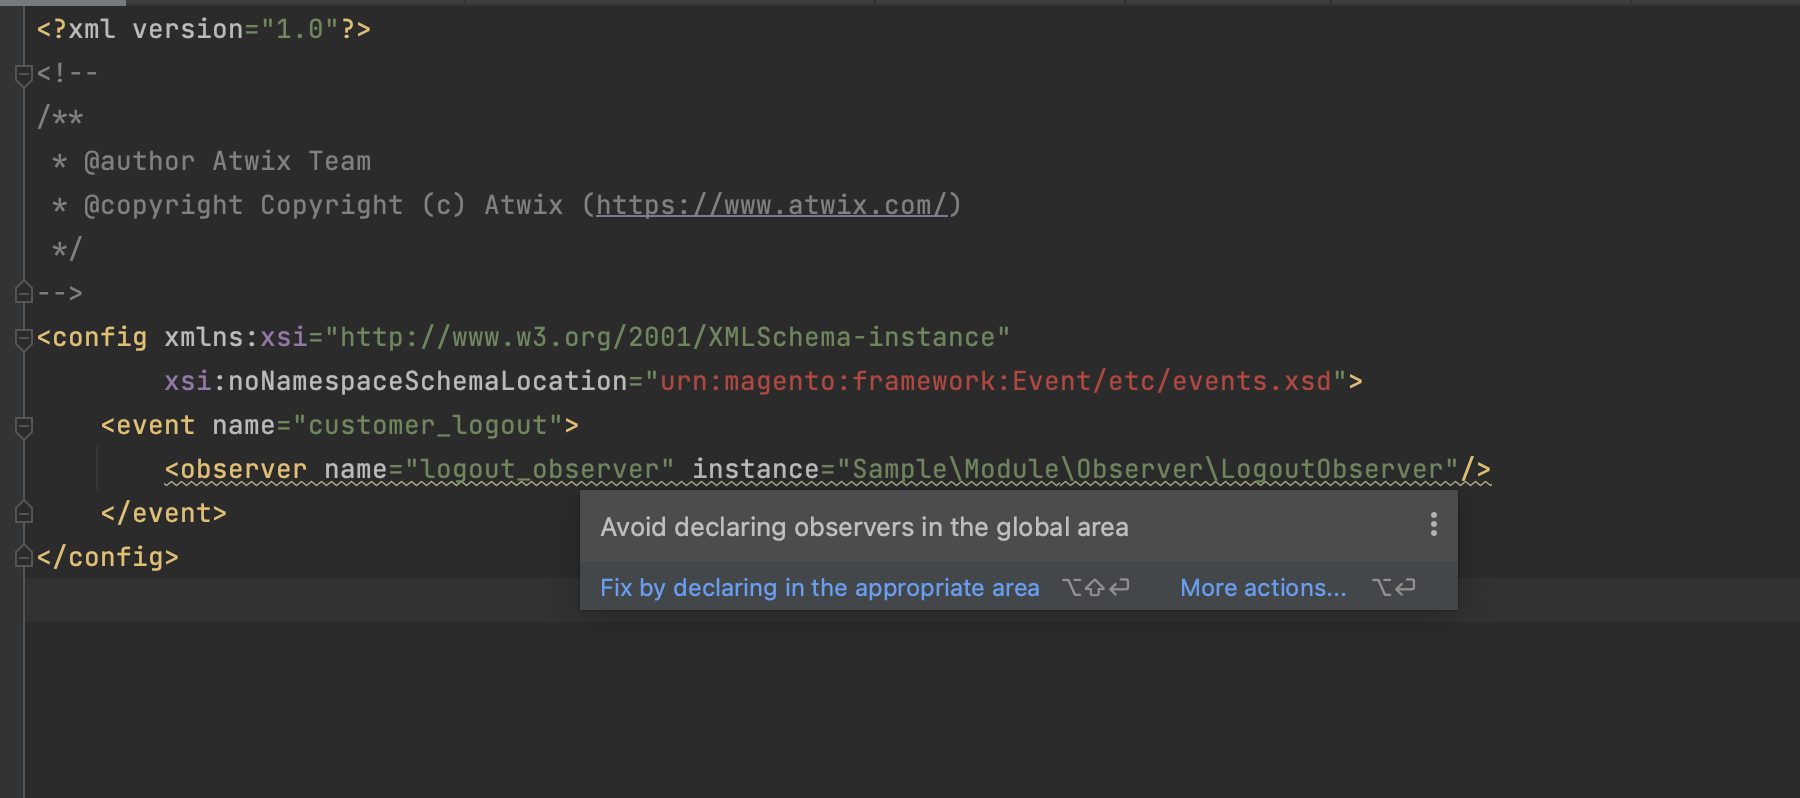
Observers should be declared in the scope of the proper area
Observer by itself is used for listening to specified events such as sales order place, customer login or, for example, invoice paid. Also, it can listen to the specific area for the previously mentioned events. For example, the business needs to track successful order placement only on the storefront. In that case, the observer can be created for the frontend area only to prevent not needed execution in the scope of the web-api area or admin. Also, it should make the application bootstrapping a little bit lighter.
Global are for observers should be used only in case when the logic that the observer initiate should be executed in multiple areas.
The “Observers should be declared in the scope of the proper area”
inspection validates that the observer is created in the scope of the area that is equal to the area of the method where the observe is instantiated. Notification of this
inspection has a Weak Warning status that only helps developers to double check that they made a correct design decision.
ChatGPT
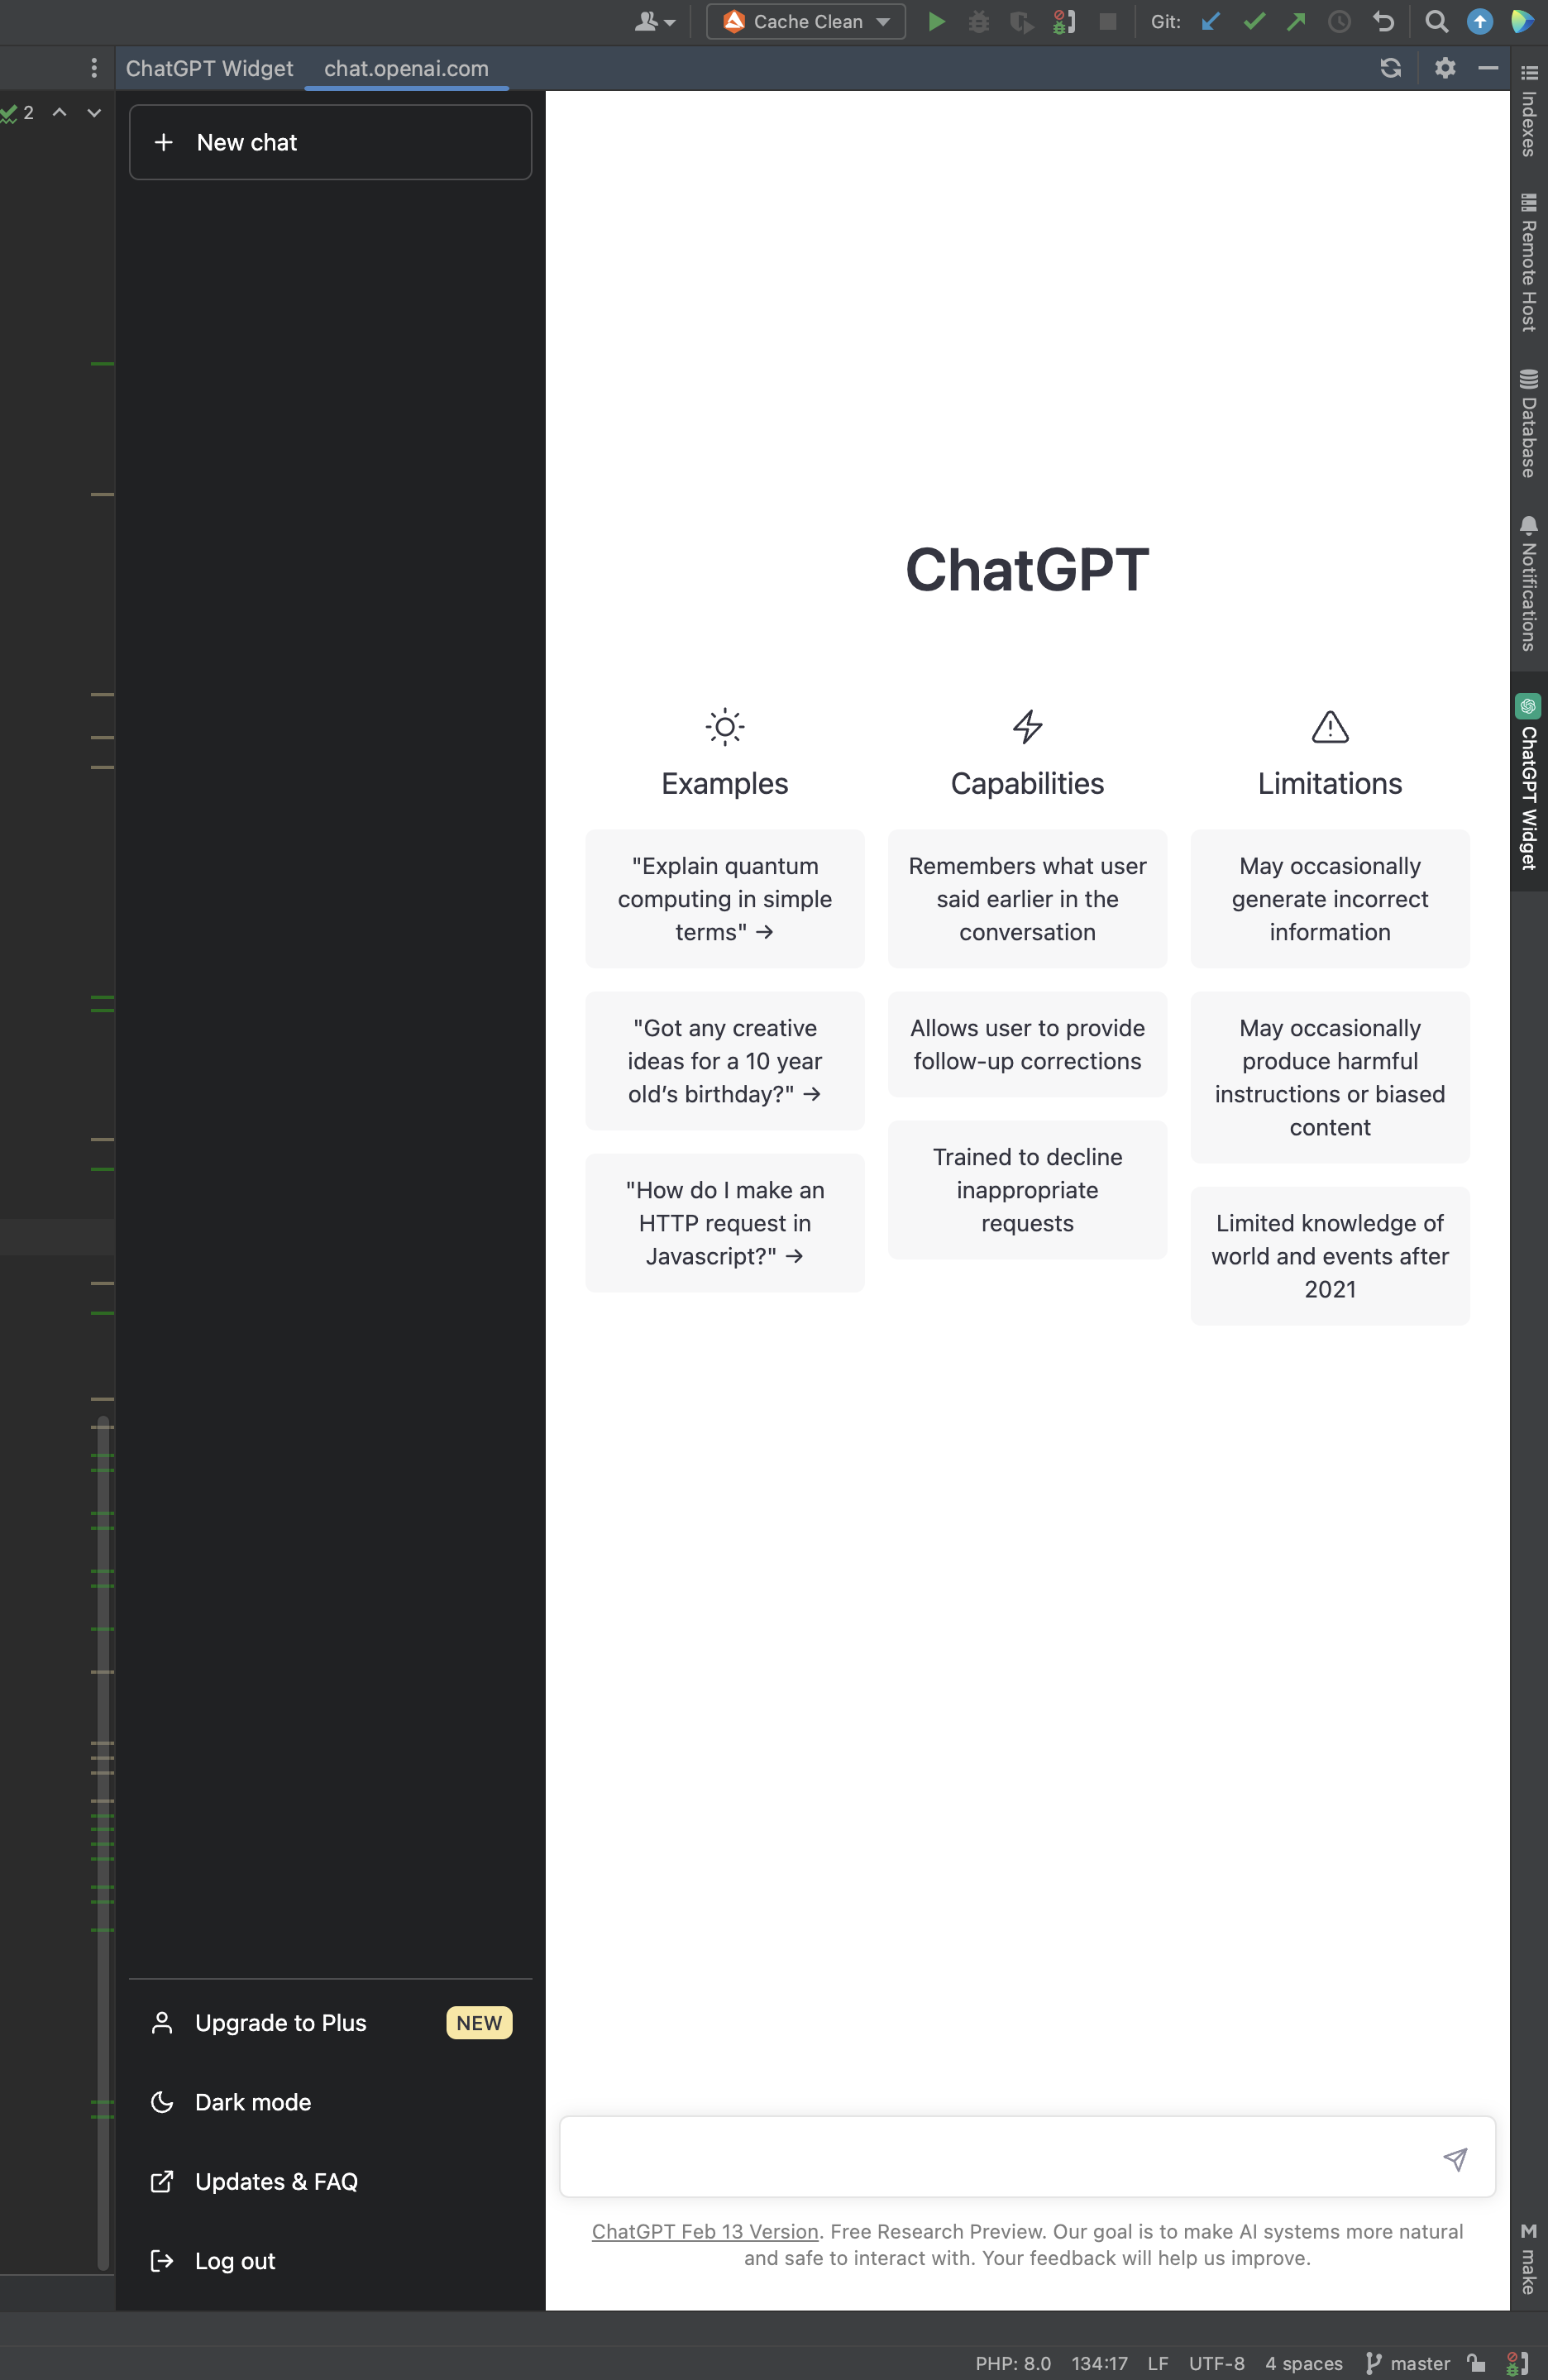
ChatGPT widget integration
The plugin provides integration with the
ChatGPT trained model as a PhpStorm widget. To configure it open
View -> Tool Windows -> ChatGPT Widget.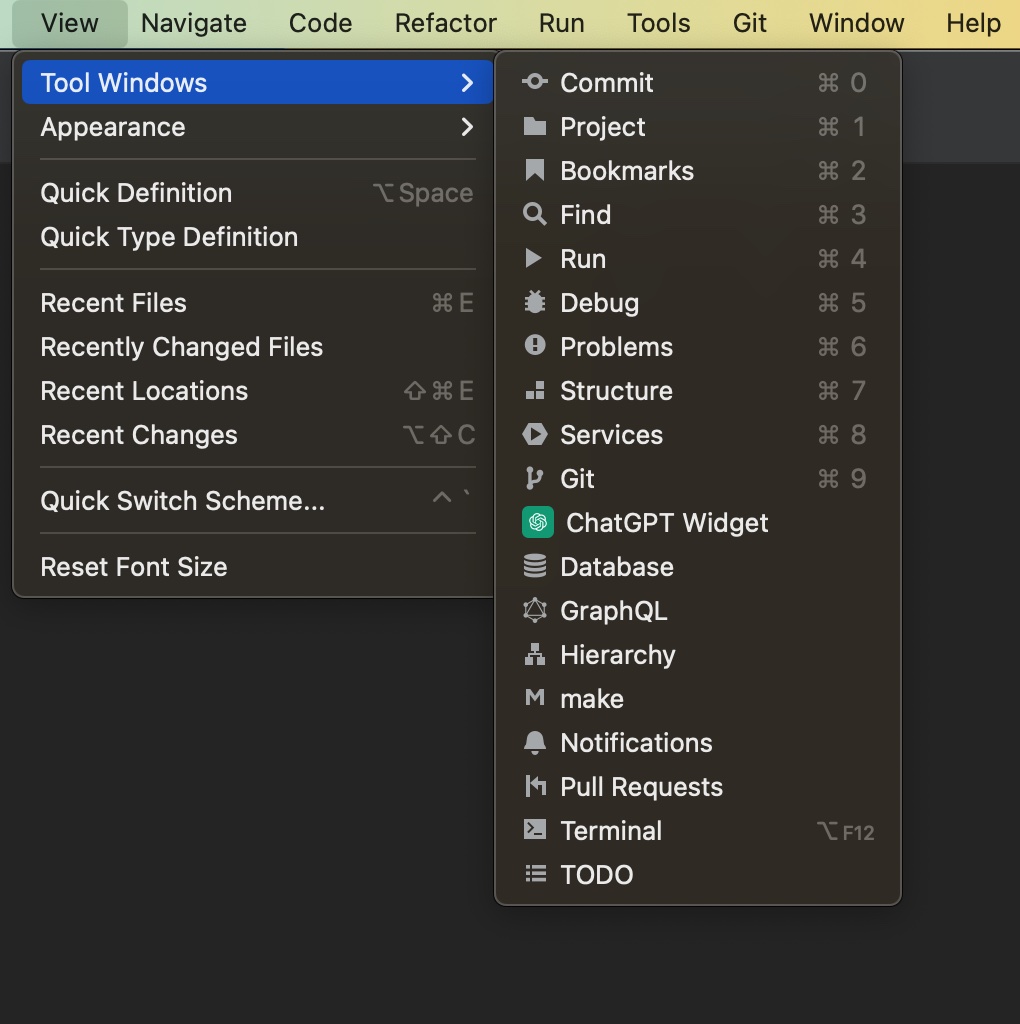
The ChatGPT widget will be added to the widget panel of the PhpStorm.
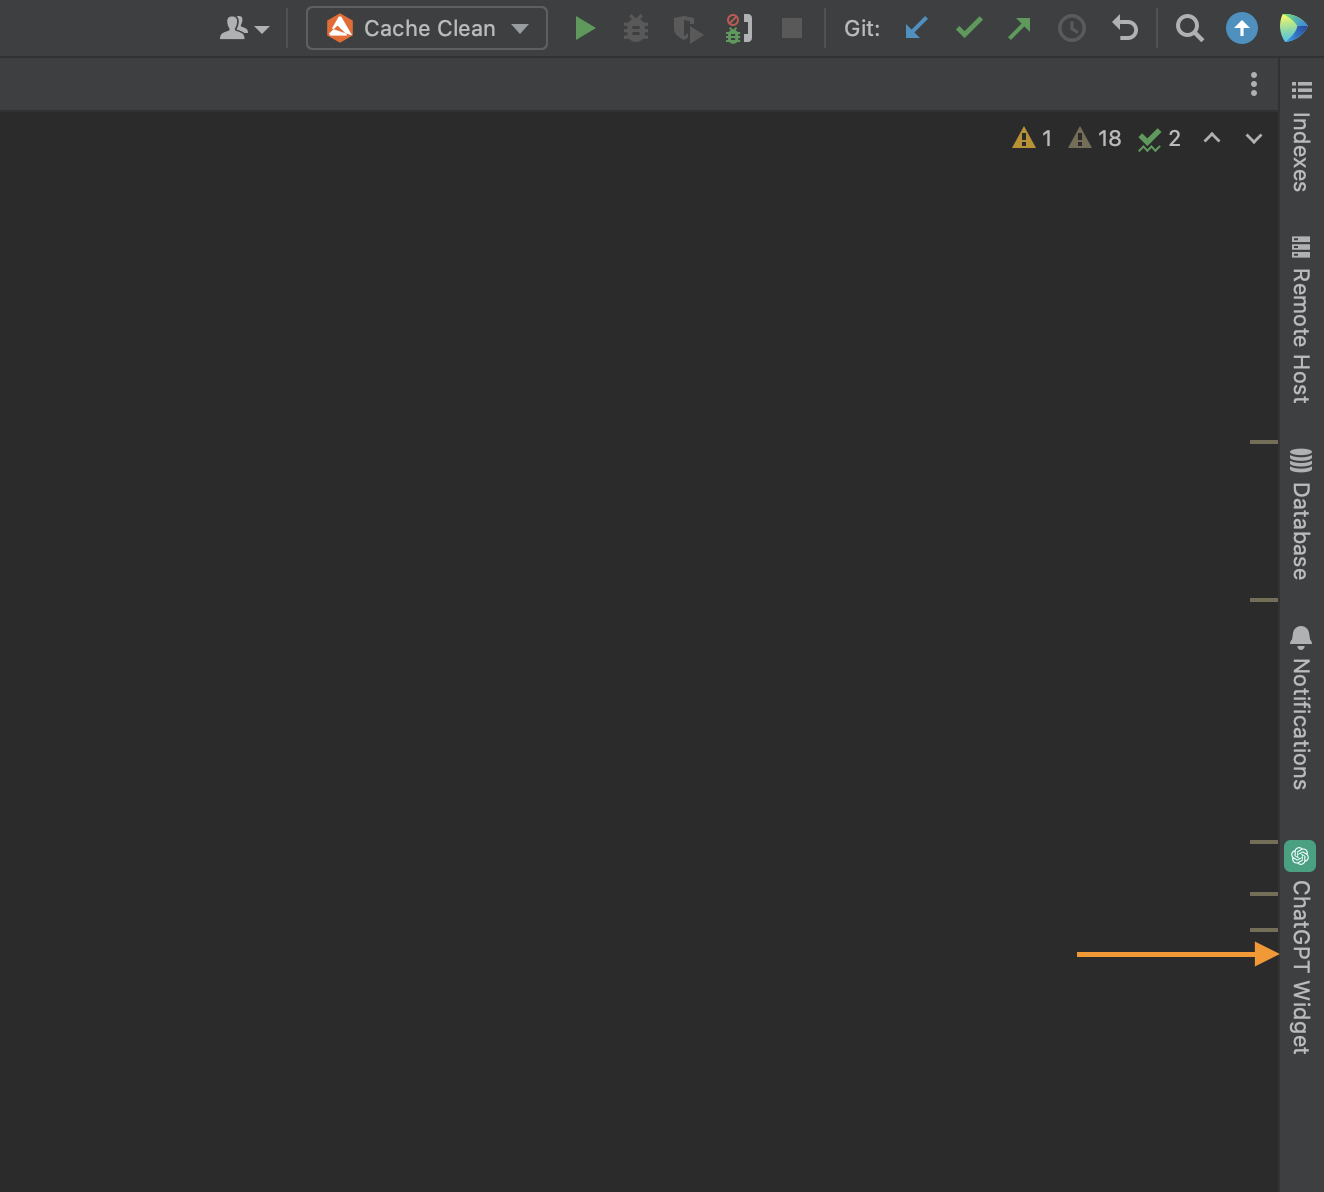
At the first run of the widget it will show standard authorisation step for the ChatGPT.
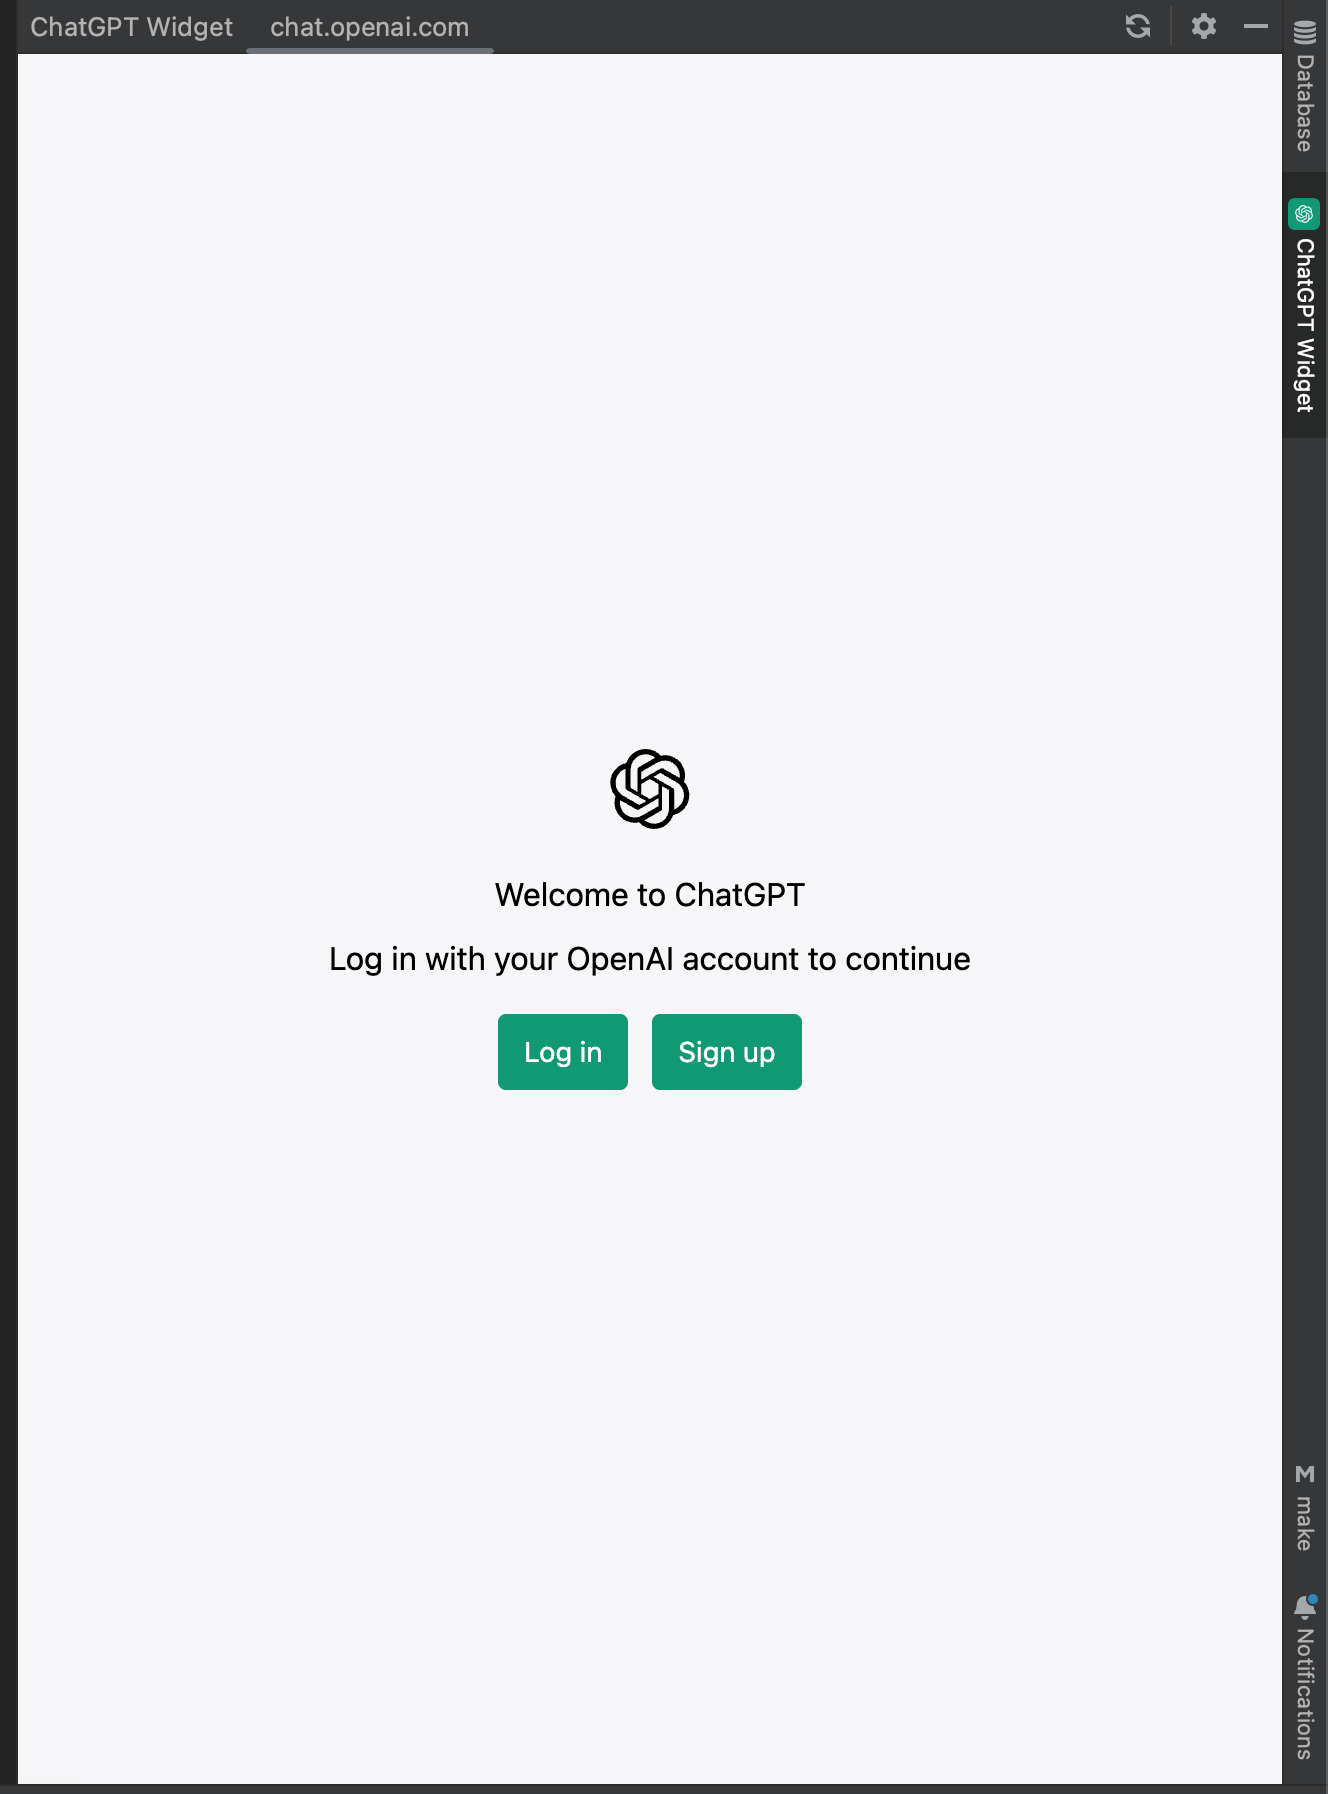
After successful authorisation the ChatGPT is accessible from the widget.
Code refactoring with ChatGPT
It is possible to run code refactoring with the help of the ChatGPT on the code in the scope of the file. To enable this functionality open PhpStorm -> Settings -> PHP -> Magento 2 Support -> ChatGPT settings -> Enable ChatGPT Support? -> select the checkbox
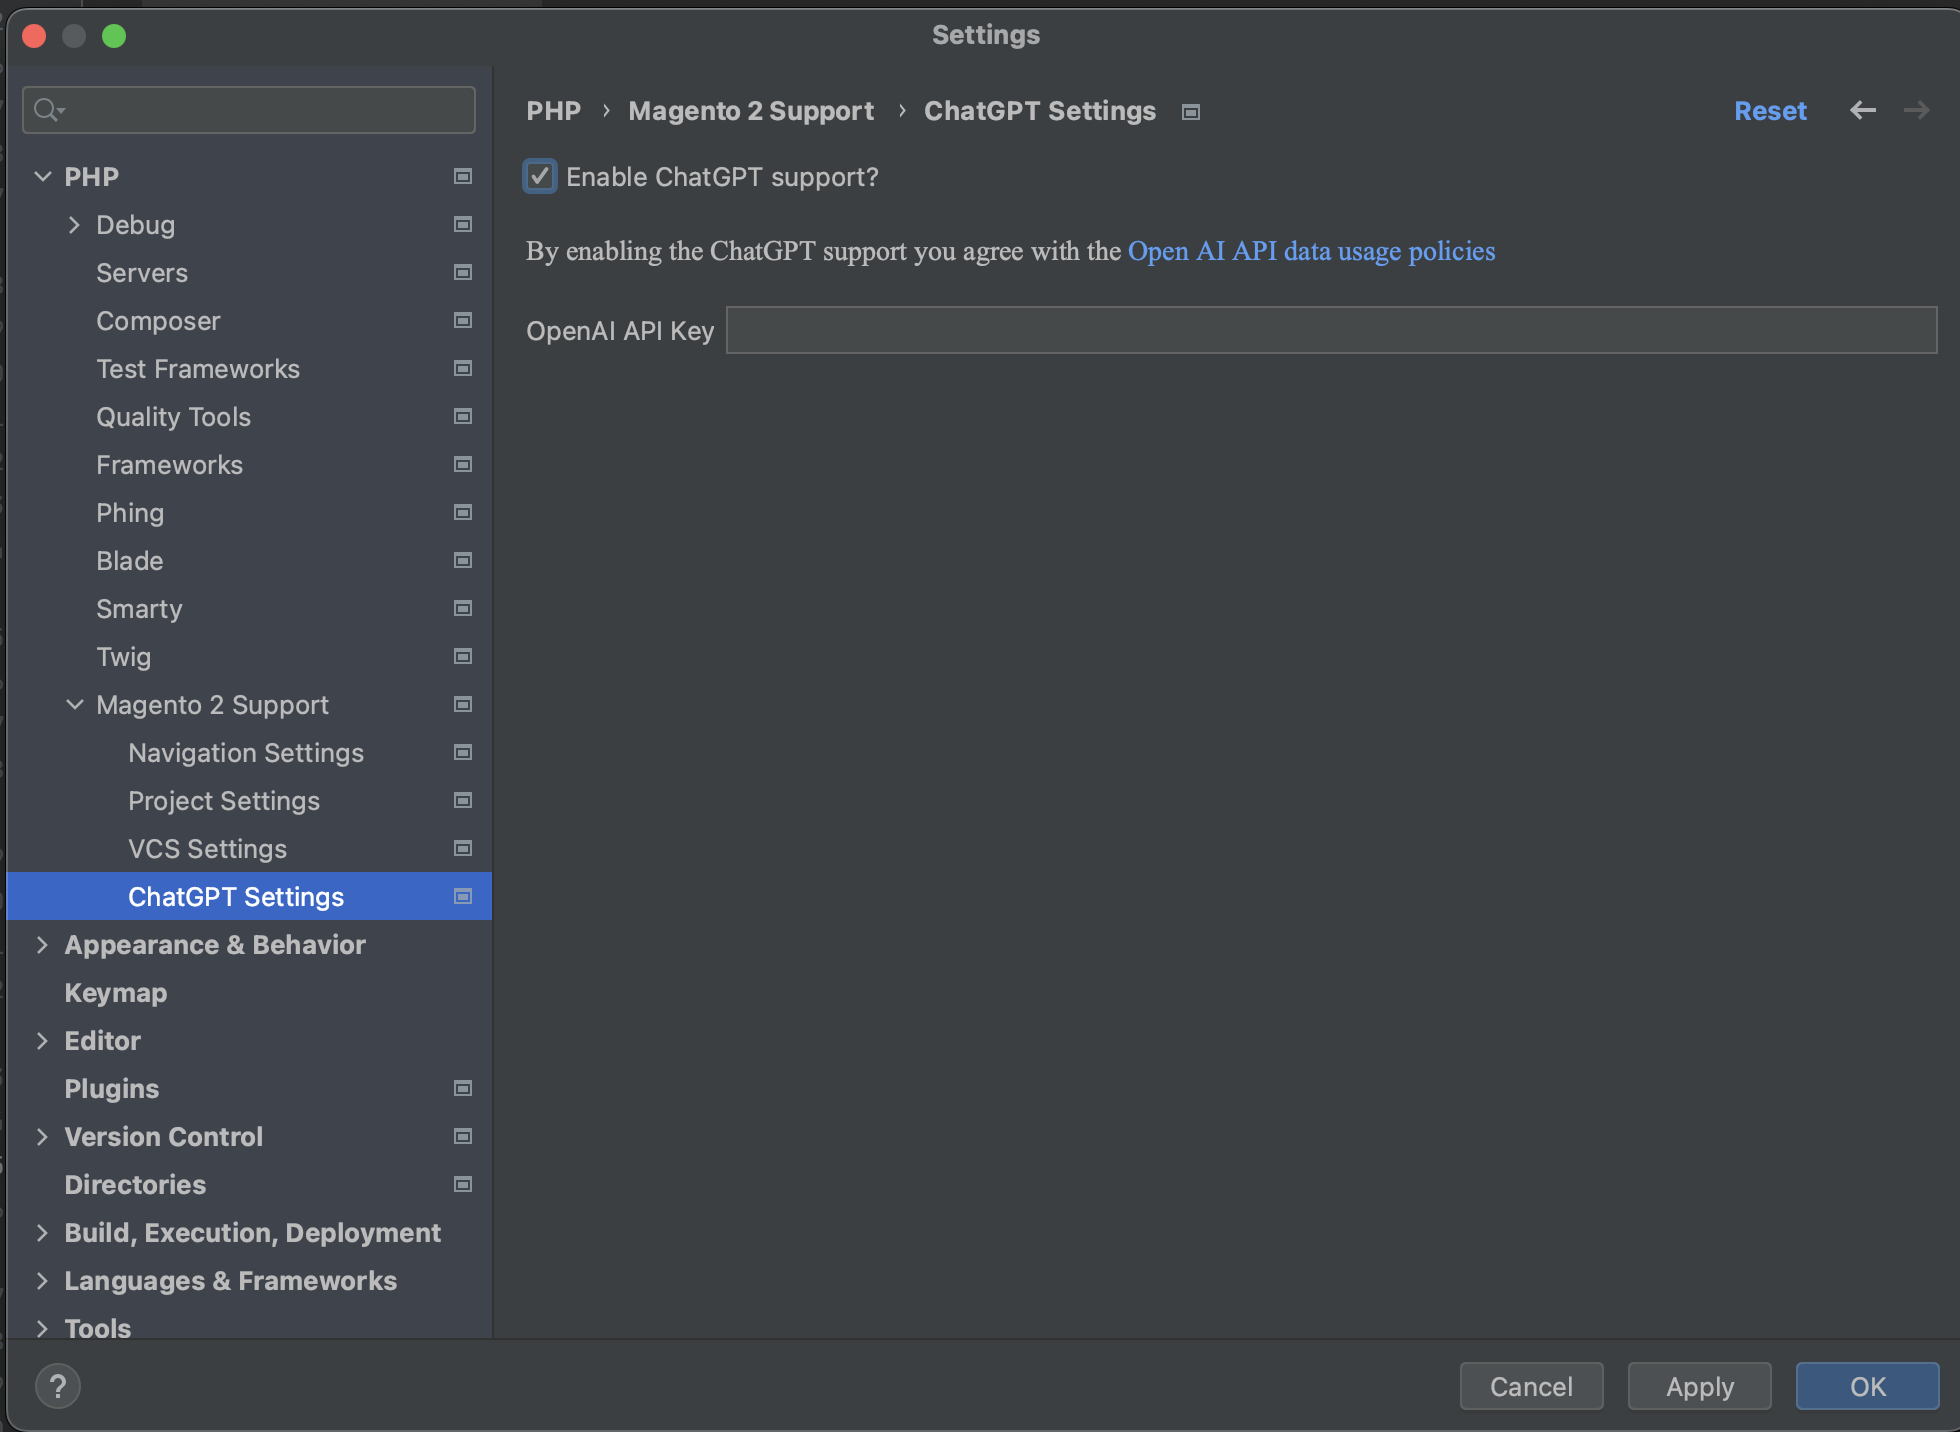
After successful enter of the Open API Key you can select a code in the scope of the file and call for the context menu, select the Refactor with ChatGPT option at the bottom of the context menu.
Controllers
Search controller by path action
The search controller by the path feature allows engineers to find a class responsible for the specified route quickly. By copying the route, you can search for the controller class from
PhpStorm Menu -> Navigate -> Magento 2 Controller or by using the
Searching Everywhere PhpStorm functionality. This is extremely helpful when you work on a new project or functionality and face a new route.
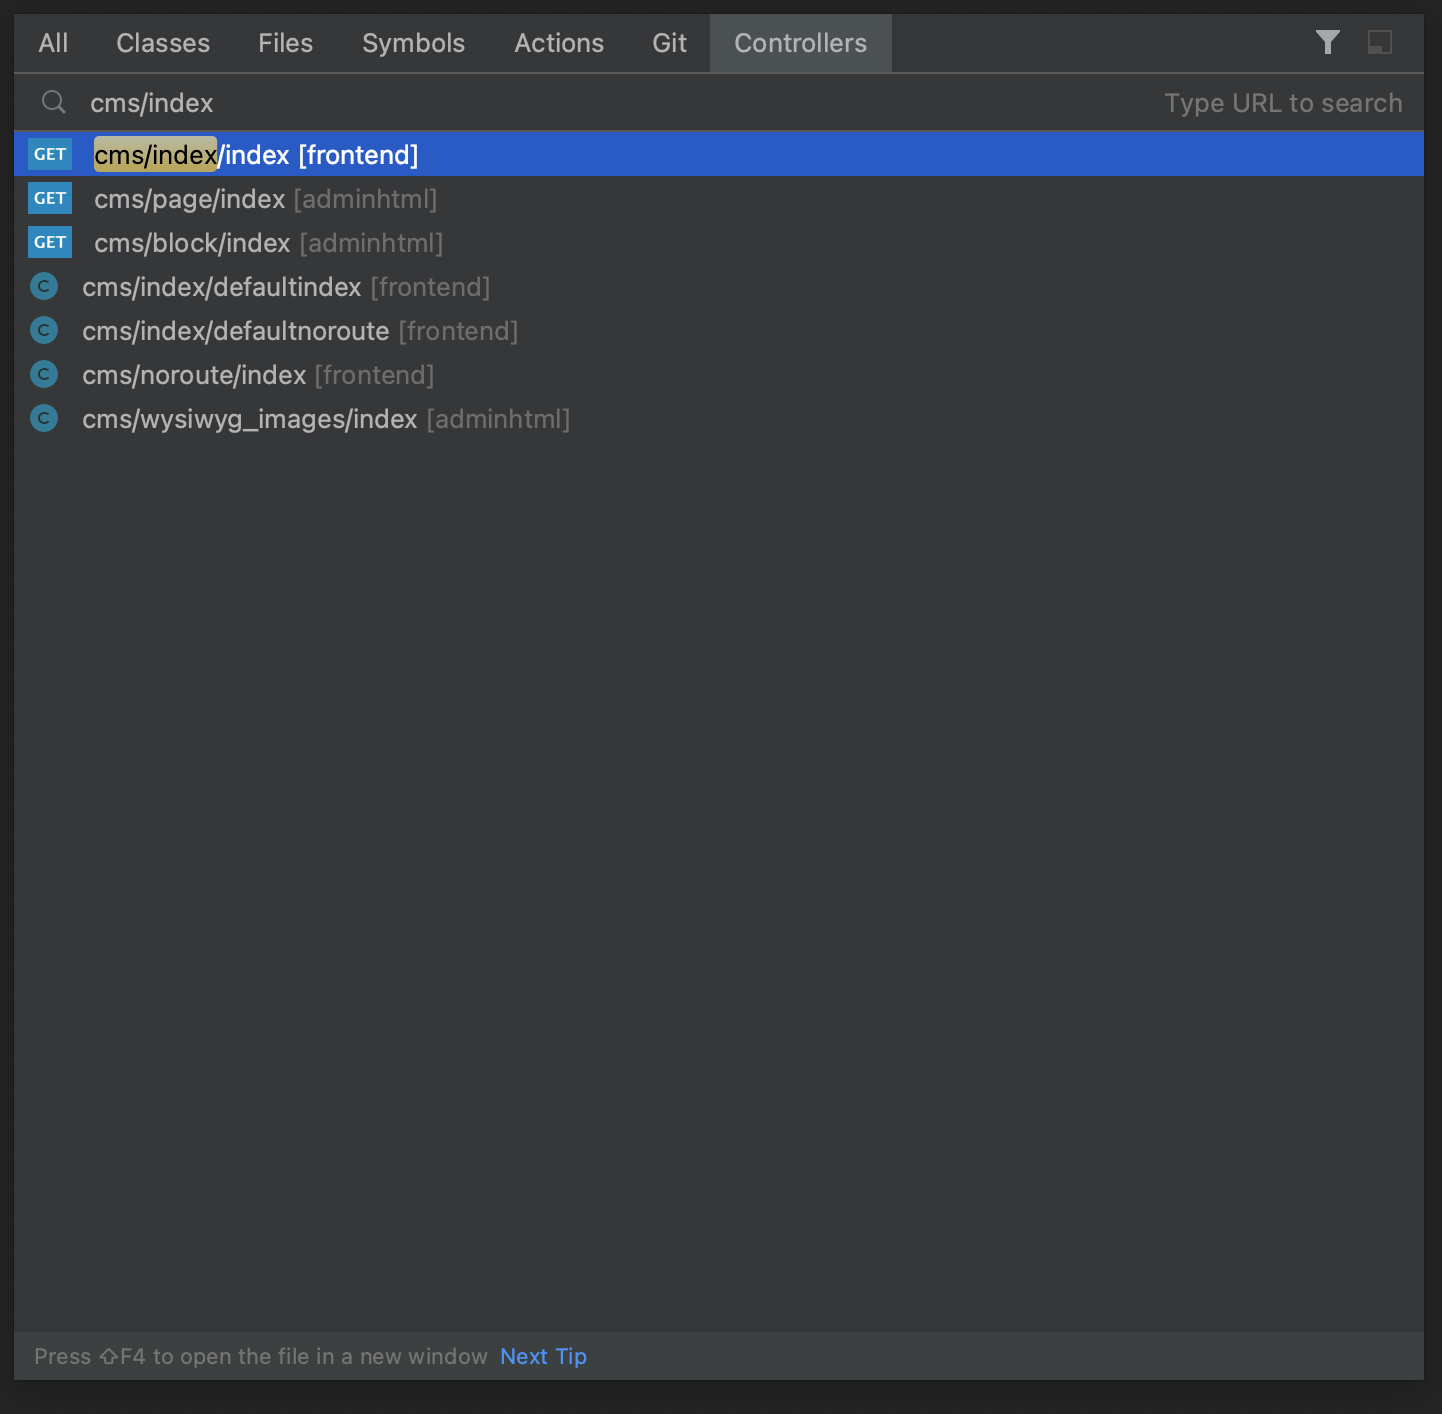
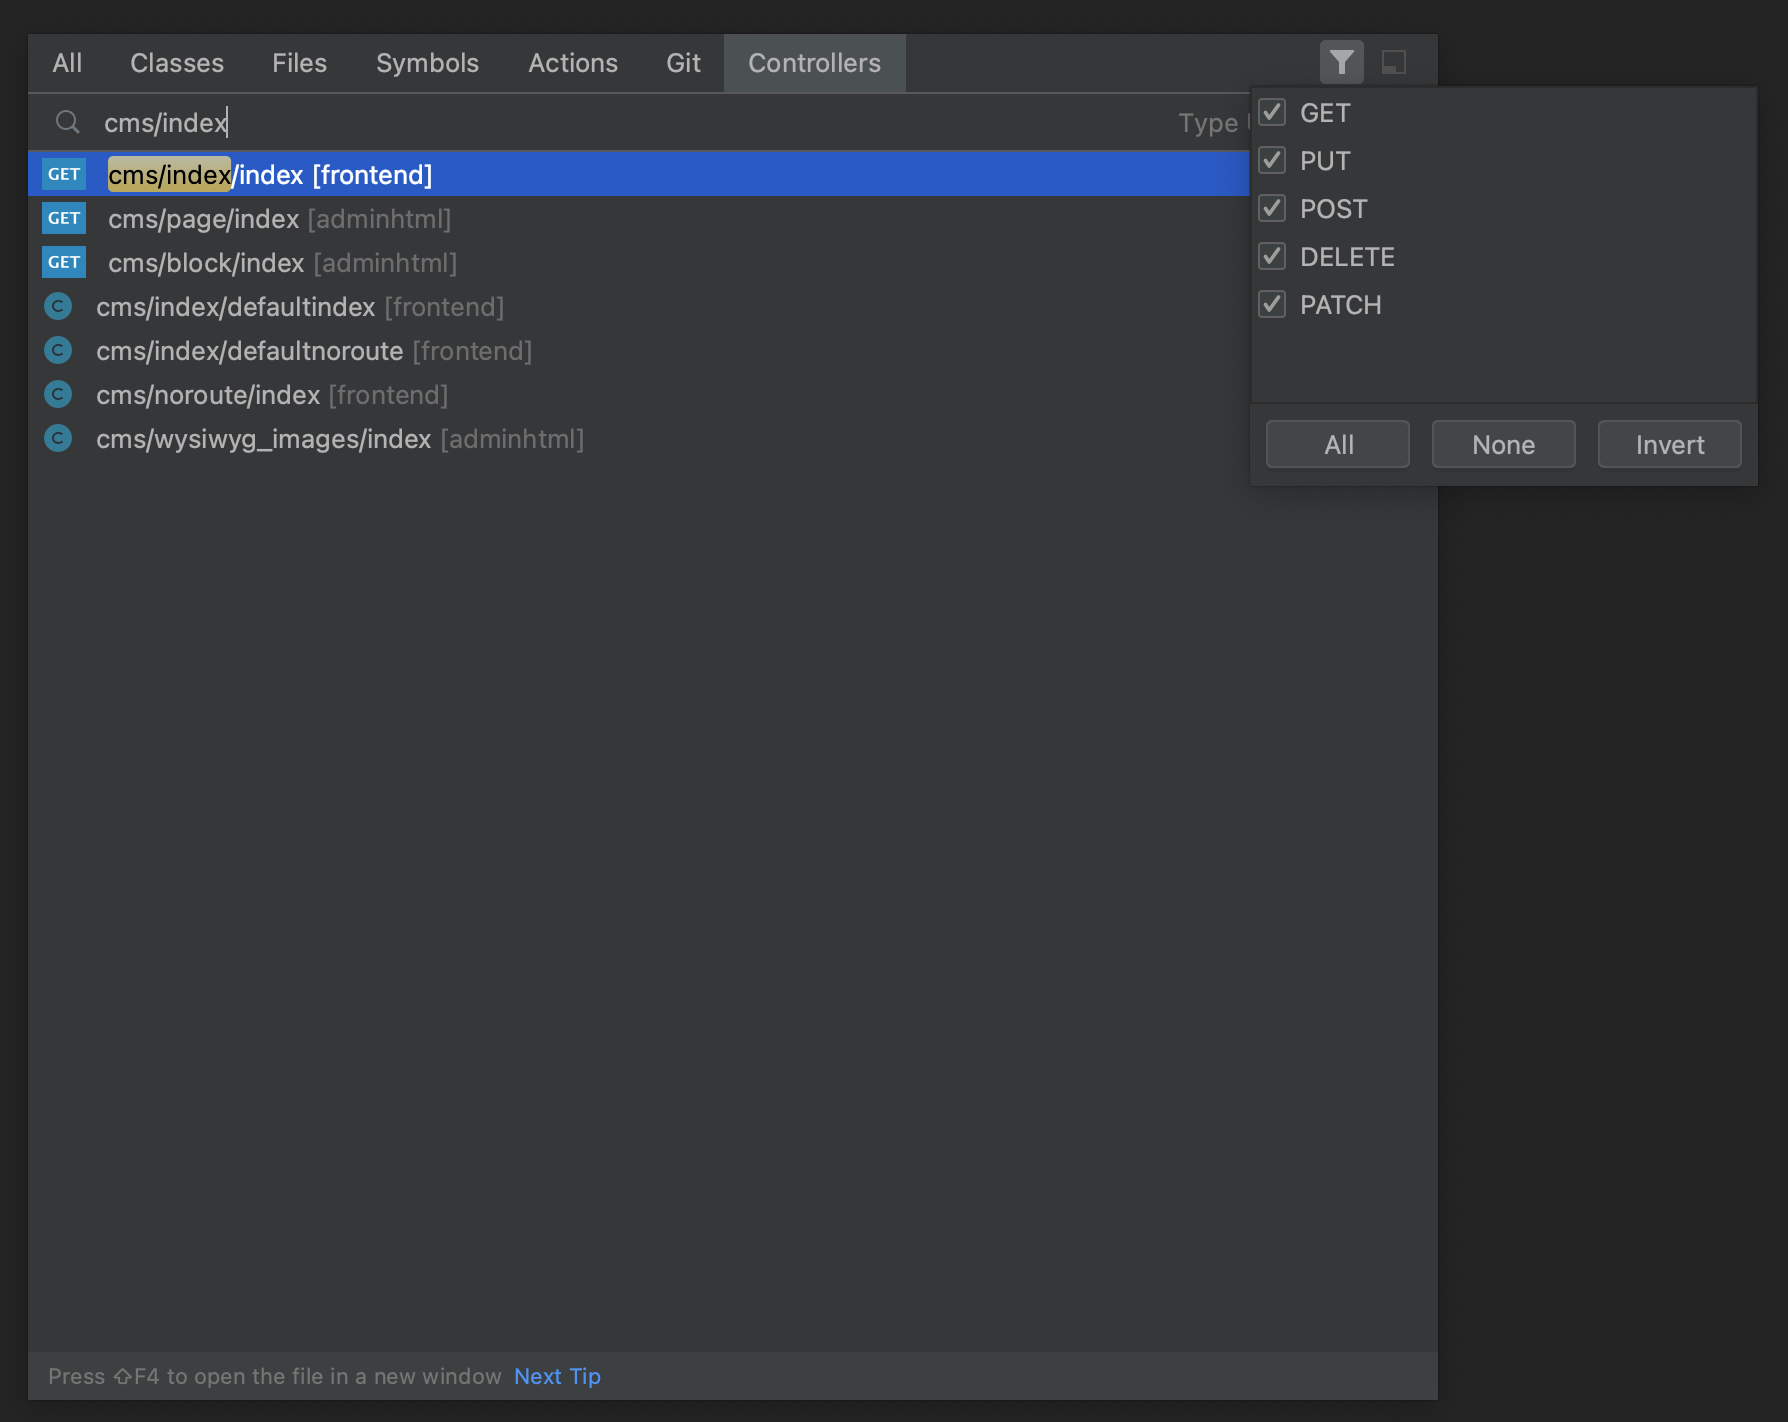
Also, it is possible to filter controller search result by the request type.
Add a new controller
The add a new controller functionality allows engineers to create a new controller for the Magento 2 module and do this with the new level of assistance from the plugin. Adding a new controller now focuses on adding a new class and all related components.
Let's discover when a module doesn't have controllers and a new one should be added. At first, the module must have a Controller folder. By calling the context menu on the Controller folder in the observing case, an engineer sees the Magento 2 controller action. This action displays the following popup.
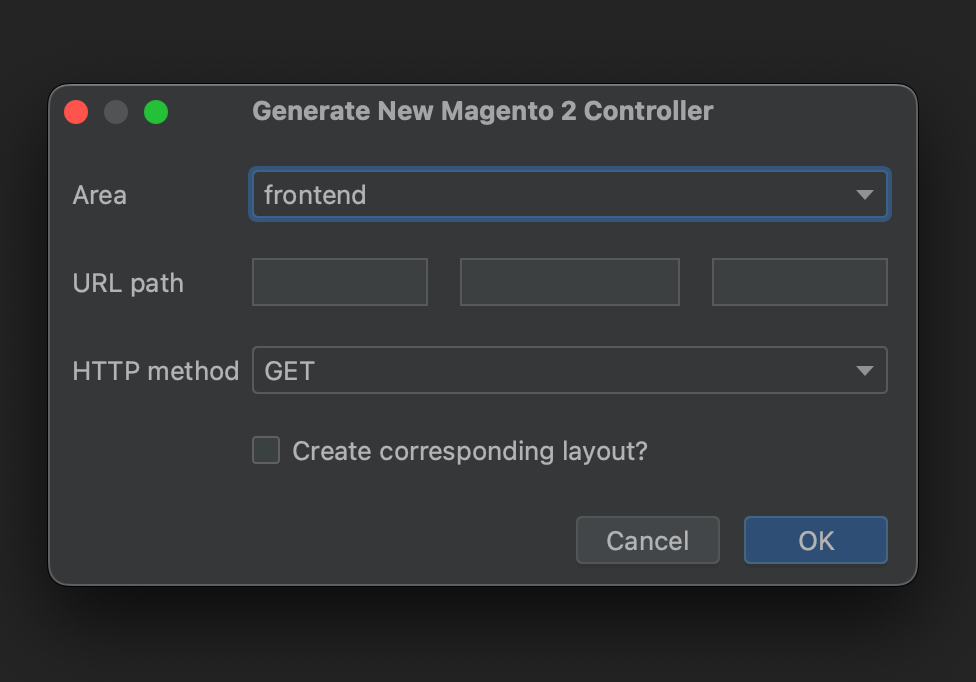
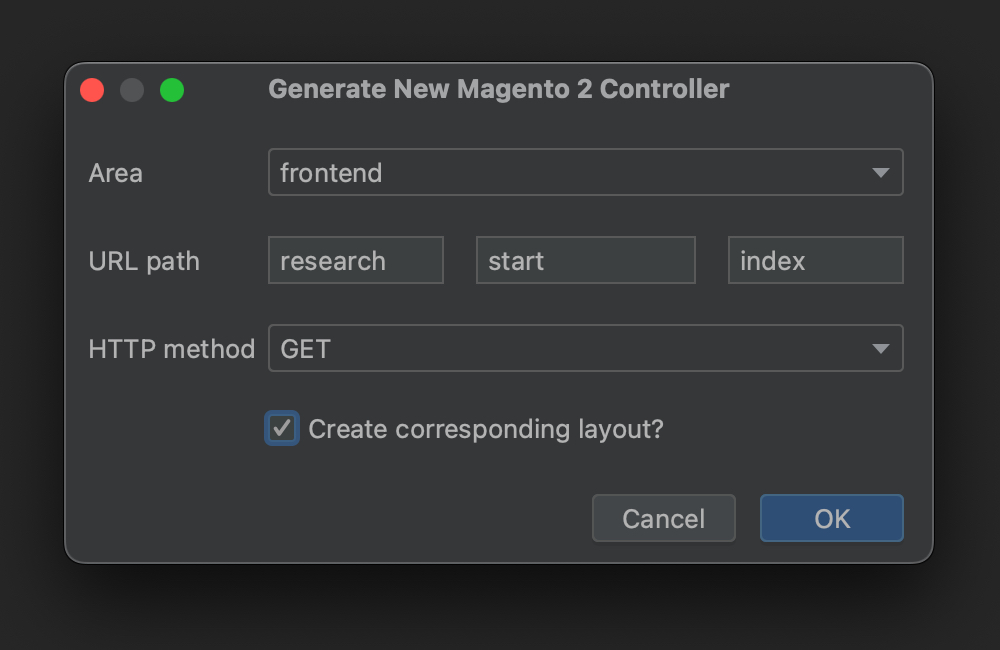
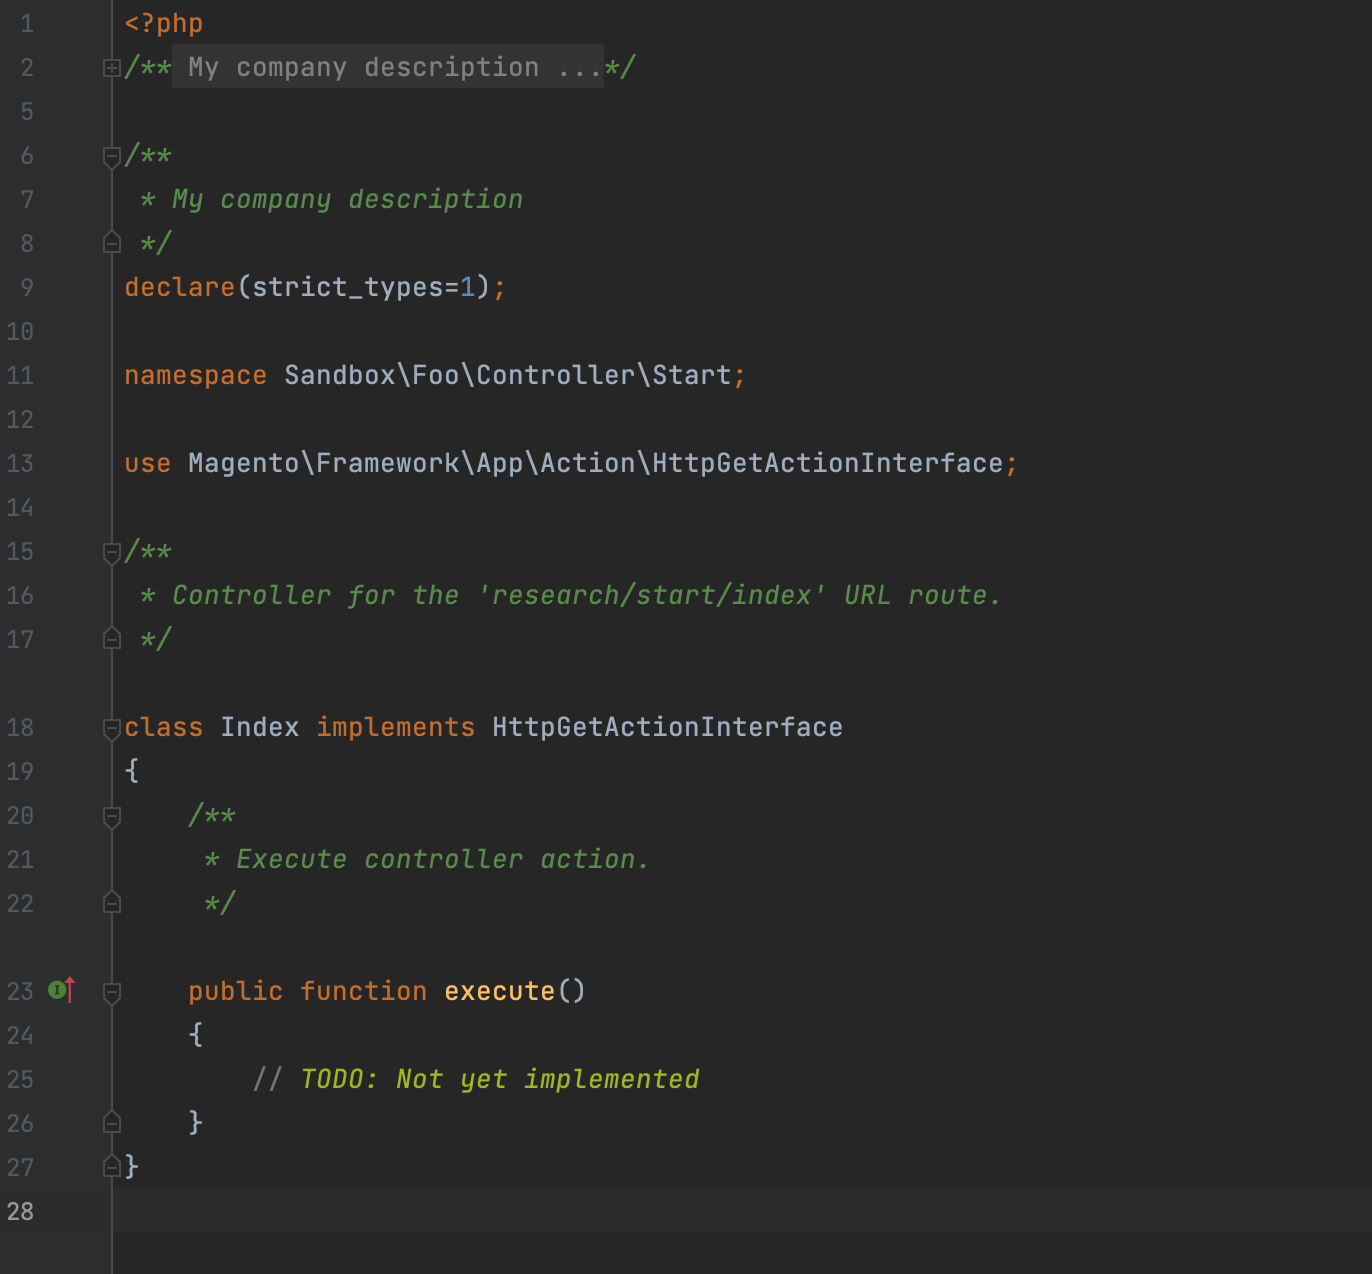
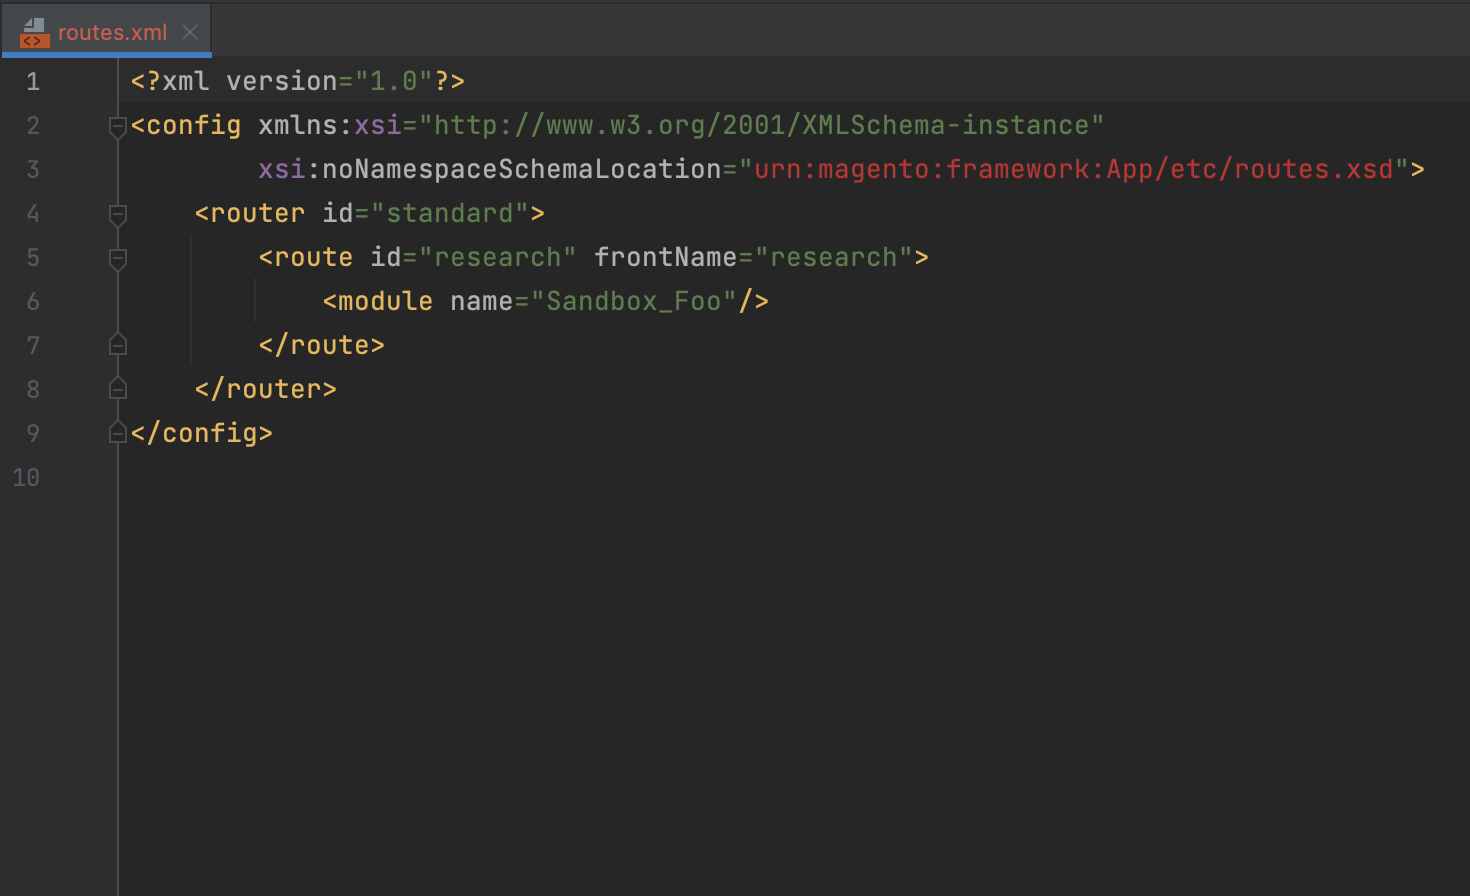
Engineers can specify area in which controller is going to be created, URL path with route and action. It is also possible to choose the HTTP method and if needed create a layout. The list of the screenshots below demonstrates creation of the controller class, route declaration along with the corresponding layout.
Add controller path above controller class
In the latest versions of the PhpStorm, a new functionality for, for example, showing commit authors upon the class was added. We used this approach to offer the controller path on the controller class name. This feature should help engineers navigate and understand projects quickly with less switching between files during navigation.
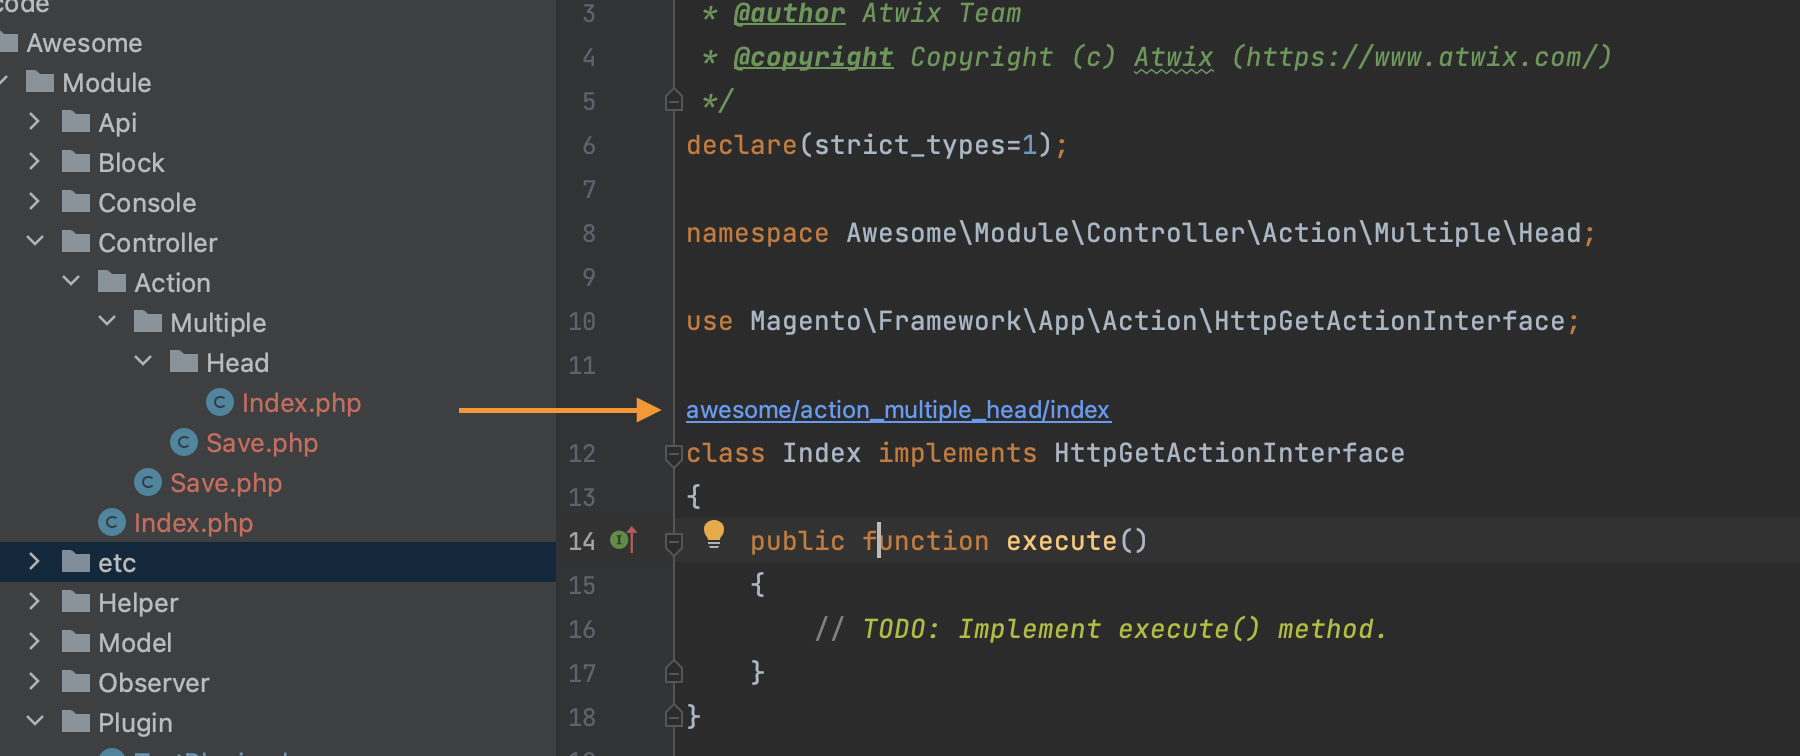

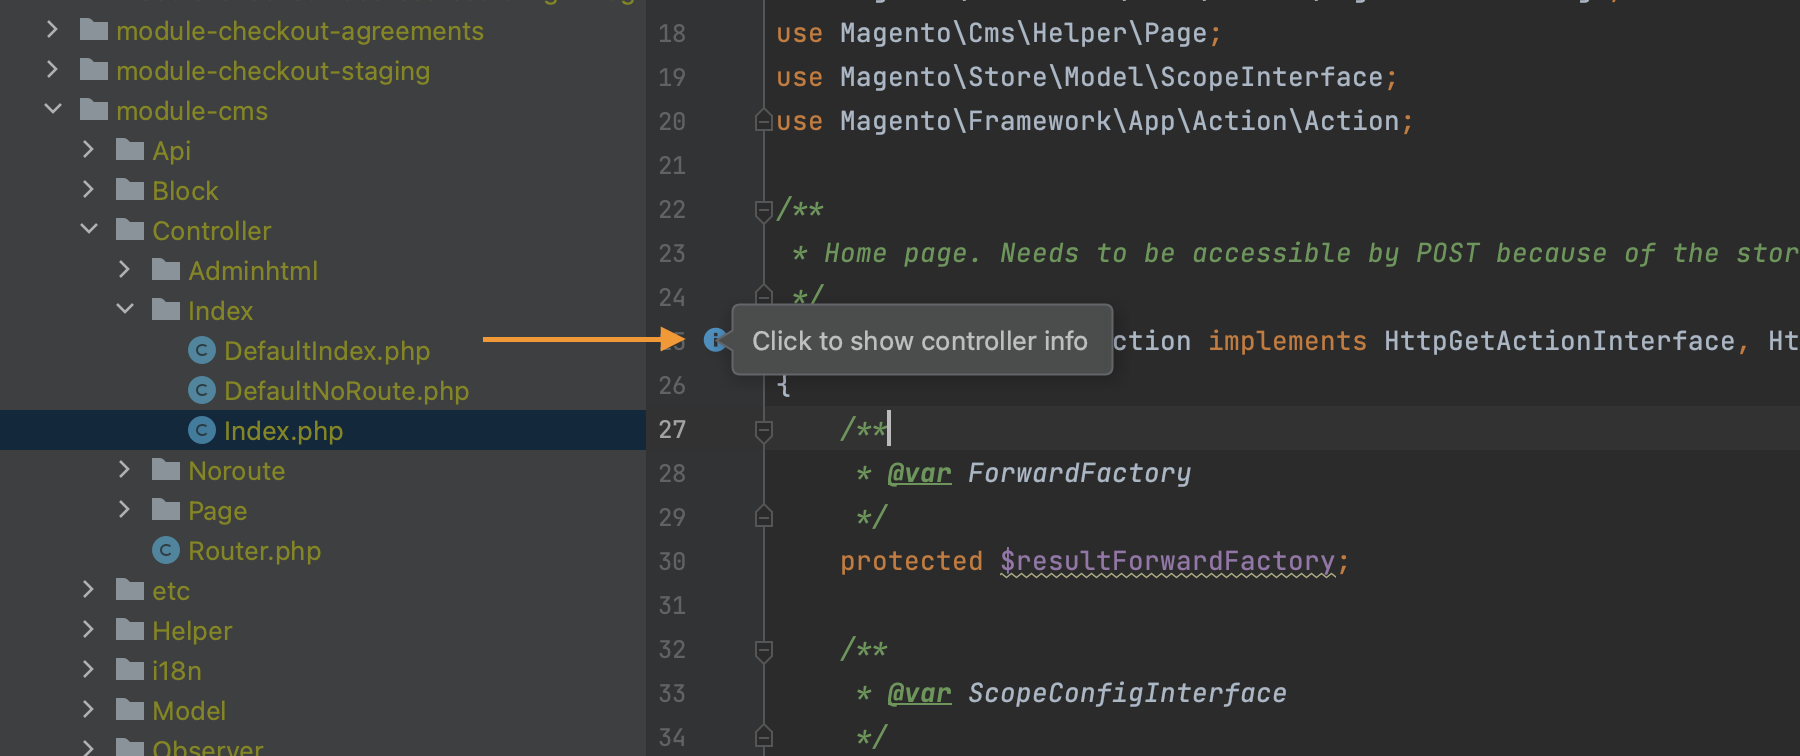
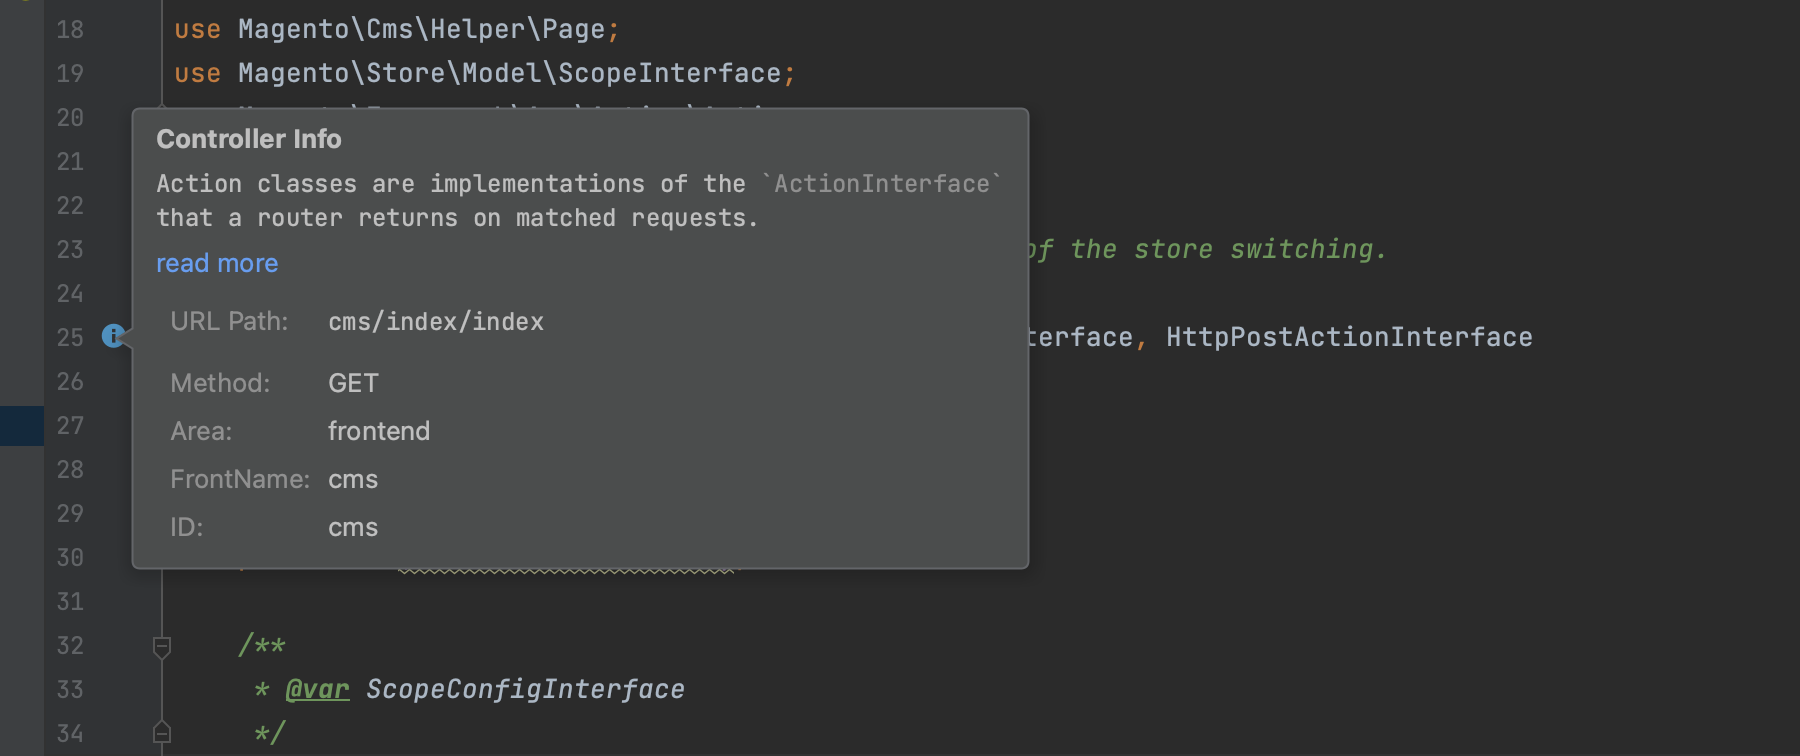
Also, in the scope of this new feature, we added a possibility to get information about the currently viewed controller with the help of line marker functionality. To use it, put the line marker in front of the controller class declaration in the PHP file and click to get more information: method type, path, id, URL path etc.
Project Structure
Analyze used code consistency with the specified module dependencies
The Magento 2 & Adobe Commerce are systems that use modules under the hood as a part of their components. Each module can interact with any of the core modules, 3rd party extensions or customisations through the SAPI principle, plugins, observers, preferences etc. This makes the system flexible and easy to customize. But with this flexibility, it is essential to pay attention to the sequences between modules and, as a result, components. This is an integral part of high-quality solutions because, with the significant change of one module (or even its deactivation) that is a sequence to the list of other modules, the whole component can be broken.
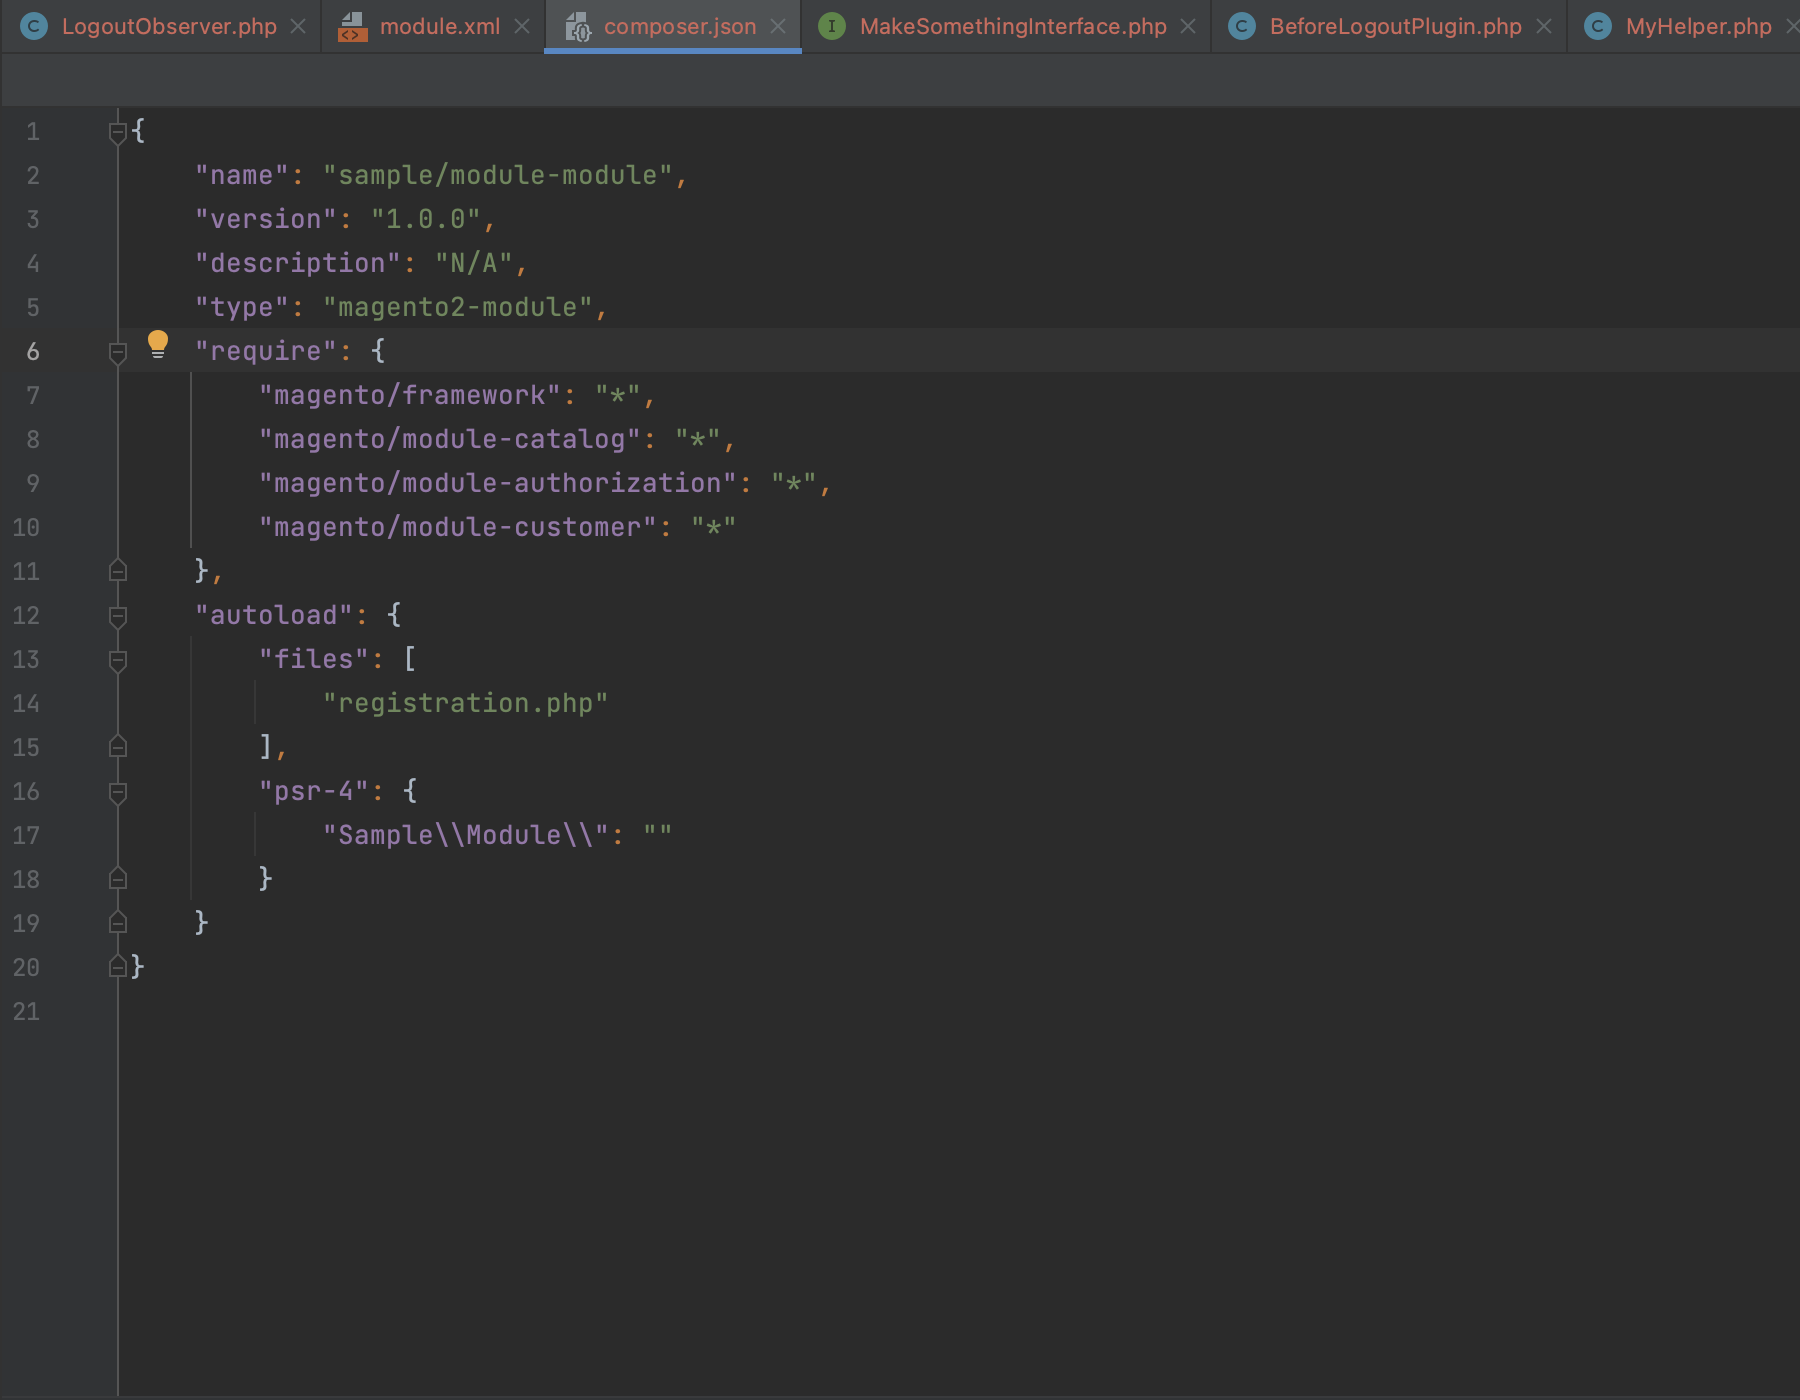
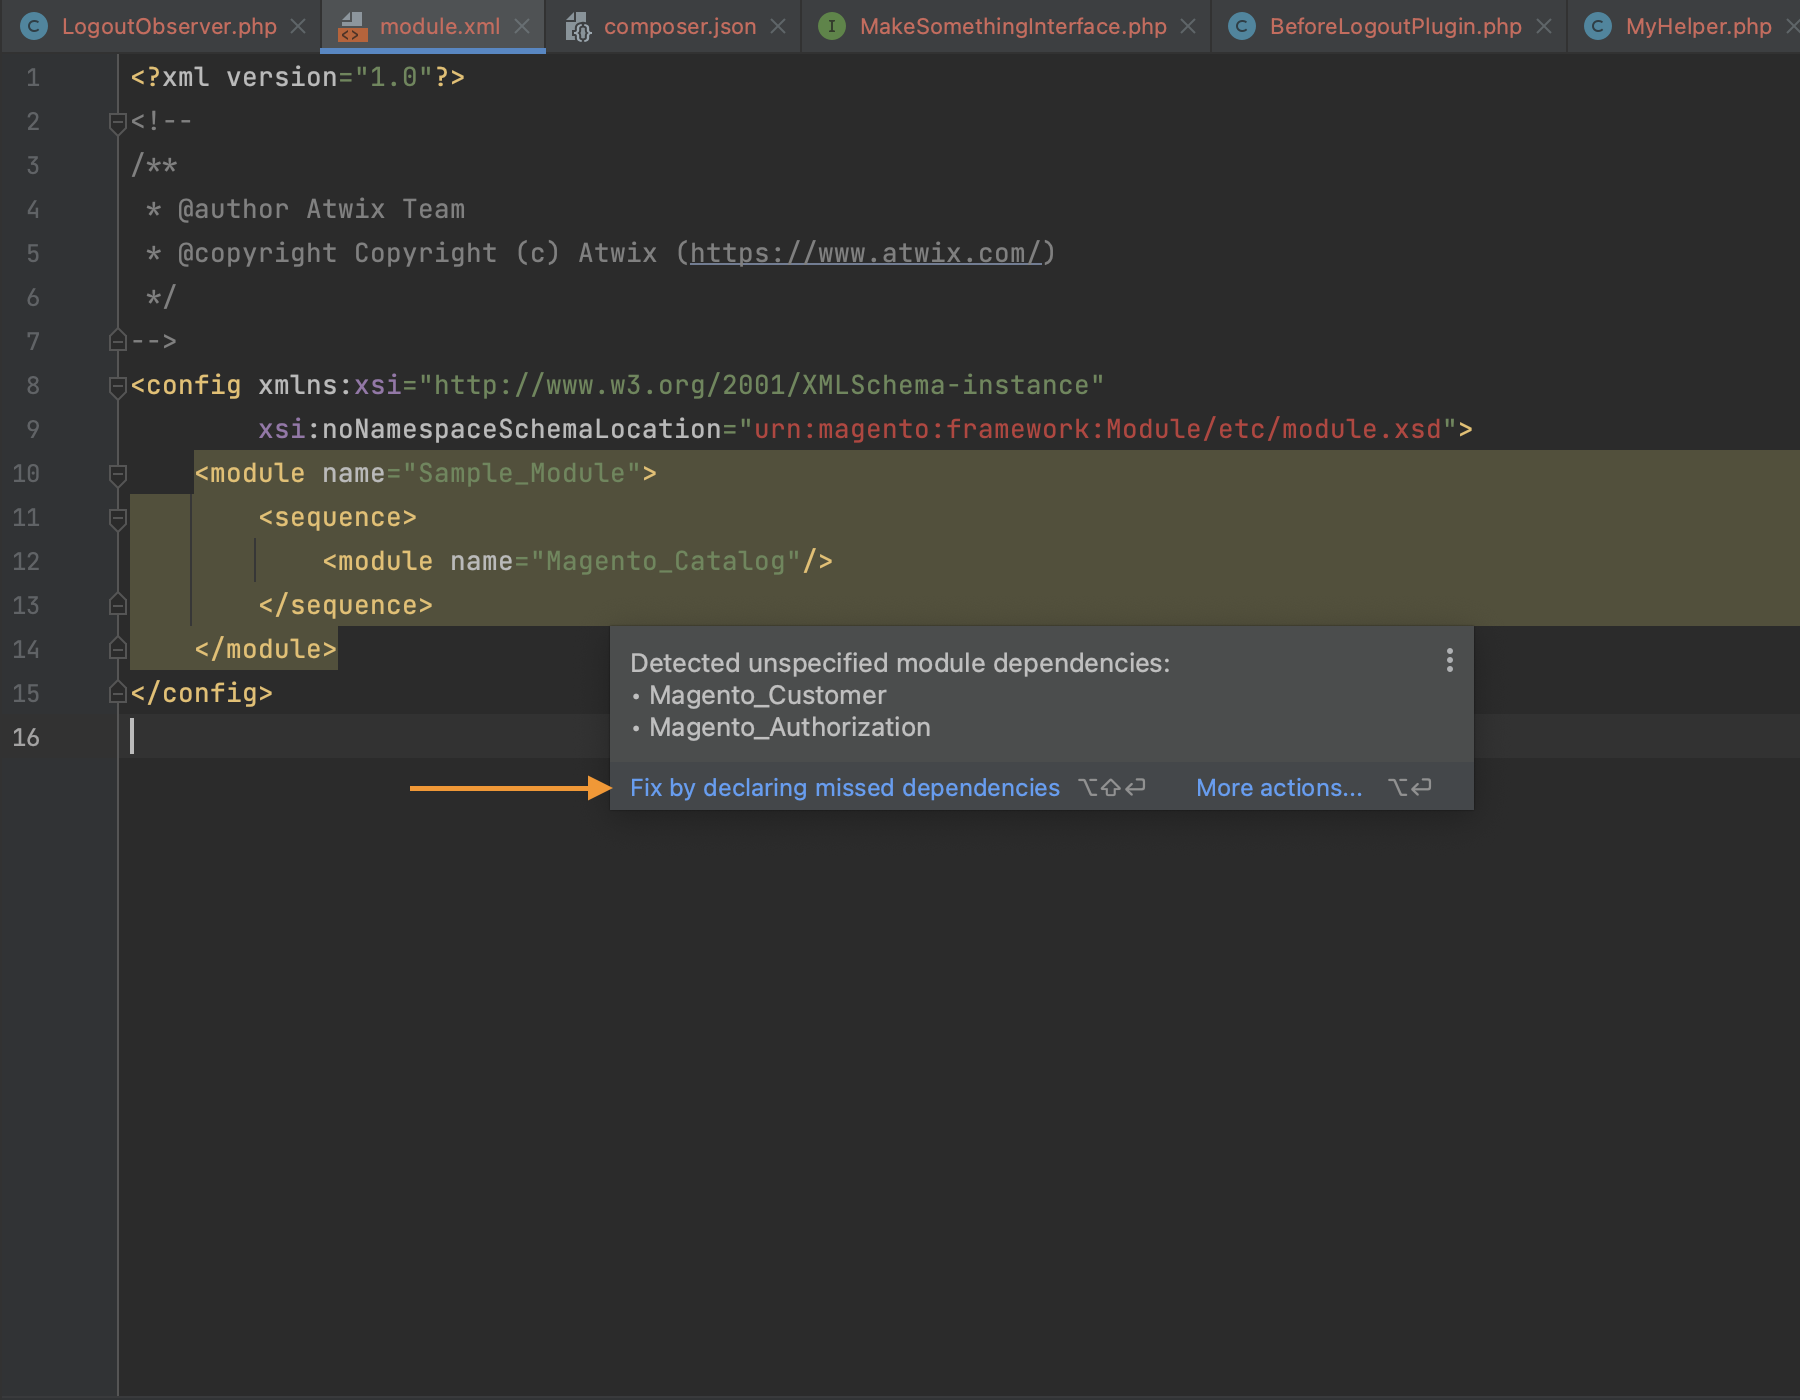
According to the best practice of Magento 2 & Adobe Commerce and general principles of the software architecture, there are two files that should be maintained in the scope of the sequence setup between components: module.xml and composer.json of the module.
The “Analyze used code consistency with the specified module dependencies”
inspection helps to identify unspecified sequence declarations. Two examples below show how the corresponding functionality works for composer.json and module.xml.
.png)

Files-Comparison
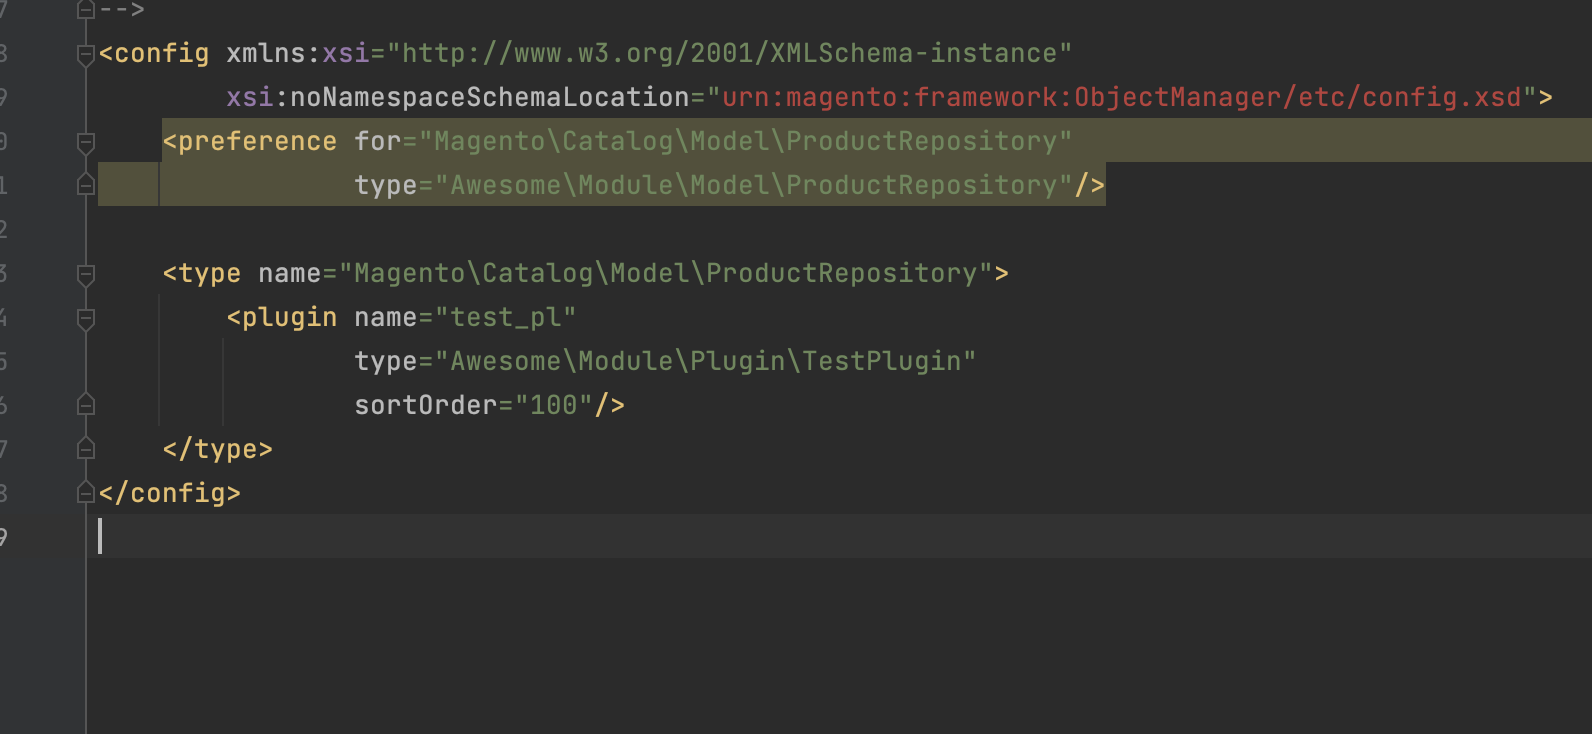
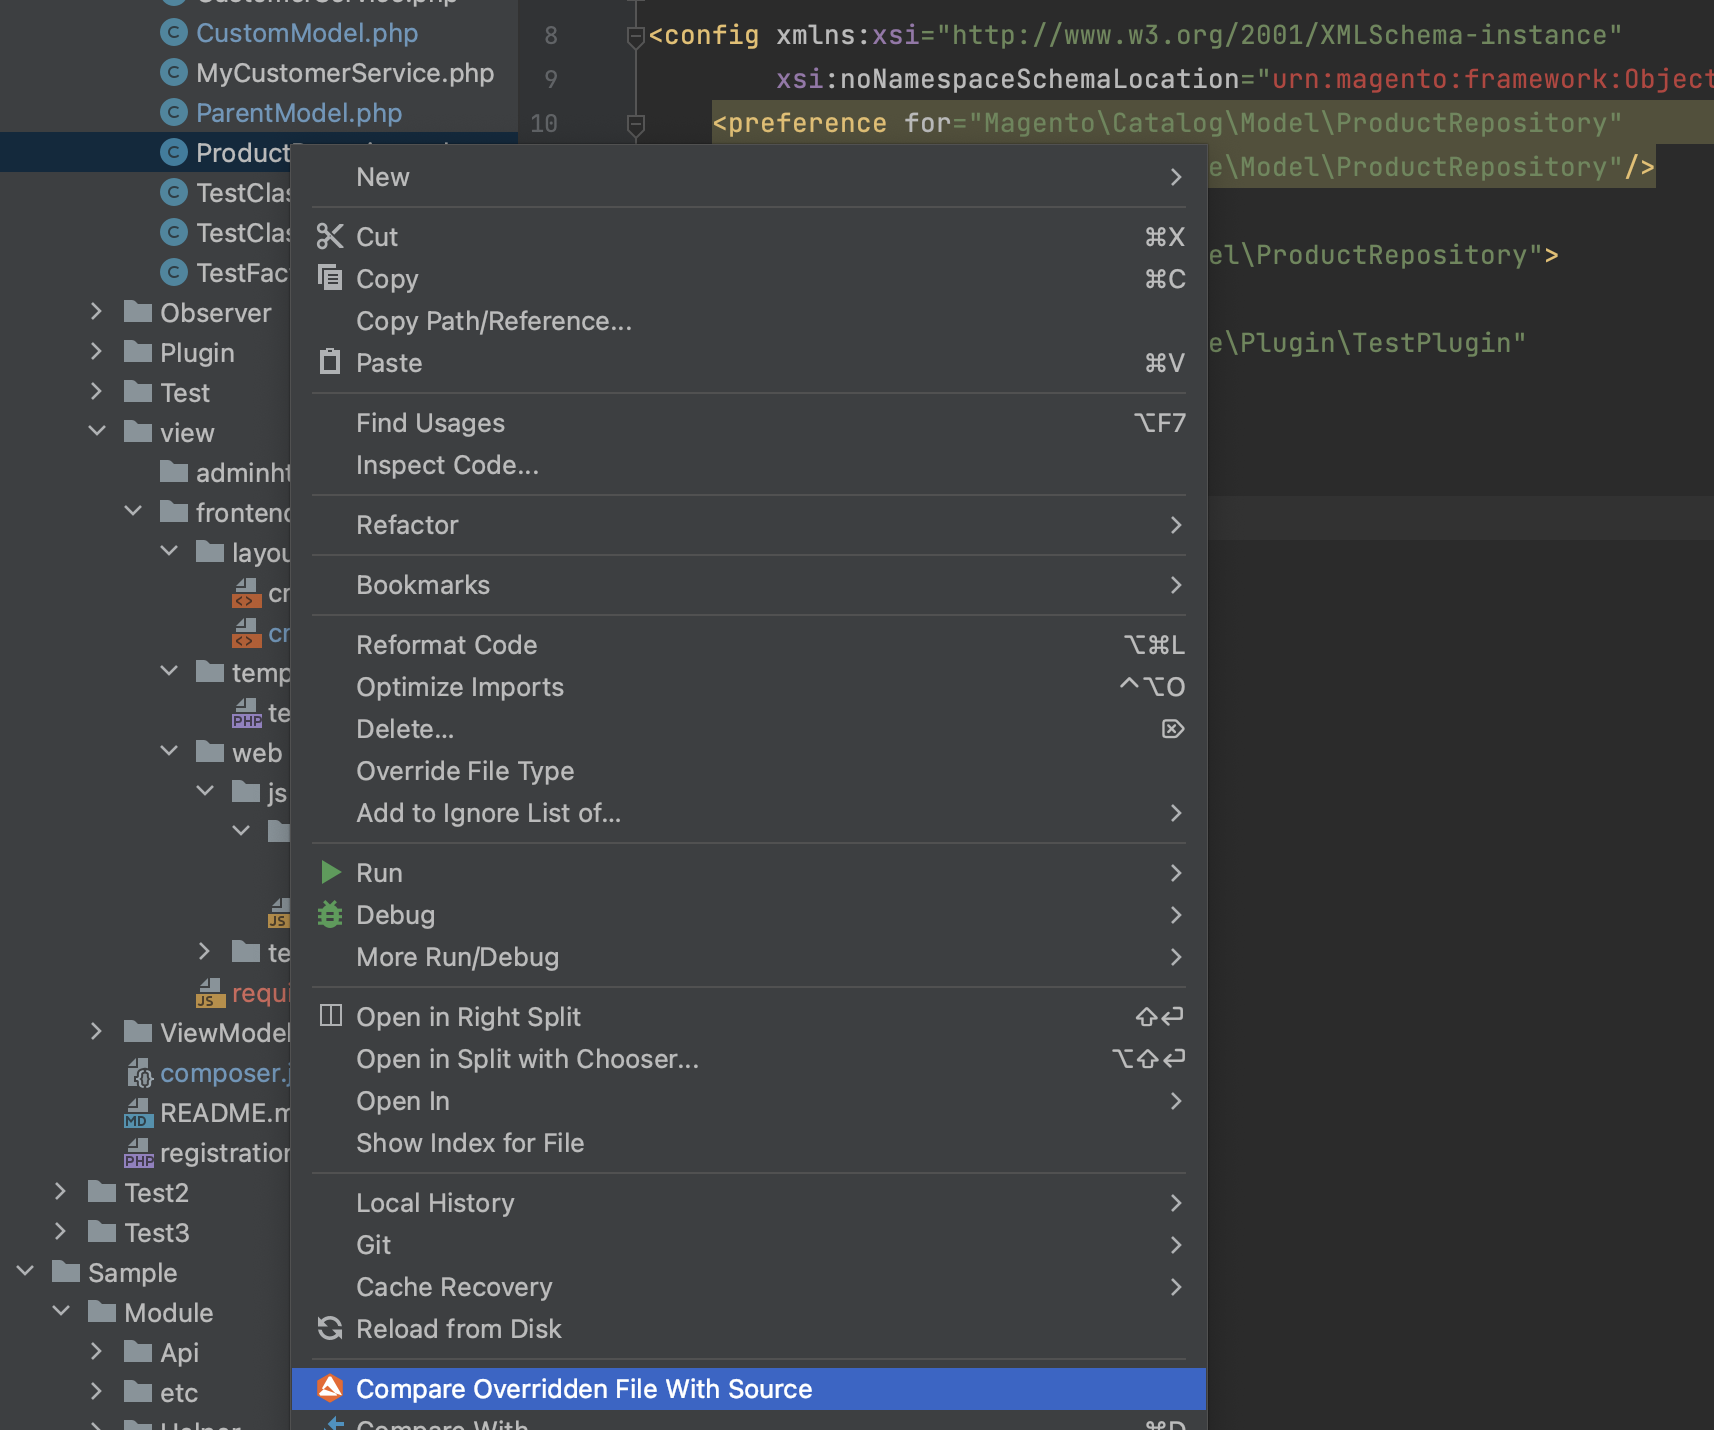
Compare Preference With Original Class
It is possible to compare a class that is a preference with the original class. To do this, call the context menu on the preference class file or be in the preference class. Then choose Compare Overwritten File With Source.
Compare *.phtml templates overridden in the Magento 2 module
One of the common tasks during the project analysis or investigation of errors in templates is to compare differences between *.phtml templates. Having the ability to quickly access the difference between files saves a lot of developers' time.
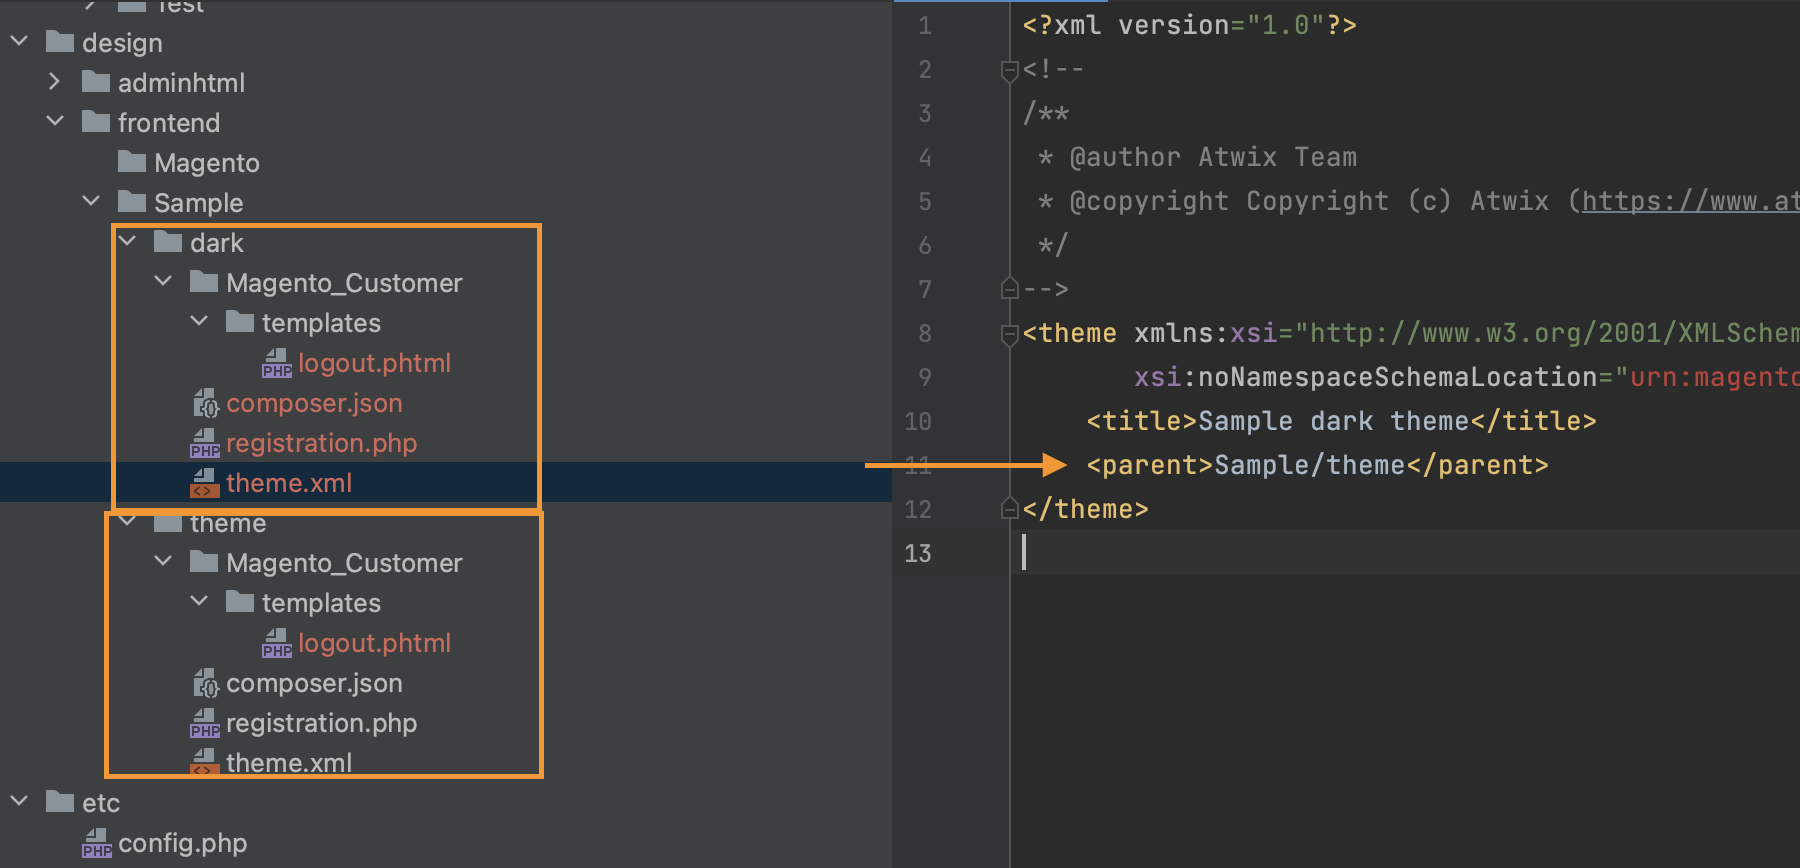
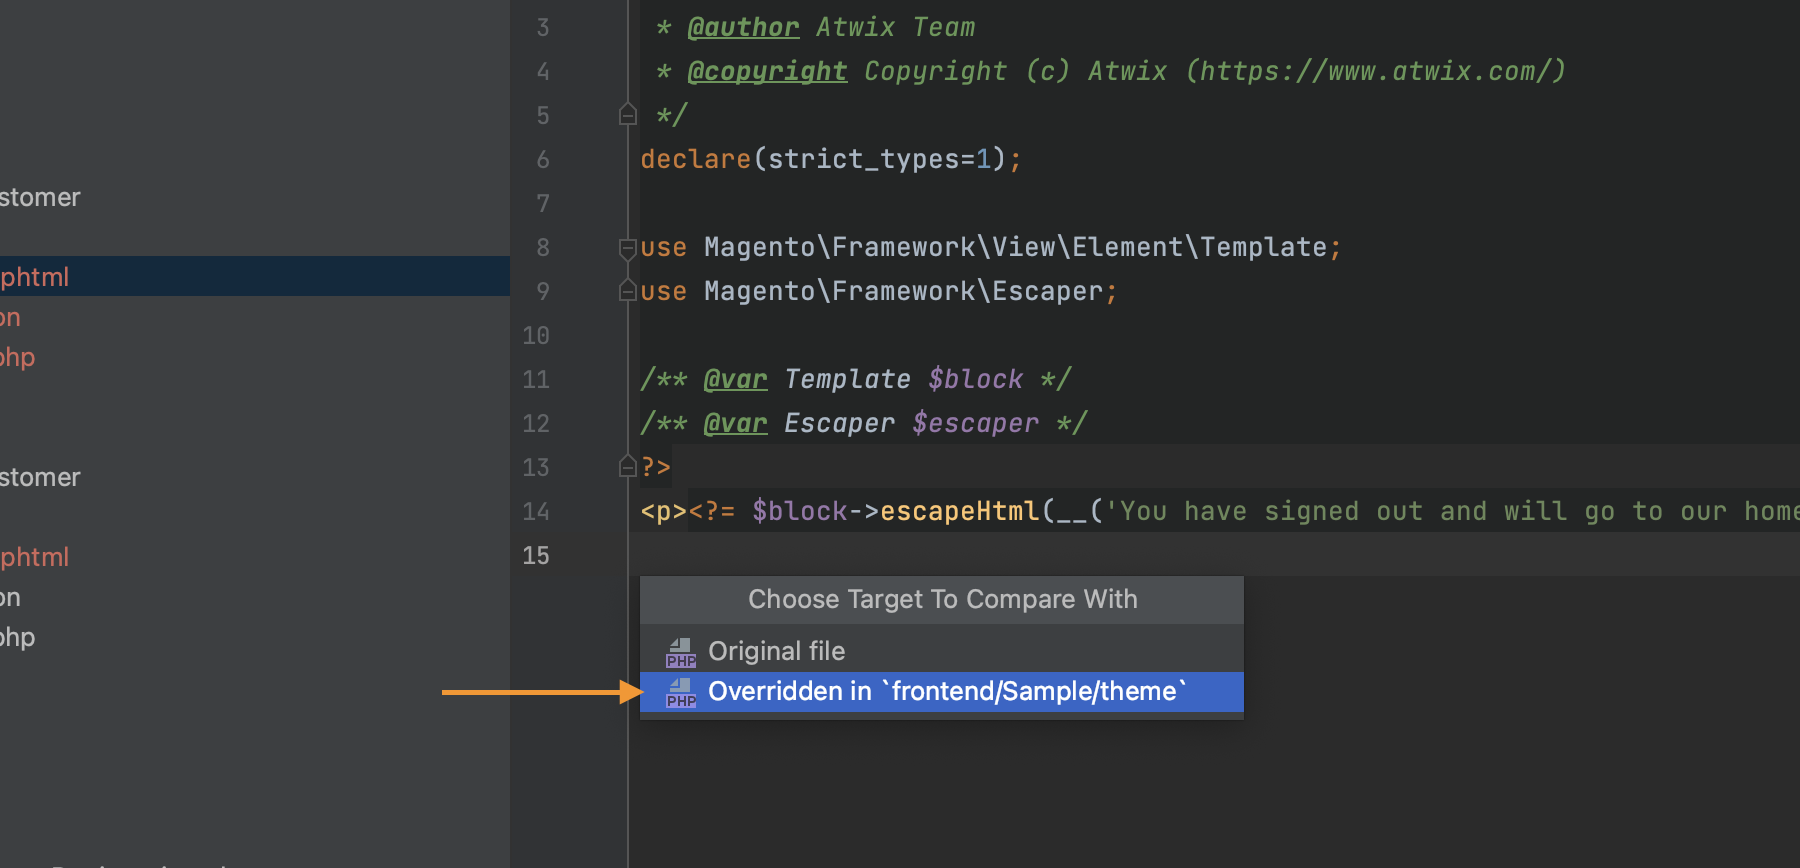
The “Compare *.phtml templates overridden in the Magento 2 module” functionality benefits in the ability to show the difference between *.phtml files based on the
Set the template used by a bloc. In such cases, described functionality identifies the original file automatically and shows the difference.

Compare functionality also represents selection between parent and overwritten theme comparison.
Navigation
Navigation support for phtml templates inside layout files and blocks
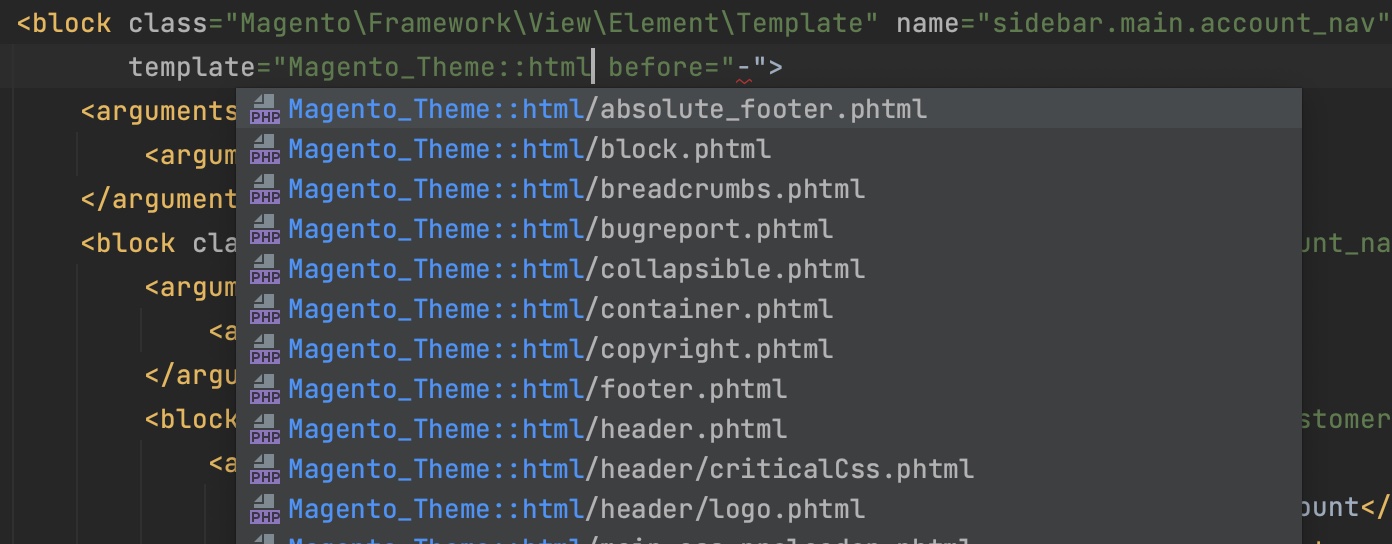
This plugin feature allows engineers to have an auto-completion for templates right from the block declaration in the layout XML files. Along with this, it is a possibility to navigate right from the template file be clicking on its name.
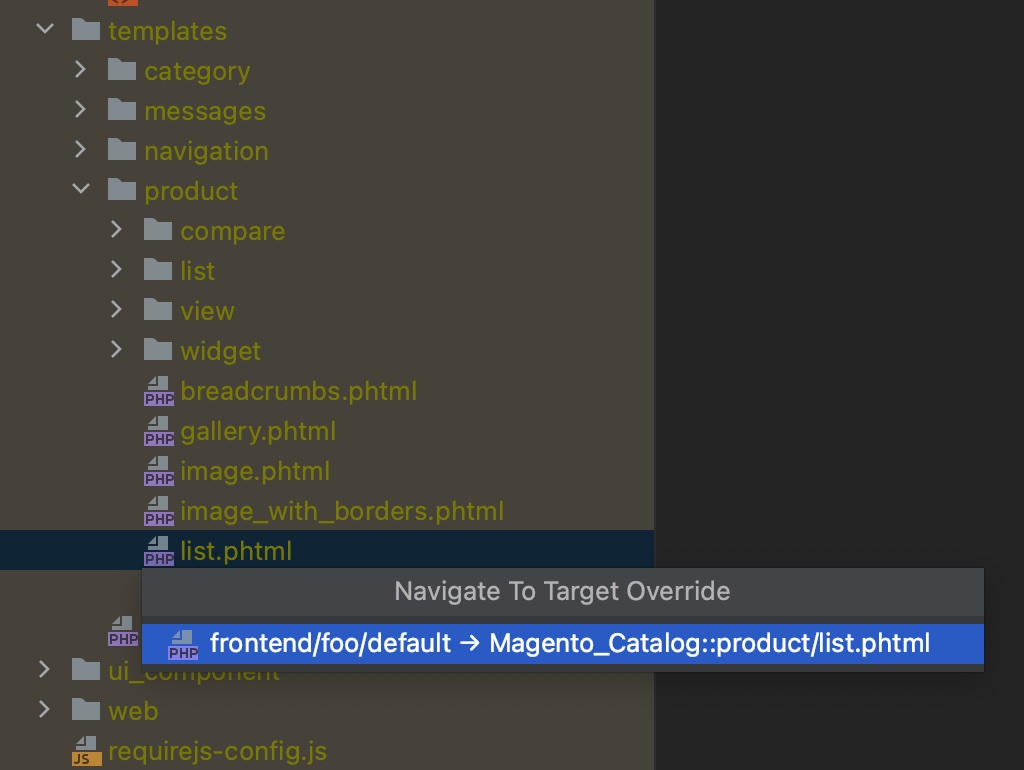
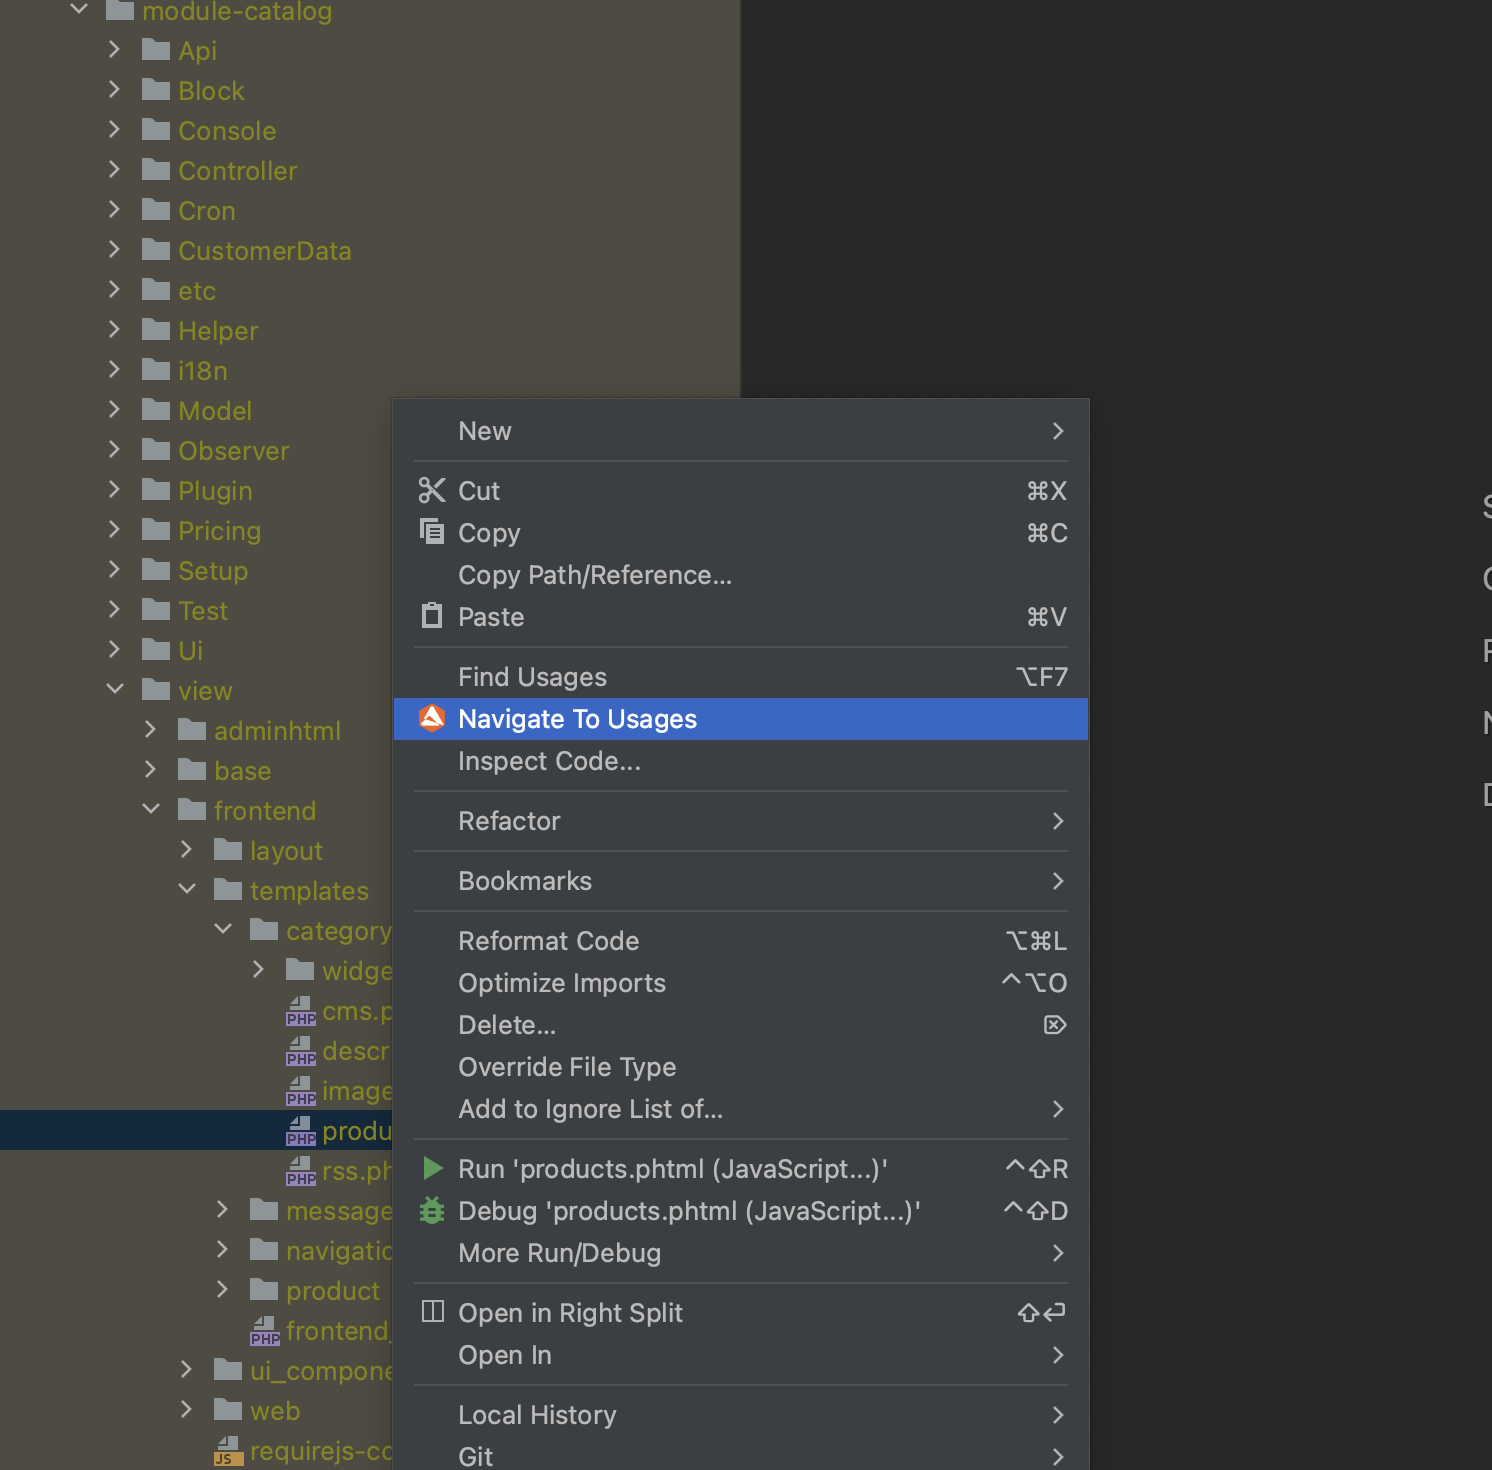
Show template overrides in the editor context action
This feature provides the ability to show template overwrites directly from the file context menu in the PhpStorm which is possible to show with the right click on the file. This feature is valuable for quick access to the file that allows developers to avoid search for the block and then file usage.
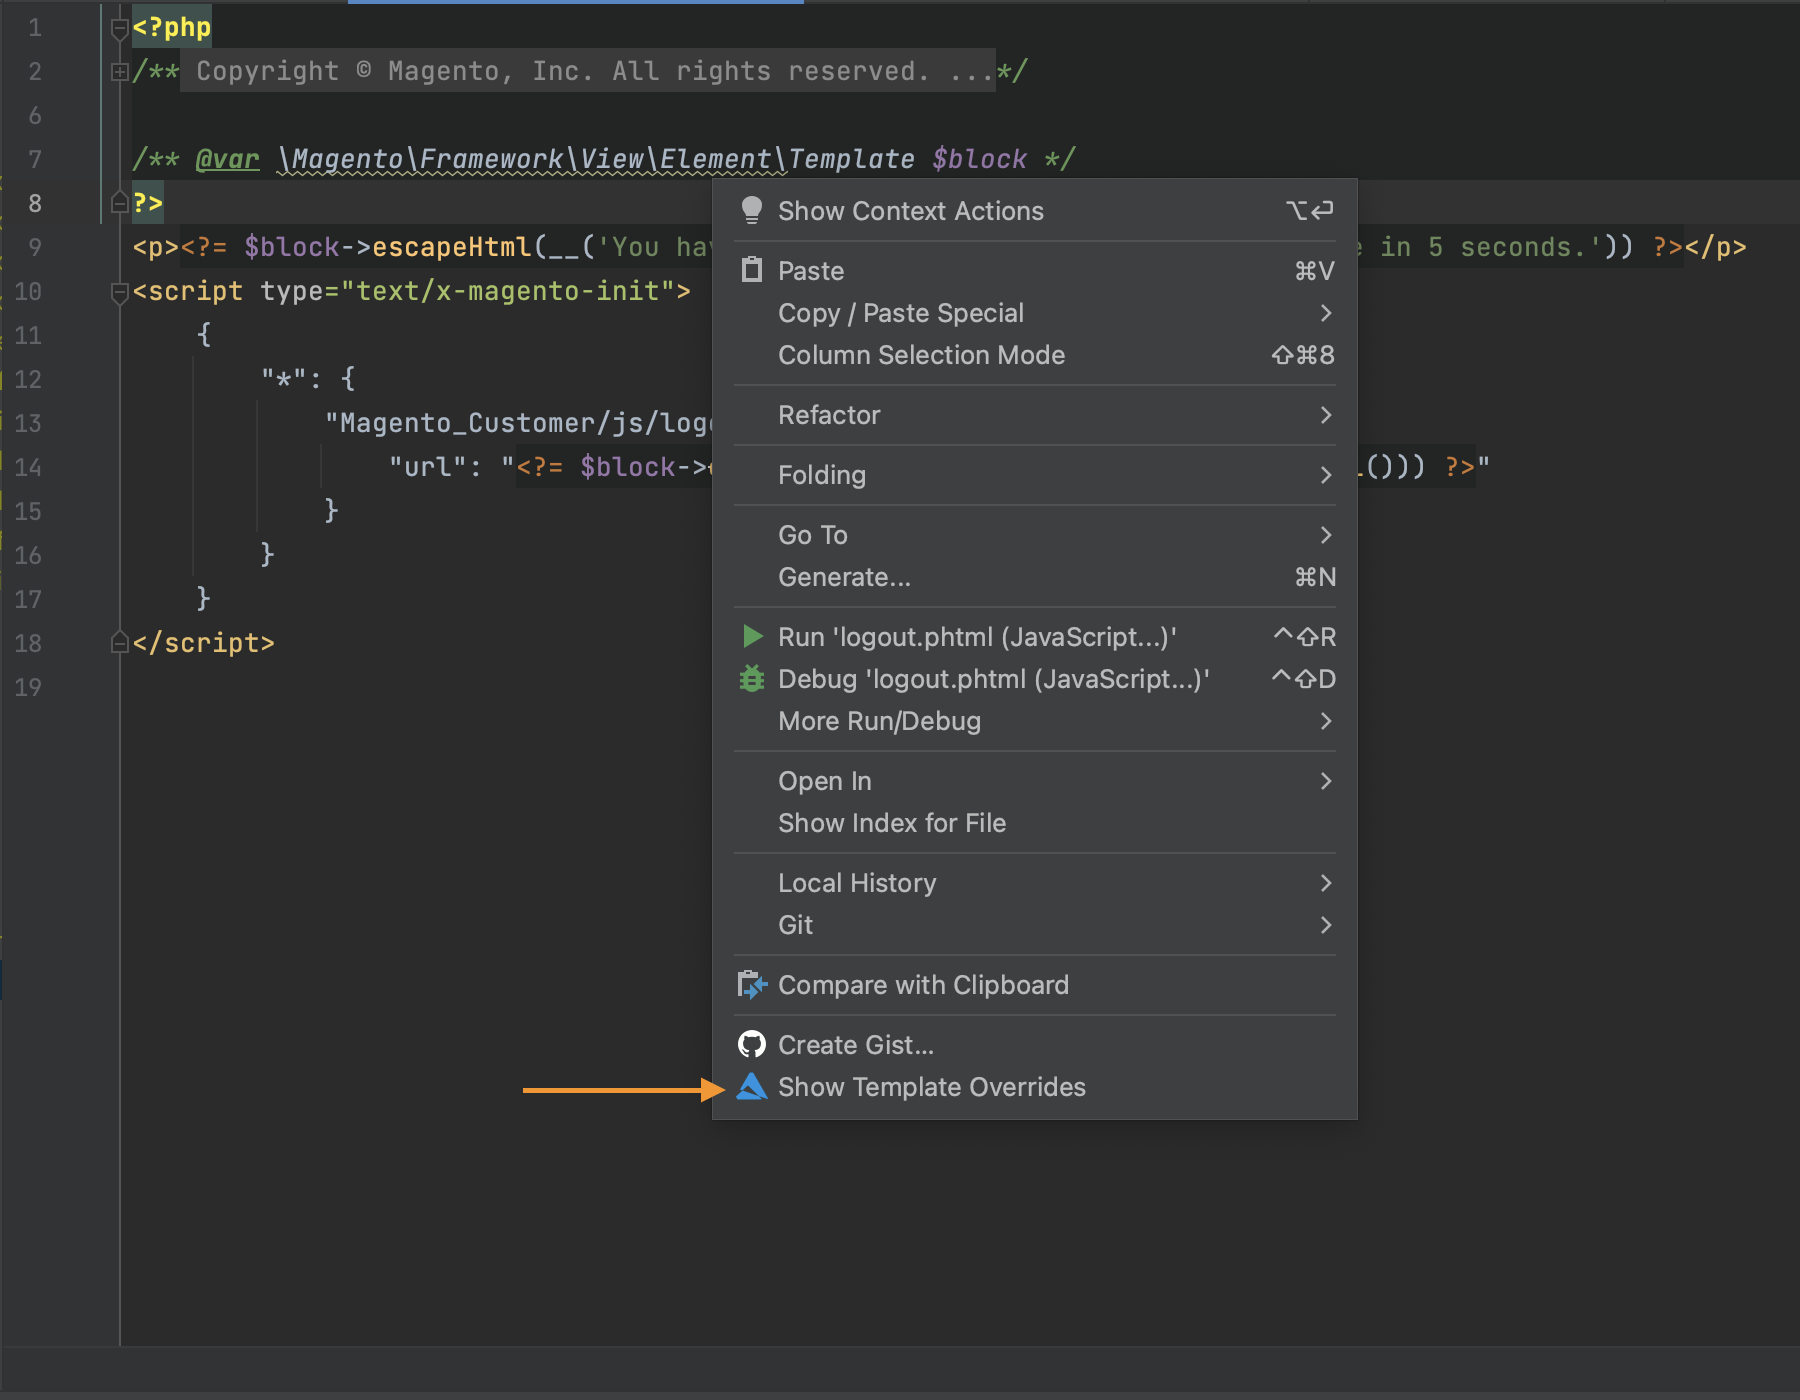
It is also possible to use this functionality from the context menu when it is called from the project navigation tree.

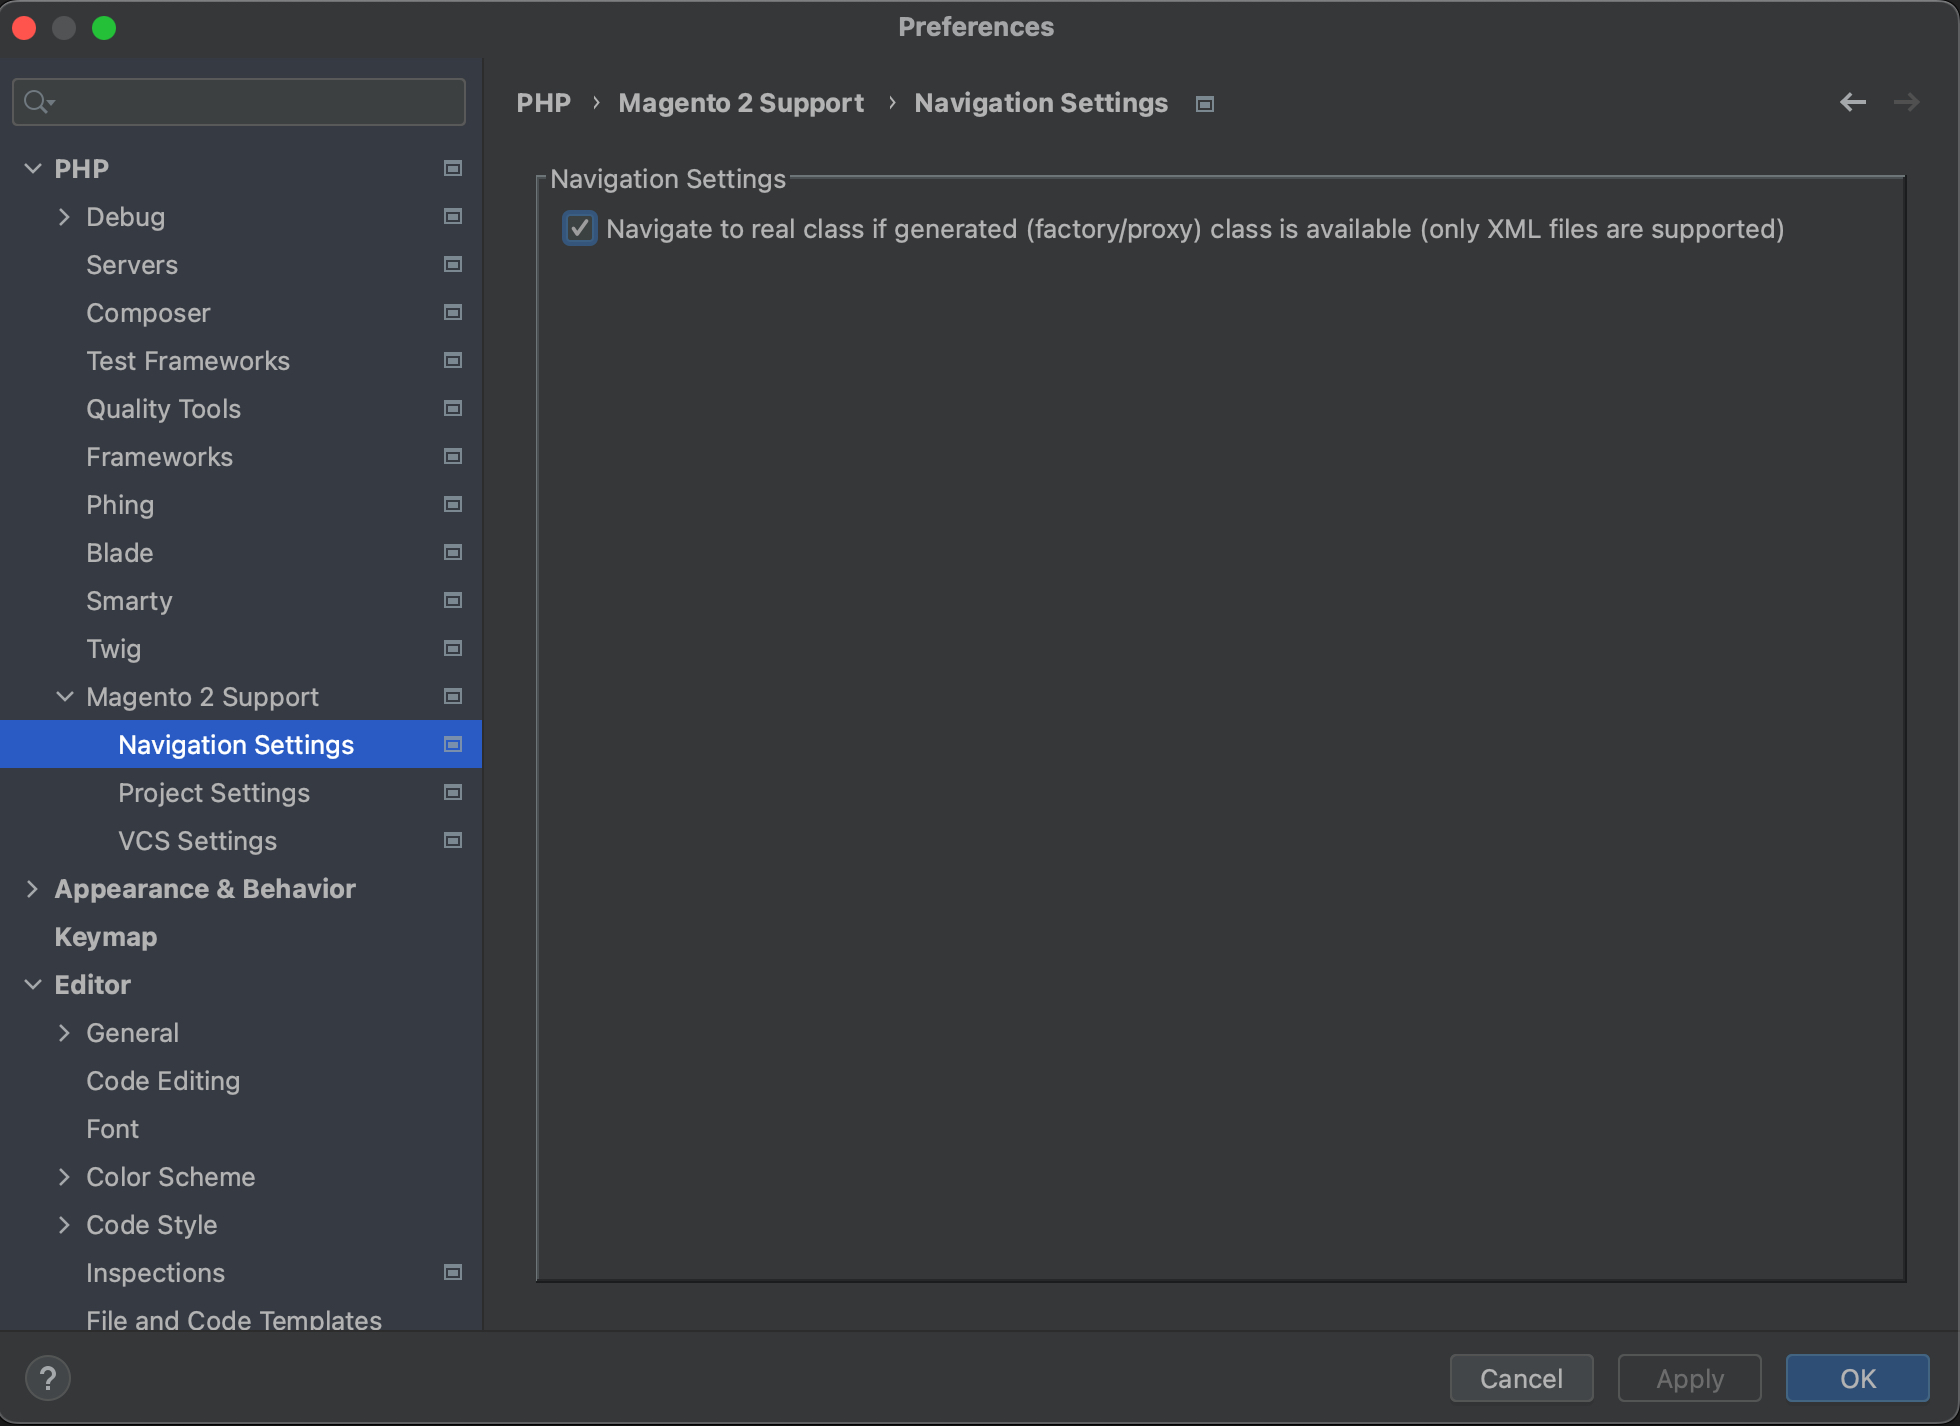
Navigate to Factory and Proxy classes from their declaration in XML files
Better user experience of software engineers is the goal of this functionality. The factory and proxy classes navigation from the XML files leads engineers to the classes directly from the XML. This feature is enabled by default and its setting can be find by the following path Preferences > PHP > Magento 2 Support > Navigation Settings > Navigate to real class if generated(factory/proxy) class is available (only XML files are supported).
Navigate to the class source from its declaration in different XML files
With this functionality it is possible to be directly redirected to the class form XML files. For example, in the di.xml file from the plugin type declaration.

Navigate to the module from the module name in the config.php file
With this functionality developers can quickly access modules from the config.php by their names. Open the config.php file, choose the needed module and click on its name.
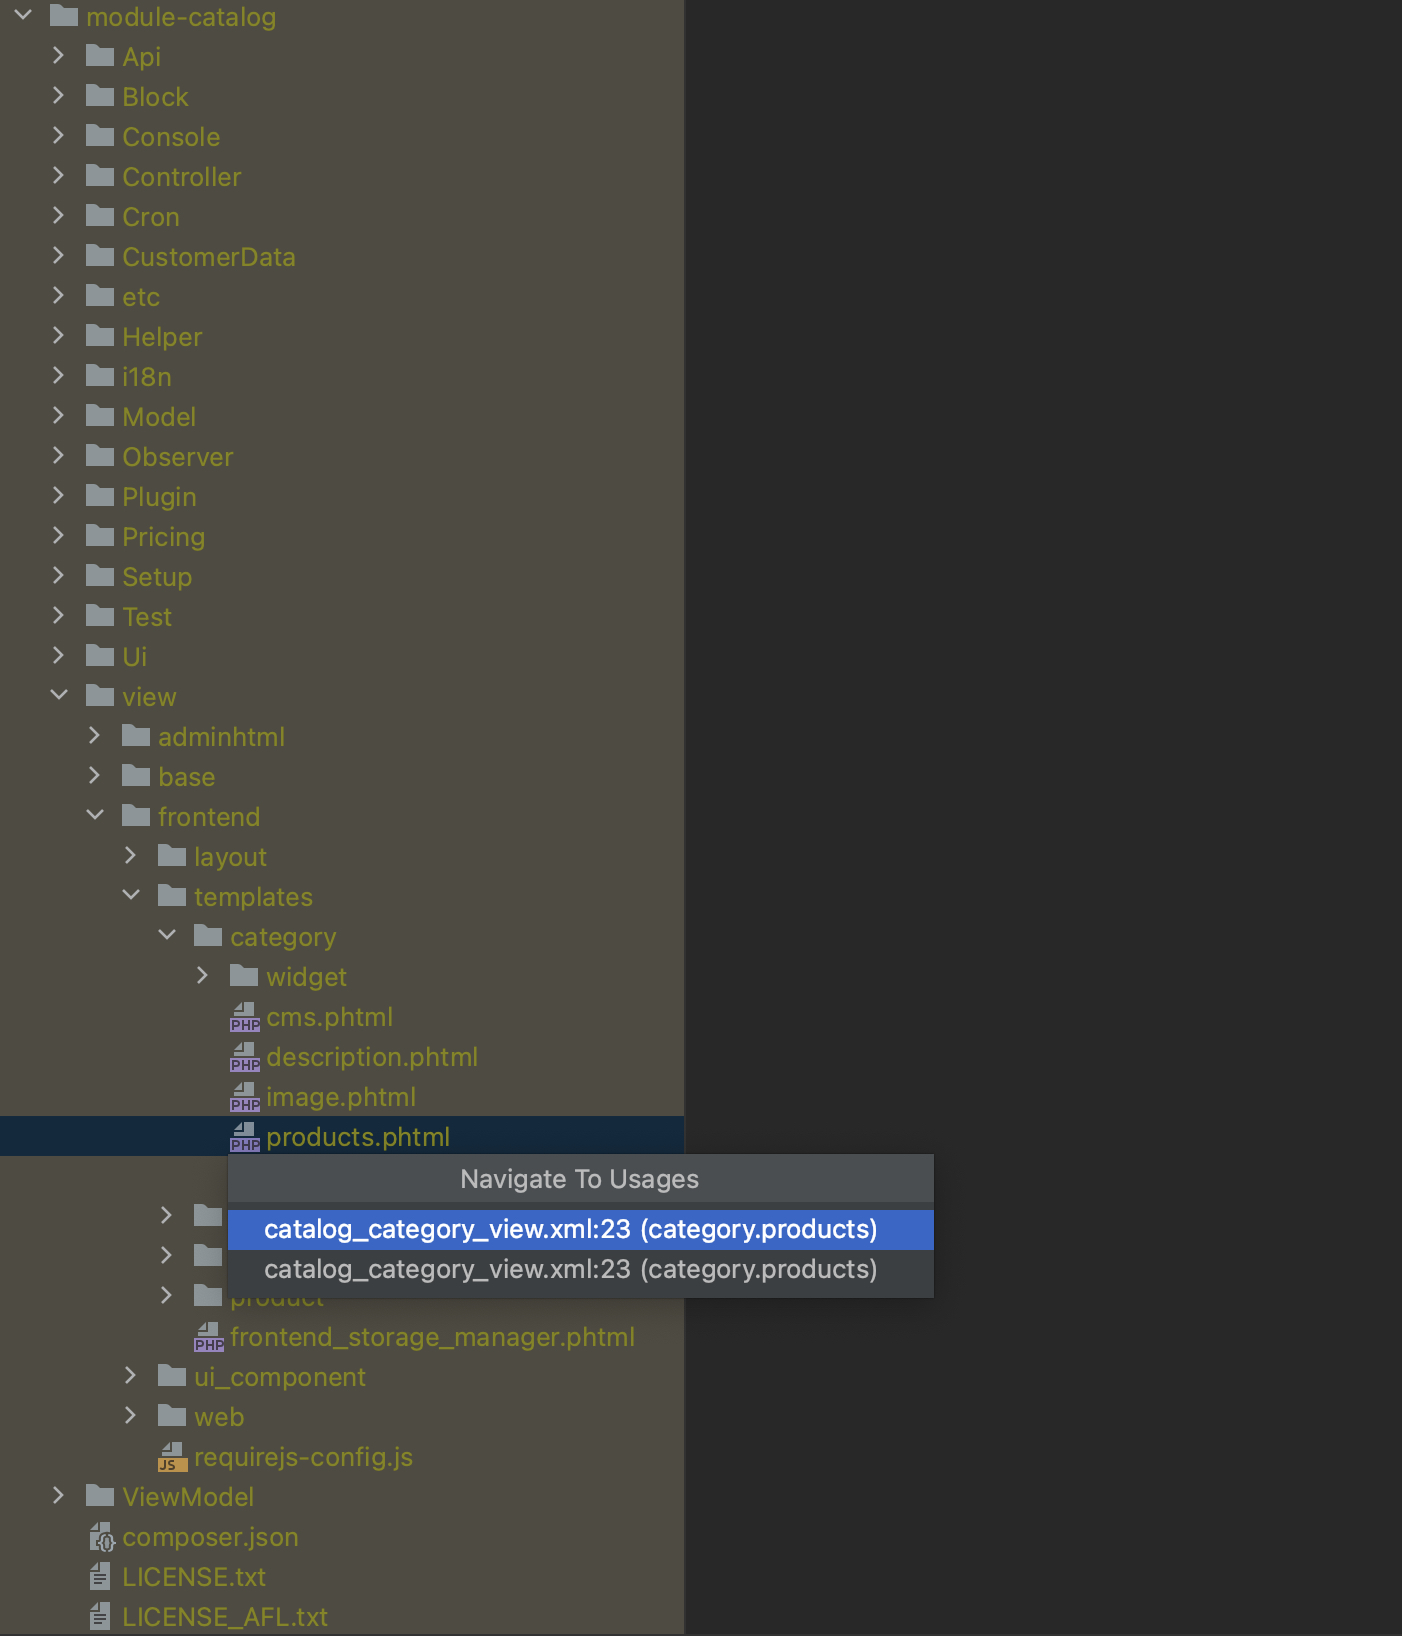
Show & navigate to layouts where corresponding template is used
With this functionality, engineers can easily access XML layouts where templates are using. To navigate from template to layout call the context menu on the corresponding template.
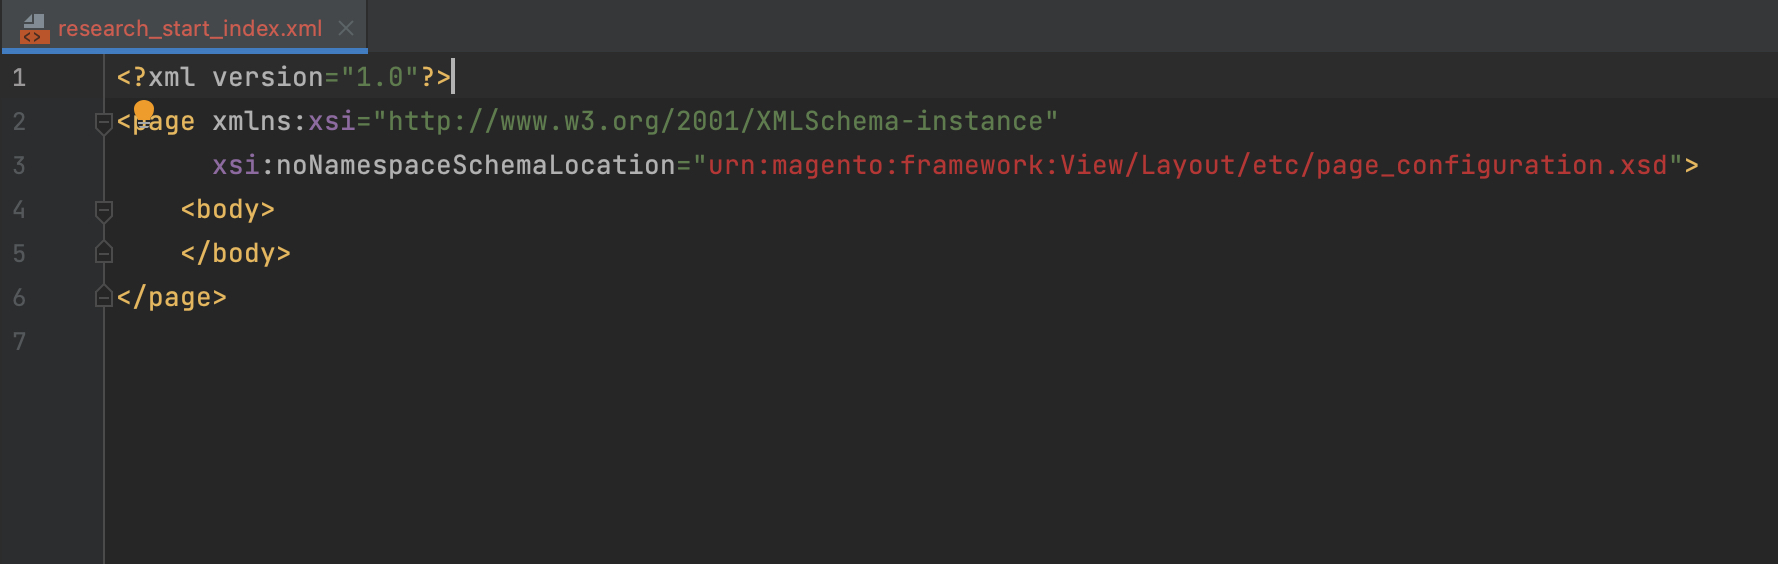
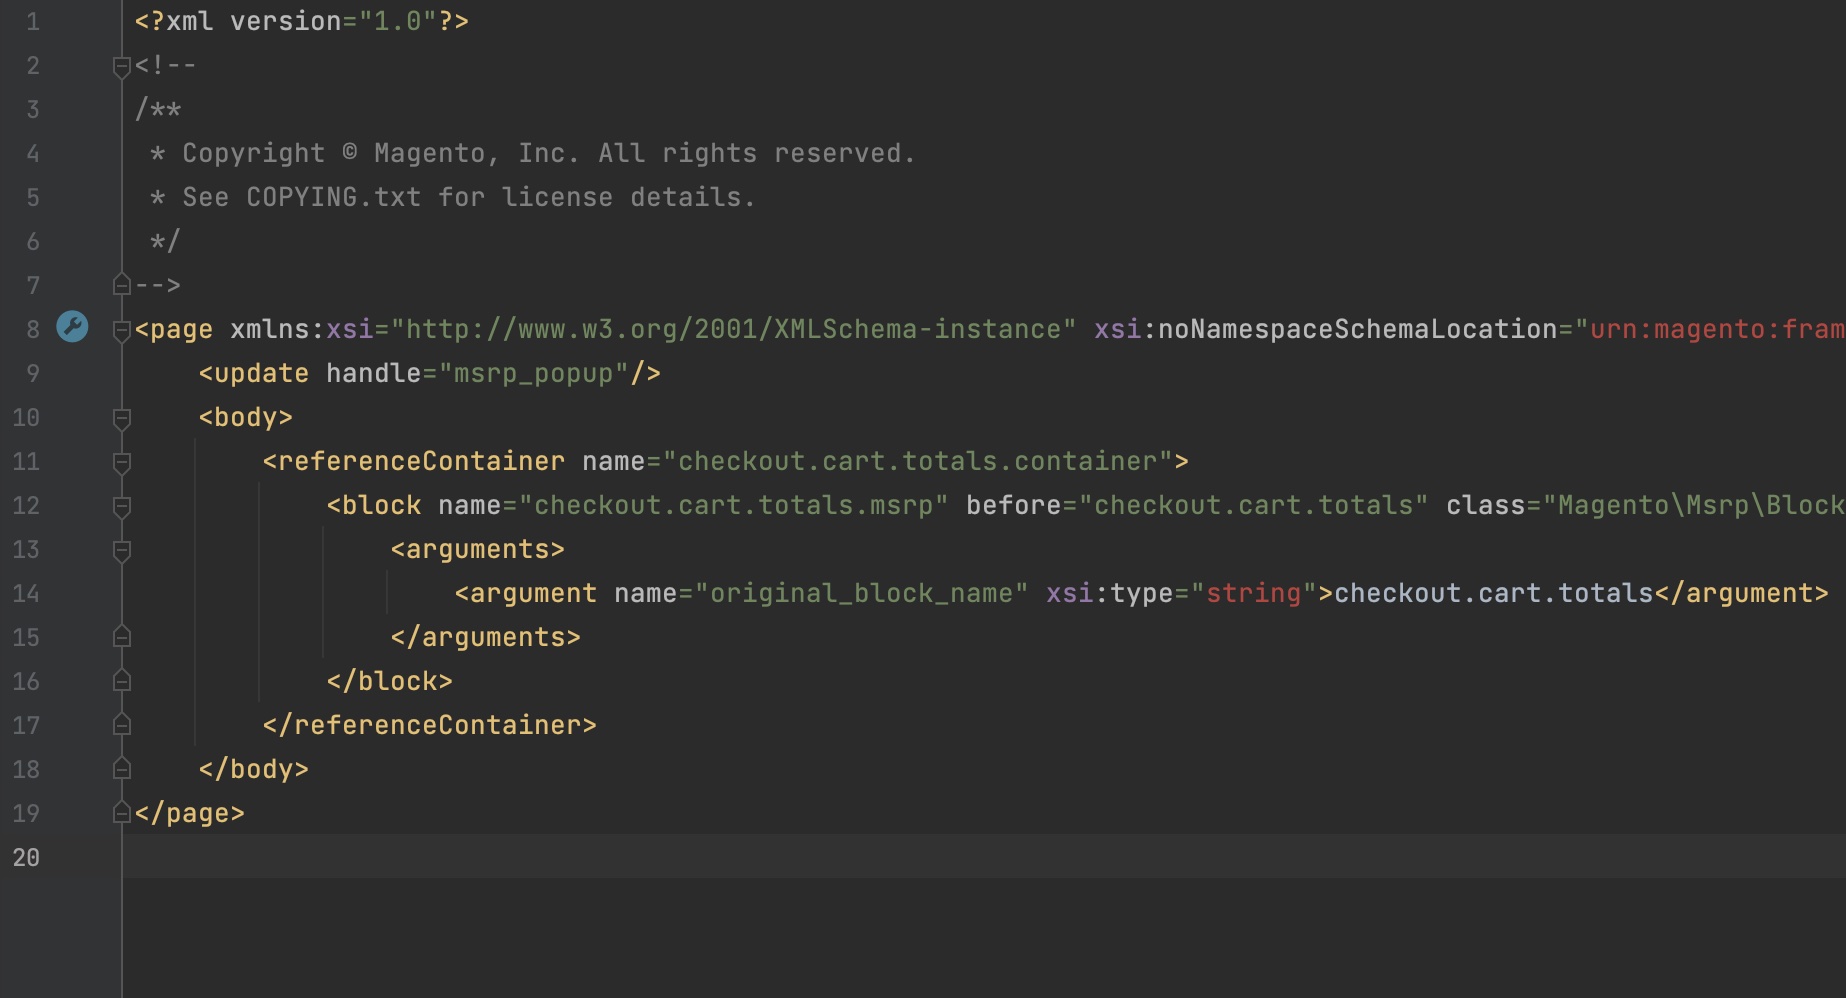
Navigate from controller to layout and vice versa
From the controller class it is possible to be navigated to the corresponding layout by clicking on the Navigate to layout(s) icon left to the controller class name.
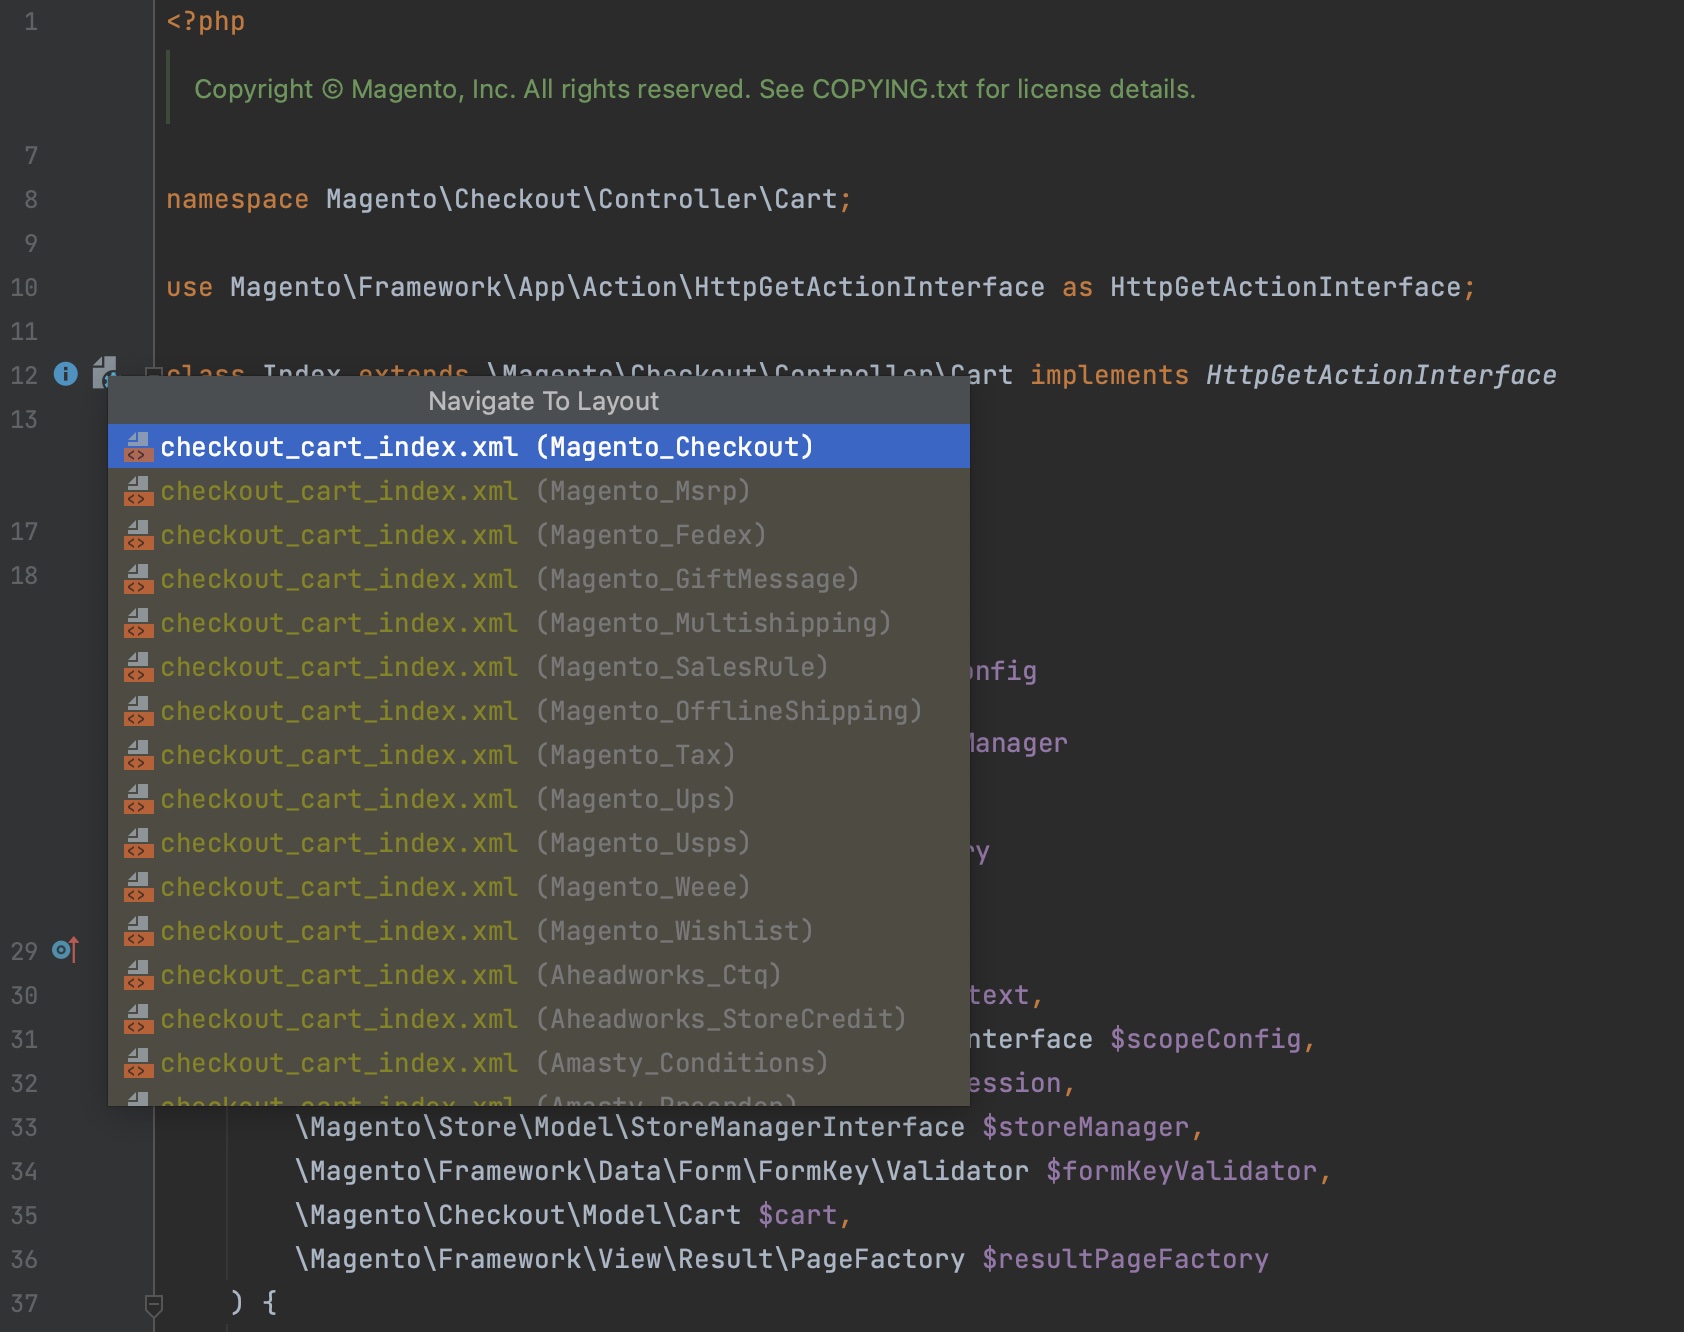
To navigate from layout to controller do the same actions to the icon left to the first node of the layout XML file.
Navigate to the module from the sequence tag
With this functionality, engineers can navigate from the module.xml sequence tag to the corresponding module in the project tree.
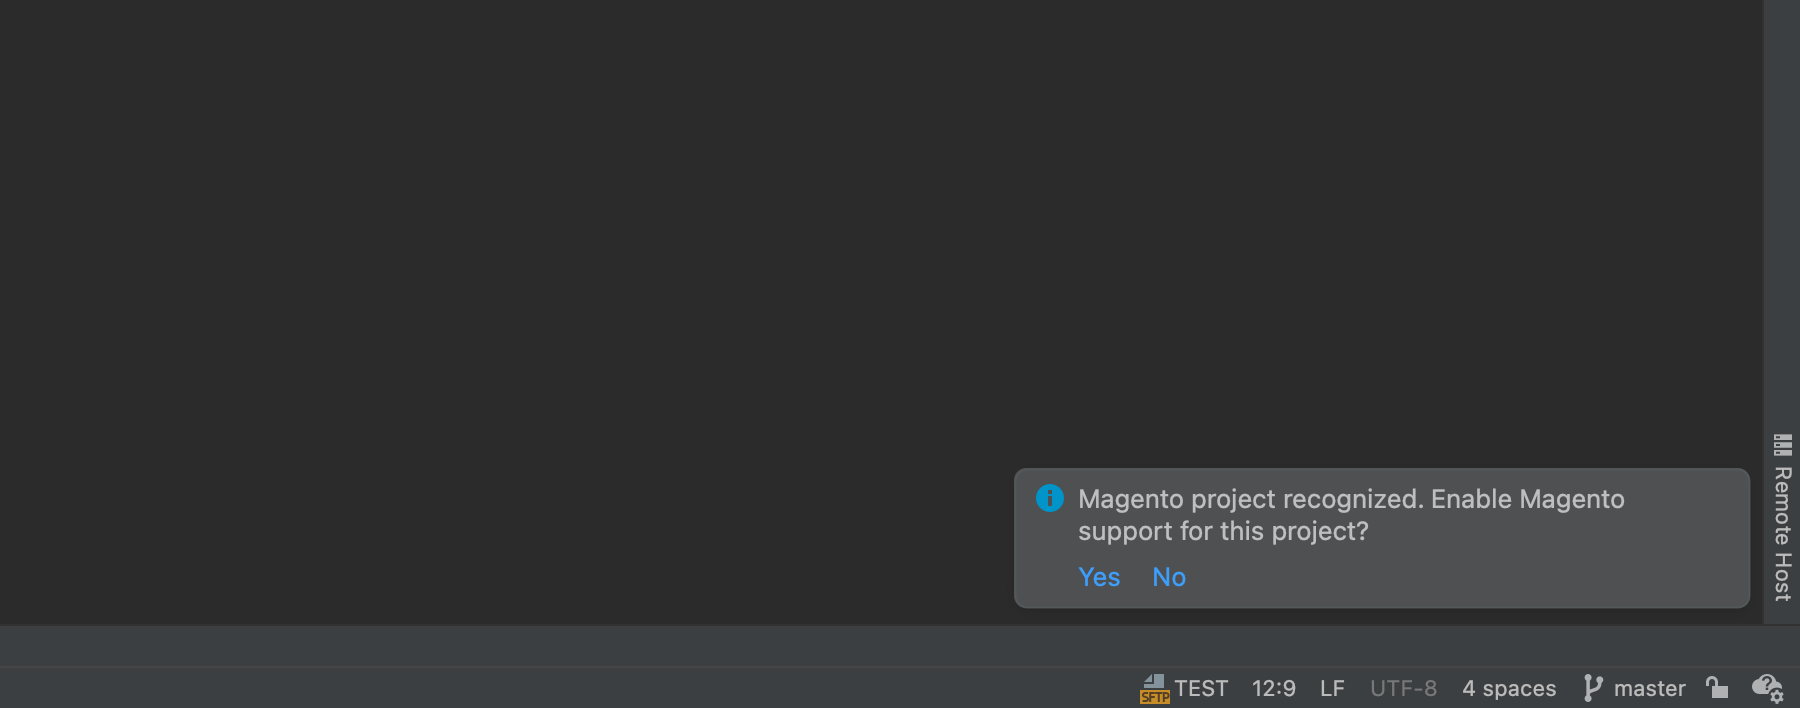
Auto-detect Magento 2 / Adobe Commerce installation path
The plugin can automatically detect that the current project is Magento 2 or Adobe Commerce based and define its installation path. When the plugin detects, it shows the corresponding notification, as on the screenshot below.
Custom code and design directories support
As an application-level dependency manager, the composer provides excellent flexibility for project component structure. The prominent feature is the ability to use different types of code sources through the repository concept. Composer allows engineers to add the local directory with the repository path type.
Described functionality in the paragraph above is one of the possible way of components organisation in Magento based projects. With the "Custom code and design directories support" functionality, engineers get full functionality support for custom directories: inspections, module creation options, navigation etc.
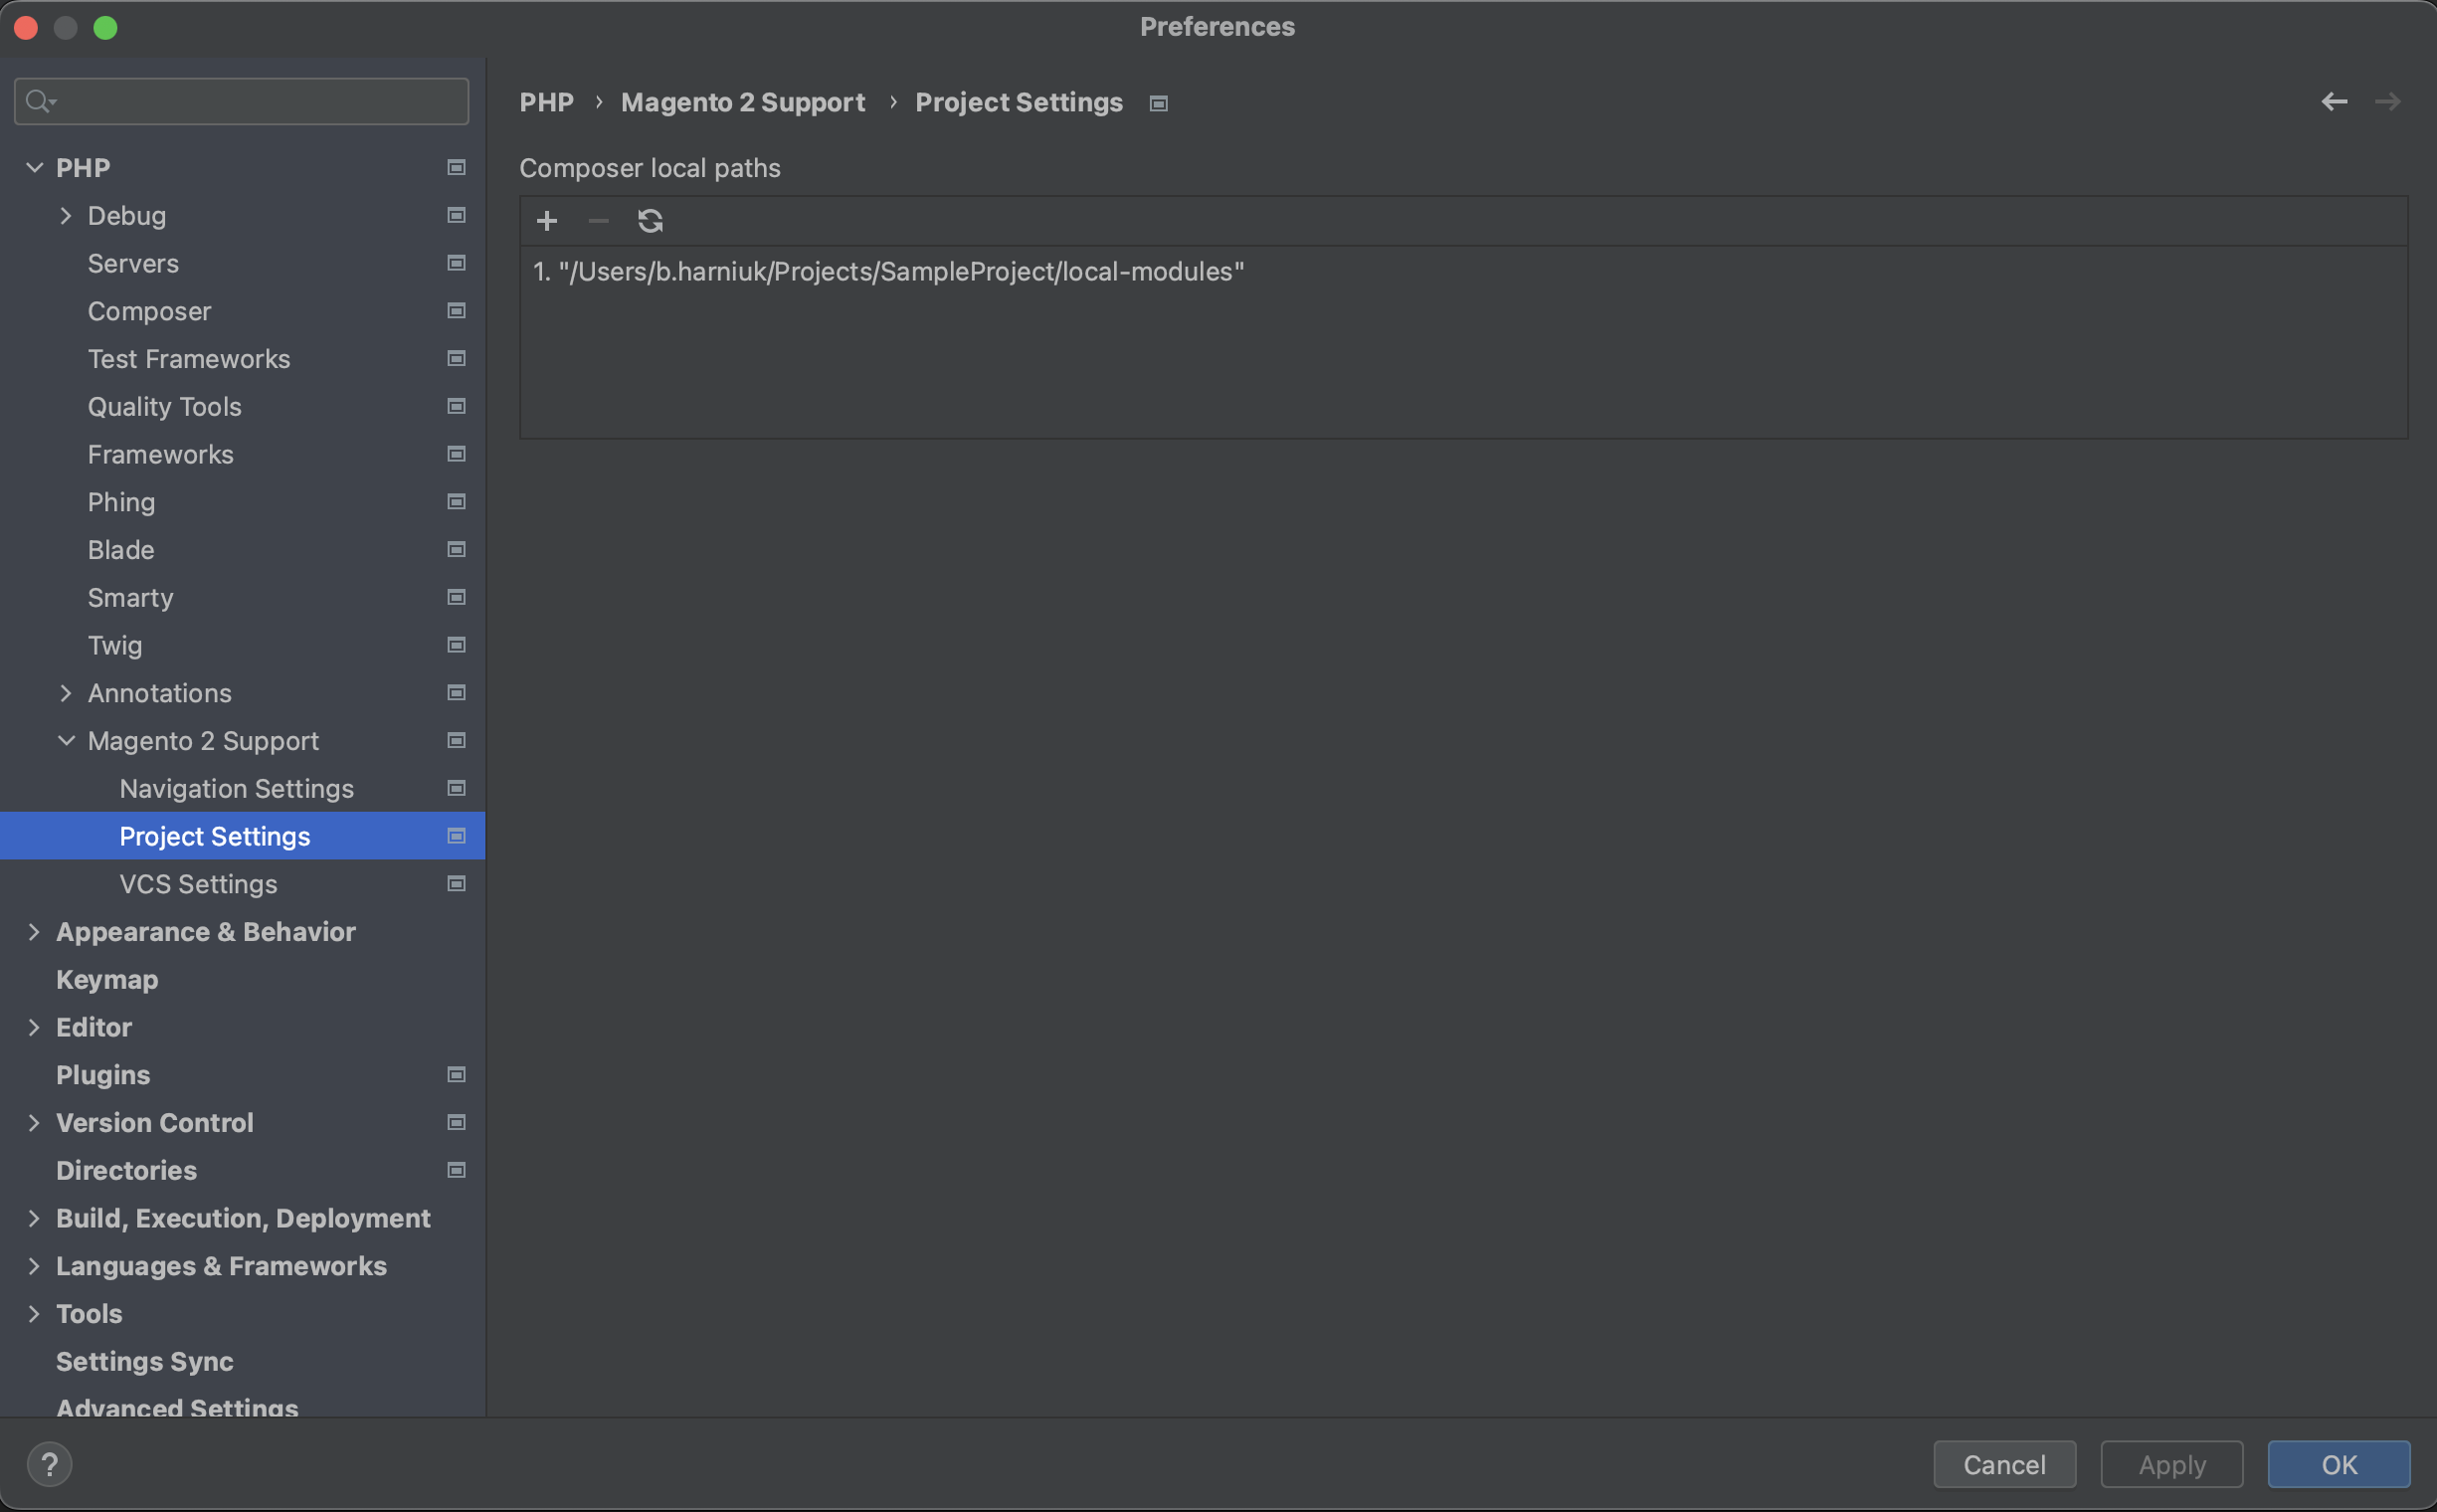
The plugin automatically detects custom code and design directories defined in composer.json with the path type and updates the plugin's configuration settings. The following path can find the configuration setting responsible for the custom directories path keeping: Preferences > PHP > Magento 2 Support > Project Settings > Composer local paths. Automatically detected paths are represented in the grid. You can manually add, edit or remove paths.
Components elements generation
Create new Magento 2 module/theme action
The plugin provides functionality for the new Magento 2 module generation. A new module can be created on the vendor level if it already exists. Or vendor namespace can also be initiated during module generation. To run module generation on the vendor's level, choose in the navigation tree necessary vendor, call the context menu on the selected vendor folder and choose the New > Magento 2 module.

In the appeared pop-up define the module's name, and description and, if needed add dependencies. To add dependencies click on the plus symbol in the Dependencies section. In the pop-up use the search field for modules search or scroll the list. To select a module and add it as a dependency, click on it in the list of modules and be sure that it is selected in the search field. This is a required step because this is the standard behaviour of the search form in PhpStorm IDE.

When all data is set, press the OK button to create a new module. The module created with the help of the described functionality has etc/module.xml, registration.php, README.md, composer.json

The same approach is used for theme generation. The main idea is to create a basic theme skeleton. To do this select the theme folder under the design directory, call the context menu on it, and the New > Magento 2 theme click.
.png)
In the appeared pop-up the theme the basics should be configured: vendor, name and parent theme.
.png)
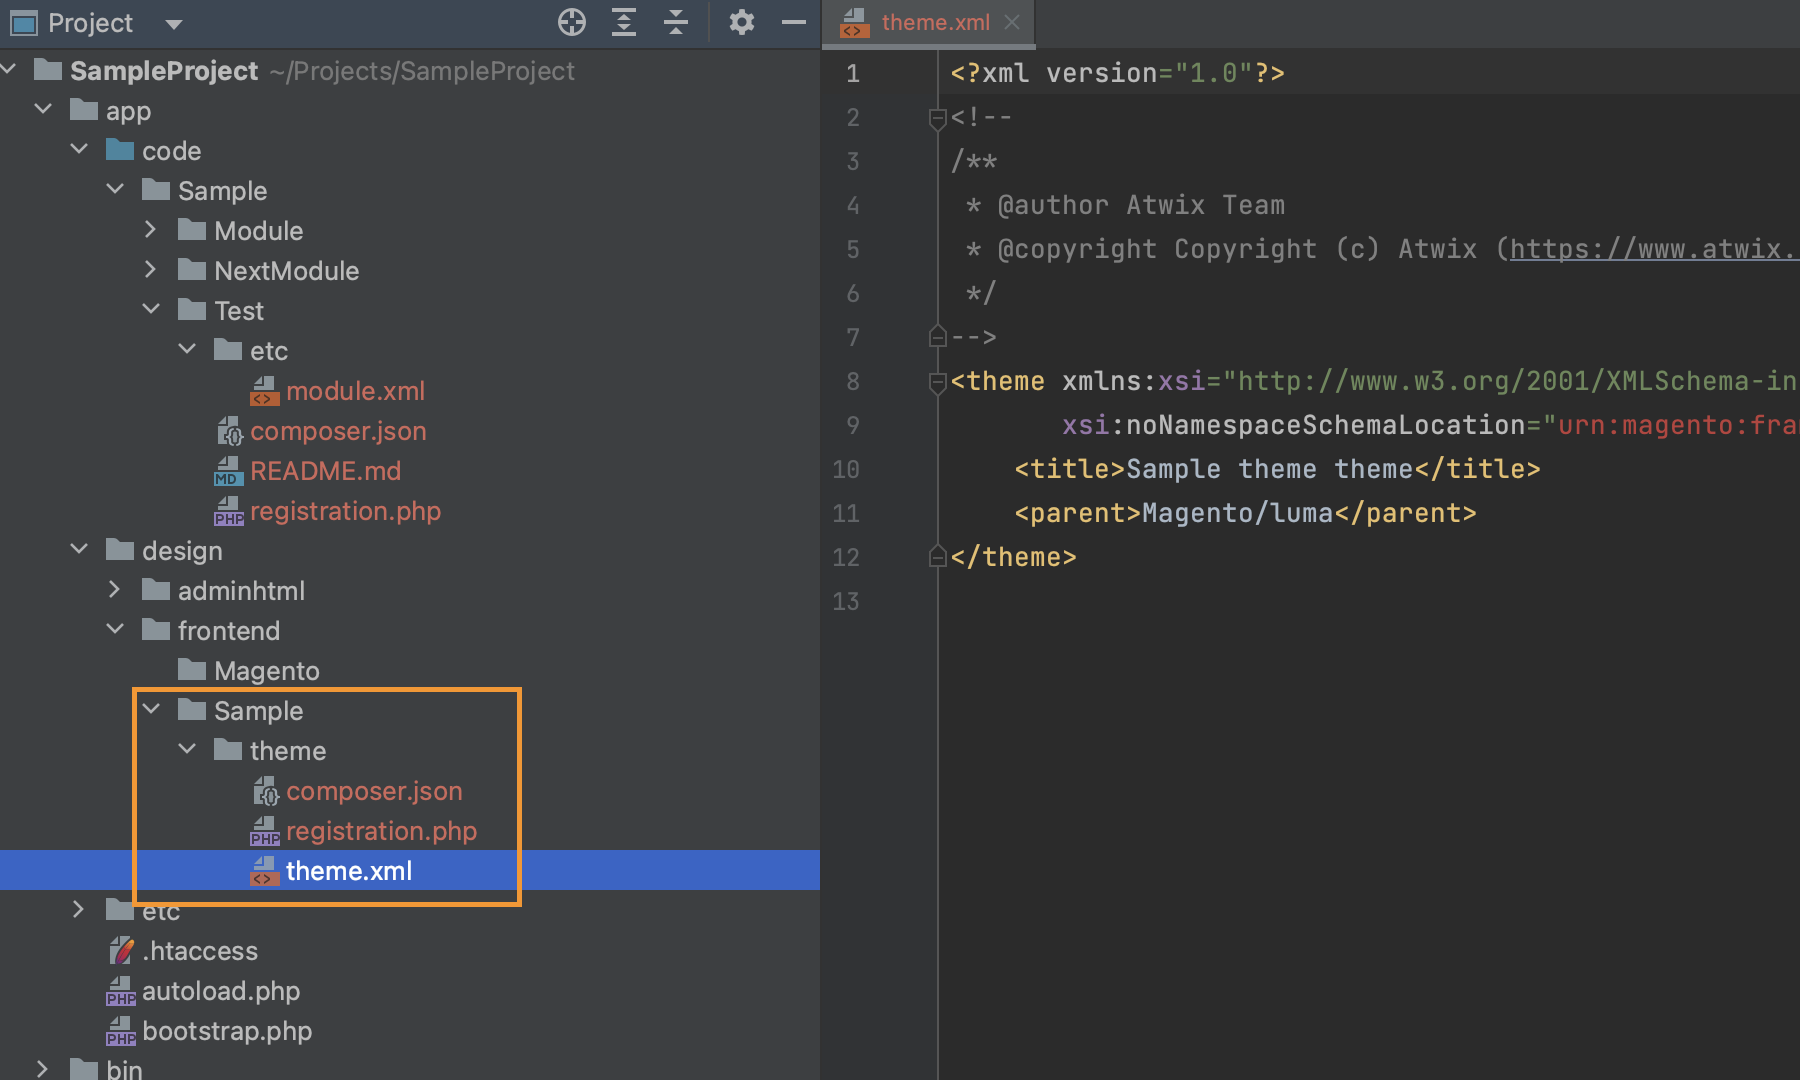
After pressing the OK button a new theme is going to be created with the following files: composer.json, theme.xml, registration.php
Inject copyright into the configuration files
This functionality allows engineers to automatically add copyright text into the module's configuration files such as module.xml, di.xml etc.
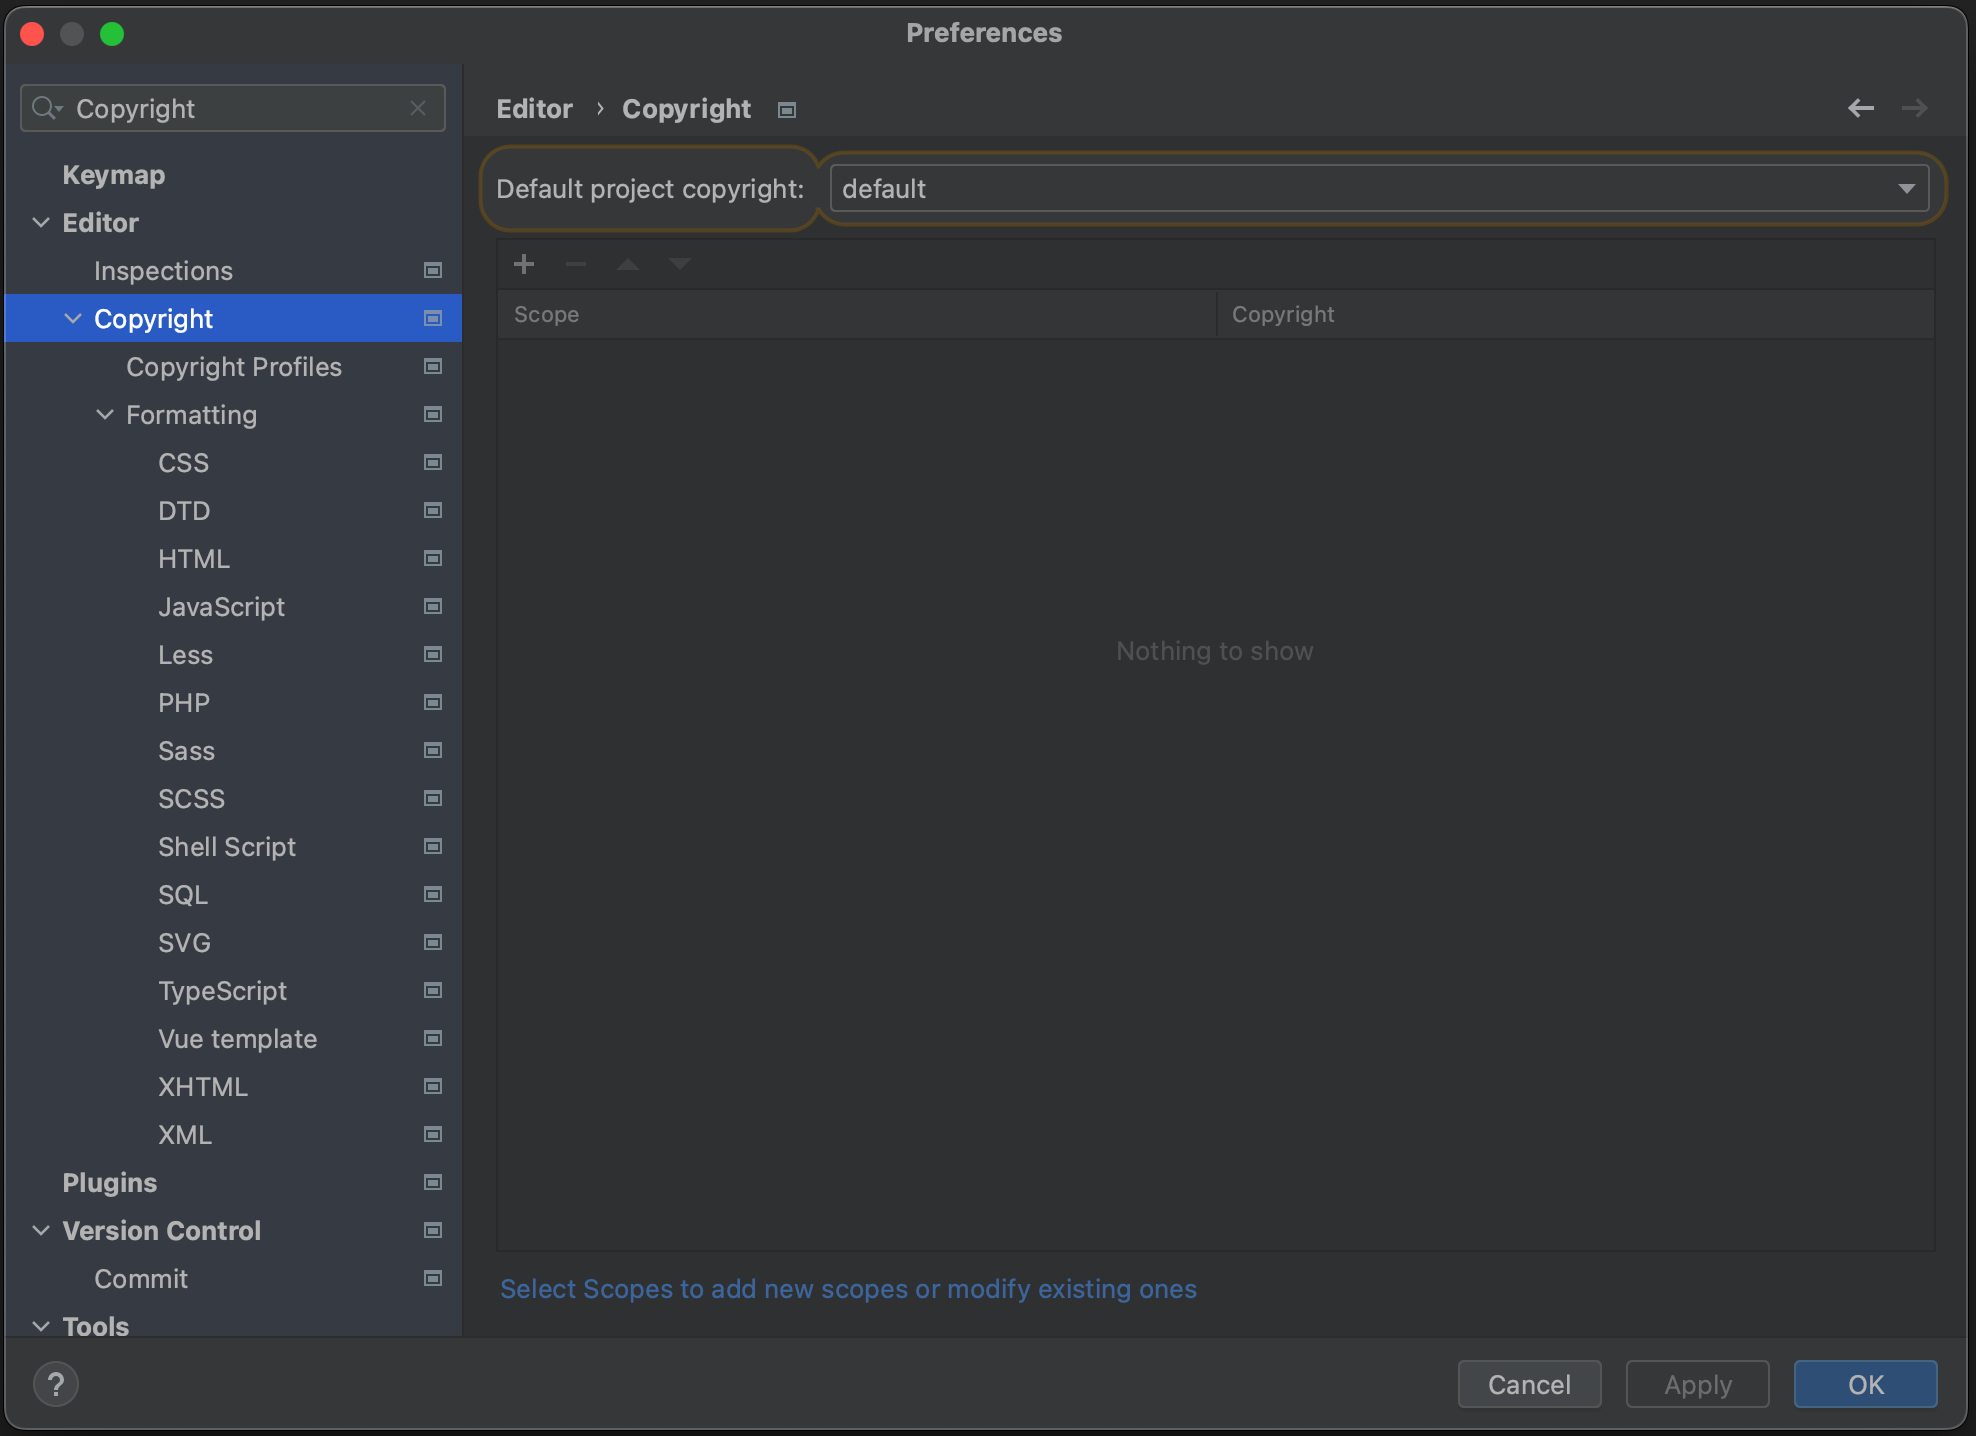
To define copyright for project you can do following: open PhpStorm > Preferences > Editor > Copyright > Copyright Profiles. Then define profile and select it in the Copyright section.
Magento Test Coverage Support
Add test source filter support for Magento
This functionality allows developers to quickly sort test files in the project tree. That allows to save time for project maintenance and search in case of a large number of test files.

CLI
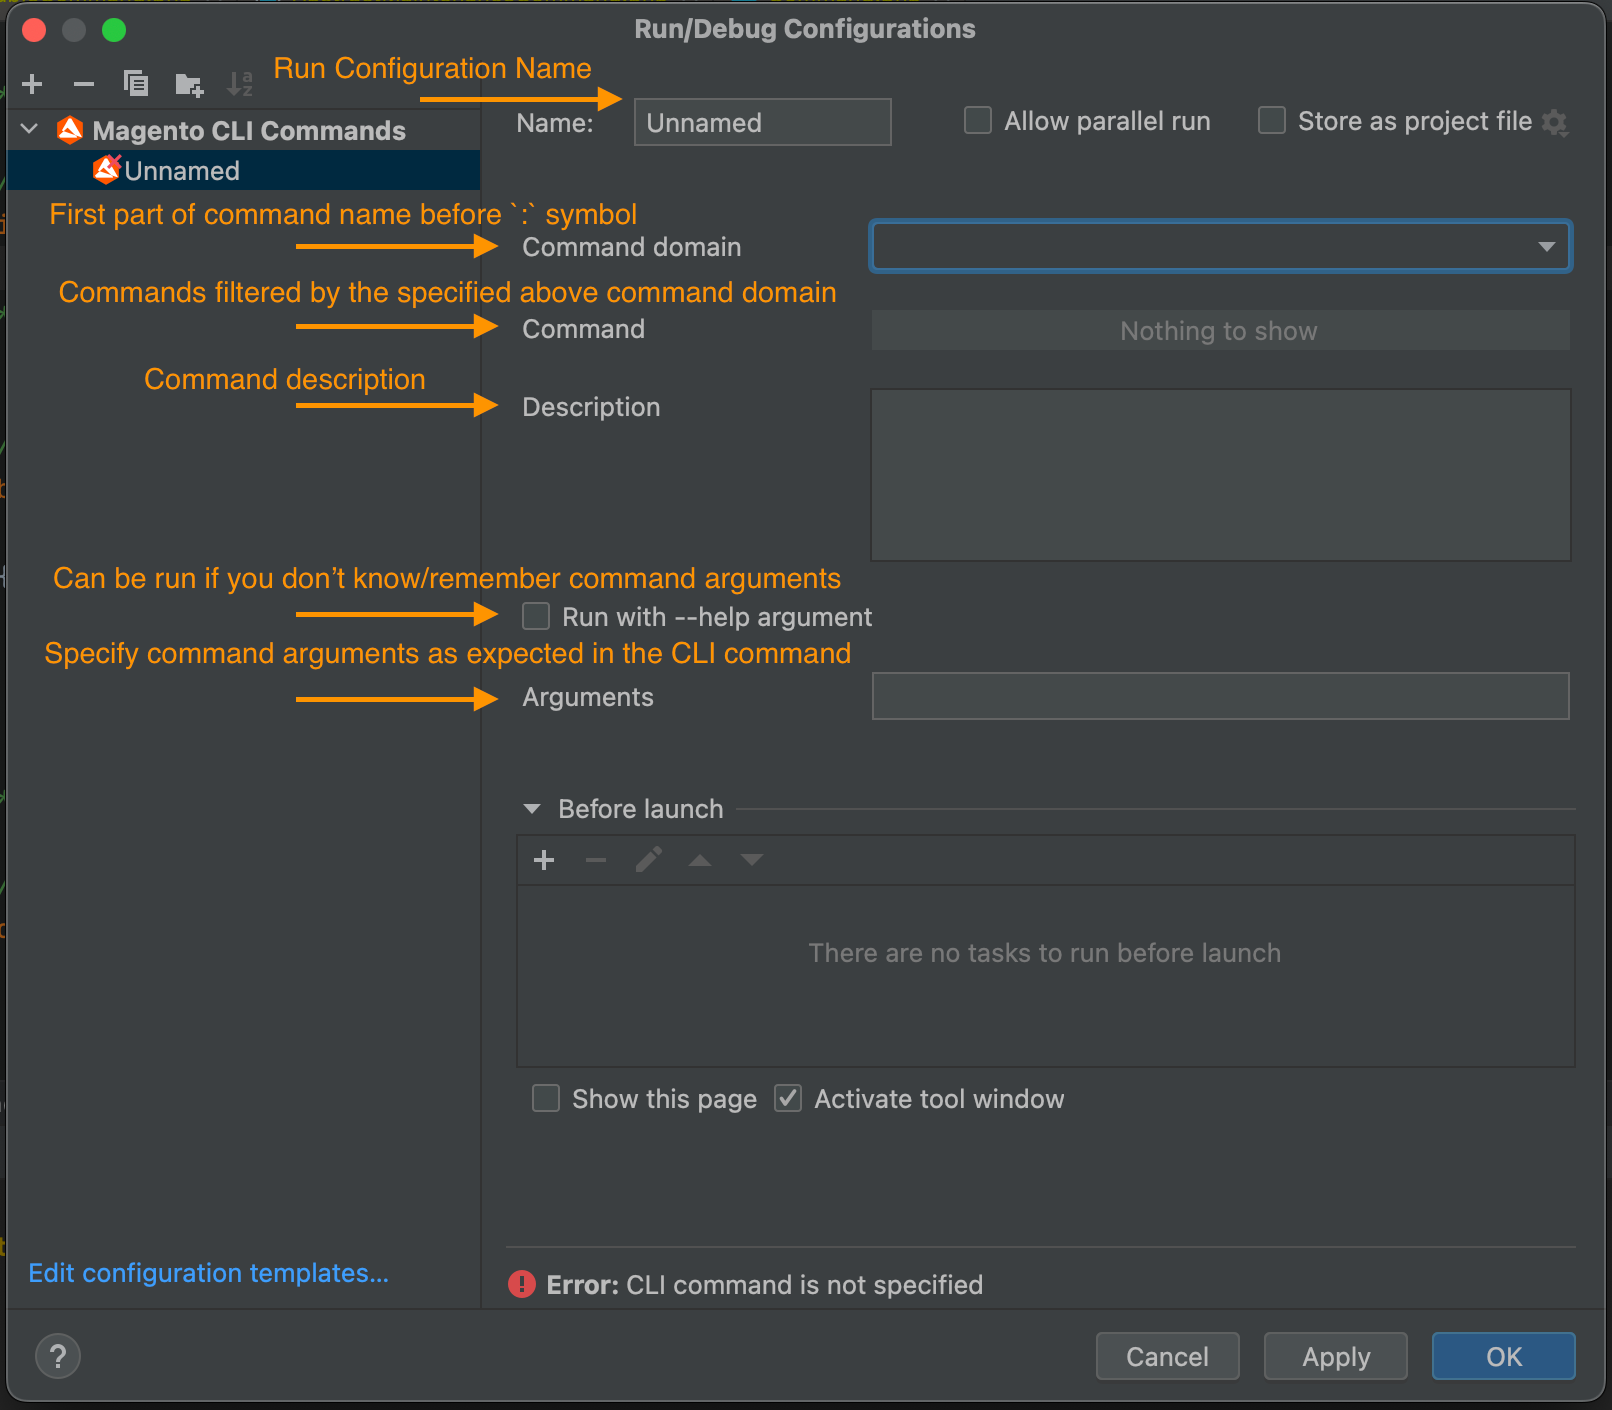
Run configurations for the Magento CLI commands execution
The PhpStorm IDE has a beneficial functionality which is called
Run/Debug Configuration. It allows engineers to create, for example, run configuration for a specific CLI command that can be quickly executed locally or even on a remote instance. This saves time and reduces cognitive pressure if you need to run a list of commands too often during your development phase.
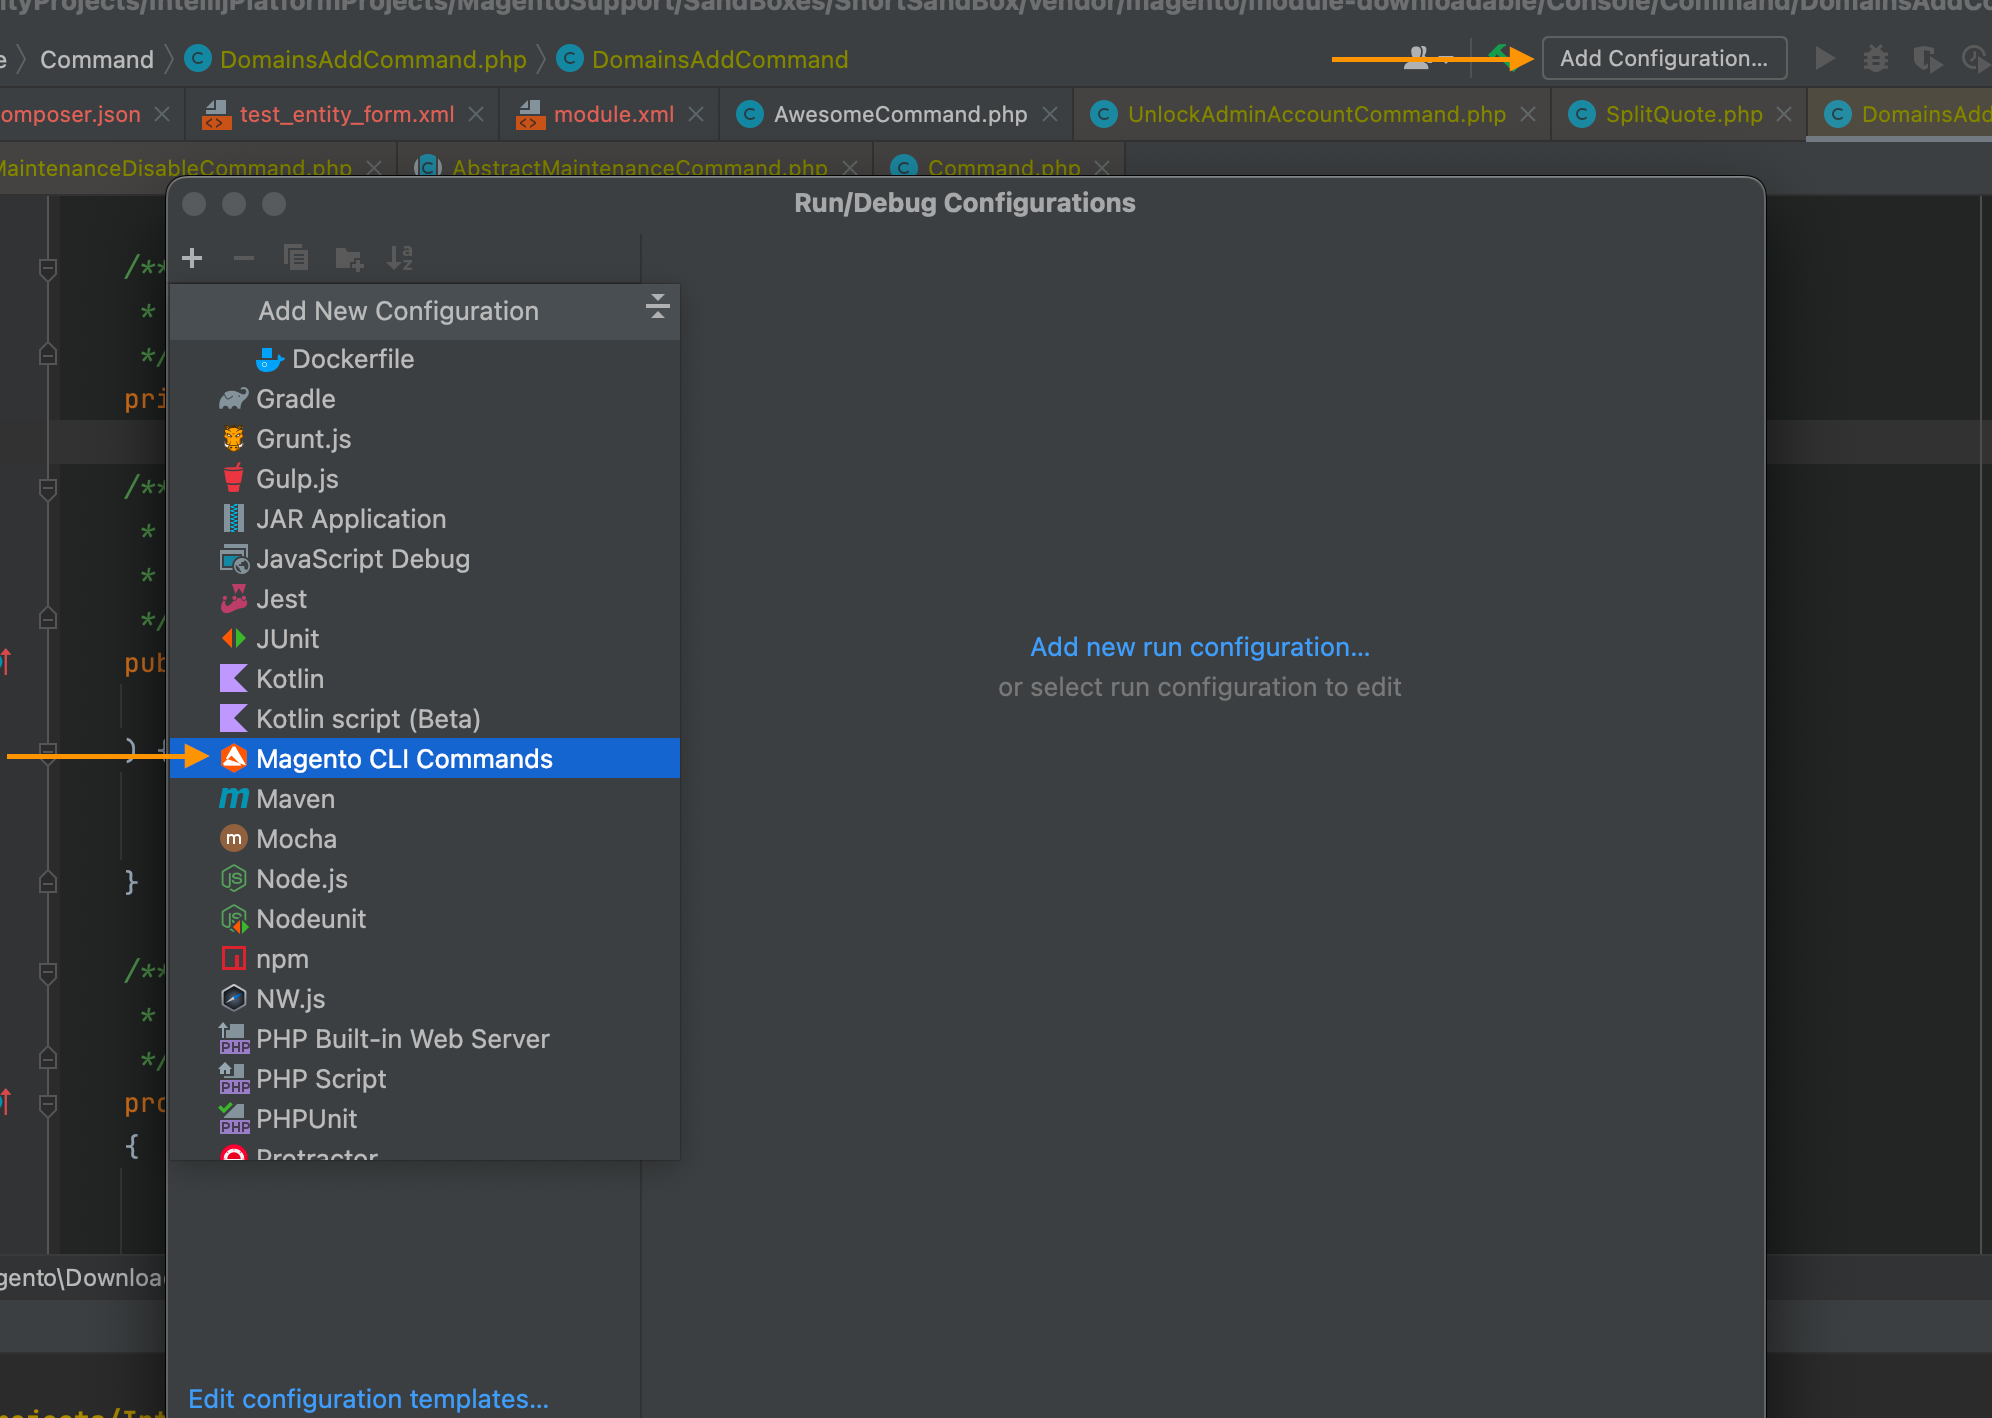
The plugin provides the possibility for engineers to create
Run/Debug Configuration for the Magento CLI commands. Under the standard menu that represents Run Configurations there is a new option:
Magento CLI Command.
The Magento 2 CLI Command run configuration helps engineers define to which domain run configuration belongs (cache, catalog, CMS, etc.) and automatically show the list of available commands. This is very helpful. For example, if the application development process requires running, reindexing and cache clean operations call often. There is no need to create custom scripts or copy-paste sequences of CLI commands. Everything can be configured in the IDE and run by click. Note that you can generate a series of run configurations and even run/define CLI commands with parameters.
There is one required precondition: the PHP interpreter should be configured. How to configure it you can find at the official PhpStorm documentation:
Configure local PHP interpretersGit related features
Analyse if a new module is added to the config.php file while committing it
This functionality's primary goal is to prevent situations when newly created modules are not added to the config.php. This situation leads to unnecessary commit and re-deployment. And as a result, time-consuming operations slow down delivery.
Described functionality is enabled by default. If it is needed to turn off, setting is located under the following path: Preferences > PHP > Magento 2 Support > VCS Settings > Check if modules are added to the config.php while commiting

The screenshots below show different situations. At the first one, the commit is organised and prepared to be delivered with the help of the PhpStorm Git functionality. The plugin identifies a new module in the project, but it was not declared in the config.php. Appropriated notification is showing.
.png)
Another level of assistance with this case is to check whether the config.php with the new module was added to the commit. It is possible that after adding a module to the config.php engineer can forget to add it to the commit. The plugin identifies this problem and reports it back to the engineer.
.png)
